The Path to SharePoint enlightenment
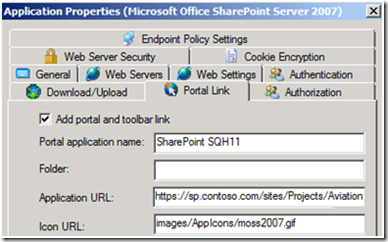
A common question about SharePoint publishing with UAG comes up in a situation where the organization has multiple areas on a single SharePoint server, and wants to provide different users with access to just the areas that are appropriate for them. For example, suppose that the team from one project should have access only to their project site https://sharepoint1/sites/Projects/Aviation, while a team from another project should only get access to their site https://sharepoint1/sites/Projects/Trains. When creating a SharePoint application on the UAG portal, you can point that application to any specific folder using the Application URL setting. For example:
You can create this application, and use the Authorization tab to limit access to it only to employees of that department. However, once having done this, you will find that you are prevented from creating another application of the same type. UAG will only let you create one SharePoint application per trunk, so you cannot simply create one for the Trains department users.
My colleague Dan Herzog has developed a solution to this conundrum. It uses two or more “dummy” application to create the pointer to the subfolders. This involves:
1. Creating a single SharePoint app that points to the root of the site, and is hidden from view for all users
2. Configuring UAG to be able to use our dummy apps
3. Creating a dummy application, using the “Other Web Application(Portal Hostname)” template, for each department/group/project we want to provide access to
4. Setting the authorization on the dummy apps for the appropriate users and/or groups
You can think of these dummy apps as something akin to “bookmarks” pointing to specific URLs. UAG’s authorization engine is what determines which users “see” which of these. The tricky part to this is the permissions – the links on the portal will send the user into a specific folder on SharePoint, but if the user types in a different URL (like another group’s folder), UAG will not have a way of blocking it. This means that SharePoint’s permission model needs to be employed as well, and prevent that kind of access.
Here are the steps, with more details:
1. Create the SharePoint application on the UAG server, in the usual way (making sure to address the regular SharePoint publishing concerns, such as the public URL and IP, the AAM settings, the SSL Certificate name etc). Make sure the app is authorized for all users.
2. Activate your configuration, and test the app to make sure everything is working correctly (for example, file check-out and check-in).
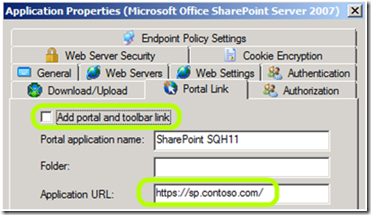
3. Open the application’s properties, uncheck the option “Add portal and toolbar link”, and activate the configuration again:
Note that the Application URL points to the root of the SharePoint site!
4. At this point, the app should no longer be visible on the UAG portal, but if a user types https://sp.contoso.com, he will reach the root of the SharePoint server. This is expected, and as noted earlier, the permission settings on SharePoint should be set to block access for the various users to the root, if so desired.
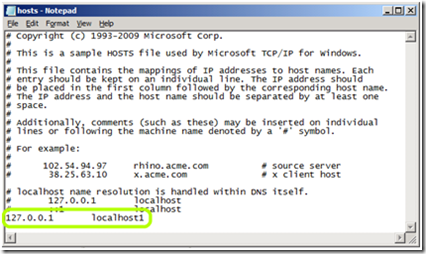
5. On the UAG Server, open the system’s HOSTS file for editing with a text editor like Notepad. The file is located in c:\windows\system32\drivers\etc\
6. Add the line 127.0.0.1 localhost1 to the file (the digit 1 at the end is not a spelling mistake), and save it. Note that you need to be a local administrator to edit the file, so make sure you launch your text editor as an admin.
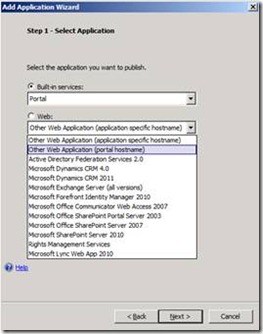
7. Create a new application, and select the “Other Web Application(Portal Hostname) ” template.
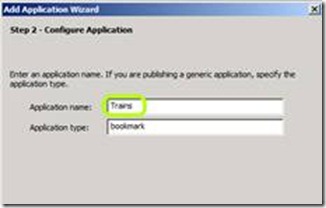
8. Type in a name and type of your choice for the application.
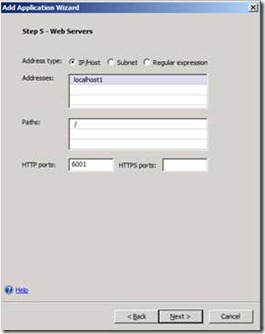
9. On the Web Servers tab, set the address to be localhost1, the HTTP port to 6001 and the HTTPS port to blank. Leave the path as /:
10. Leave the SSO settings unchecked in step 6 of the wizard
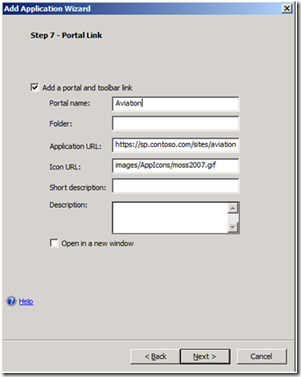
11. In step 7, make the following changes:
a. Leave the folder setting blank
b. Change the Application link to the external URL for SharePoint (https://sp.contoso.com) with the URL path to one of the groups we are targeting. For example https://sp.contoso.com/sites/aviation/
c. If you like, you can change the icon URL to use the SharePoint icon images/Appicons/moss2007.gif, for example.
12. On the last step, uncheck Authorize all users, and add the users or groups that you would like to provide access to this sub-site.
13. Activate the configuration, and test if this new application works as expected – it should only be visible to the users or groups you defined in step 12, and when accessed, be allowed based on the permissions set in SharePoint.
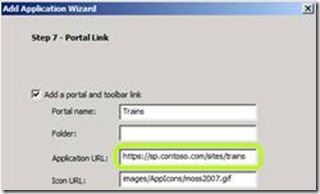
Assuming the application works as expected, repeat steps 7-13 for the other groups. Most of the steps are identical to before, but in step 8, type in the relevant name for the app (which will be shown on the portal), and in step 11, specify the other group URL:
You can repeat this for as many sub-sites that are needed!
