System Center Operations Manager 2012 - Management Pack Authoring - Part 1 Registry Based Discovery
This is the first of five part blog series about the System Center Operations Manager 2012 - Management Pack Authoring.
In this blog post, I will walk you through the steps to extend the windows computer class using Visual Studio Authoring Extension (VSAE).
Scenario : CONTOSO company has implemented SCOM 2012 R2 to monitor 1000+ servers and have many applications like SQL, Exchange, SharePoint and few third party applications. Every application has few development and few production servers. They have application teams who supports the application and needs to have access to the alerts (different views for Dev. and Prod. Servers for every application). They don’t have any way to differentiate the servers between the production or development like by OU or by the Sites.
Creating computer group is one of the option but if we create too many groups then it isn't a good option as a group is a singleton class hosted by the Management Servers, and Management Servers performs the group calculation for each group on a regular basis.
Please refer the blog for more details on the groups https://blogs.technet.com/b/kevinholman/archive/2009/02/05/what-is-a-group-anyway.aspx
High level steps:
A. Overview
B. Extend the windows computer class and add two properties (ServerType & Application)
C. Create the discovery to discover the values for the properties.
D. Create the folder and views structure.
E. Import Management Pack and verify.
A. Overview
1. Overview of VSAE
Link to download VSAE: https://www.microsoft.com/en-sg/download/details.aspx?id=30169
2. Classed & Relationships:
Please refer this link for more details :
3. Discovery:
Please refer this link for more details :
There are four types of discoveries.
1. Registry :
Accessing the registry on the local computer is a preferred method of discovery because of the small overhead required. The registry frequently contains lots of easy to access configuration information for many applications. A discovery can check whether a particular key or value exists, or it can collect the data from any value. Collected values may be either only collected for a property or compared to some known value to determine whether discovery data should be created.
2. WMI :
WMI can provide lots of information about a computer or Windows operating system components. It can also be the source of information for any application that includes a WMI provider exposing parts of the application through a WMI interface. A discovery can run a WMI query to determine whether instances of a particular WMI class exist and to collect the properties from any returned instances.
For example, a particular management pack might collect information from the computer BIOS, that can be obtained by using the WMI32_BIOS WMI class.
3. Script :
If a discovery requires data inaccessible from the registry or WMI, or if the discovery needs more complex logic than those discoveries provide, a discovery script must be used. A discovery script can be written in any language that can access the MOM.ScriptAPI COM object that is installed with the Operations Manager agent. The most typical scripts are written either in a language supported by Windows Script Host (VBScript or Jscript by default) or Windows PowerShell.
4. WSMan :
Used to access Unix/Linux resources.
Let's start with the authoring MP for our scenario using registry based discovery.
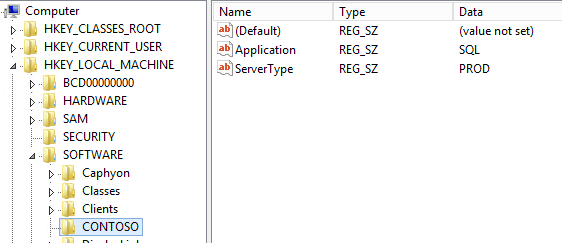
First, define the registry keys and path that we will use for the discovery.
B. Extend Windows Computer Class:
1. To create a new management pack, you first have to create a new management pack project. A project is the Visual Studio term for the collection of code that will be compiled into a finished form – often an executable, but in this case, a management pack.
2. From the Visual Studio Start Page, select the New Project… link, or click File → New → Project. The New Project dialog box appears.
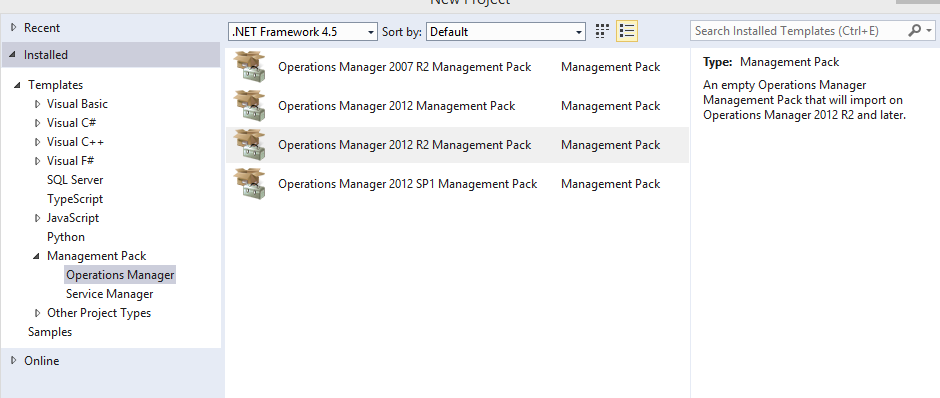
3. Select the correct management pack version. I'm authoring MP for SCOM 2012 R2 so I selected Operations Manager 2012 R2 Management Pack.
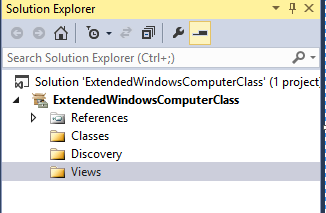
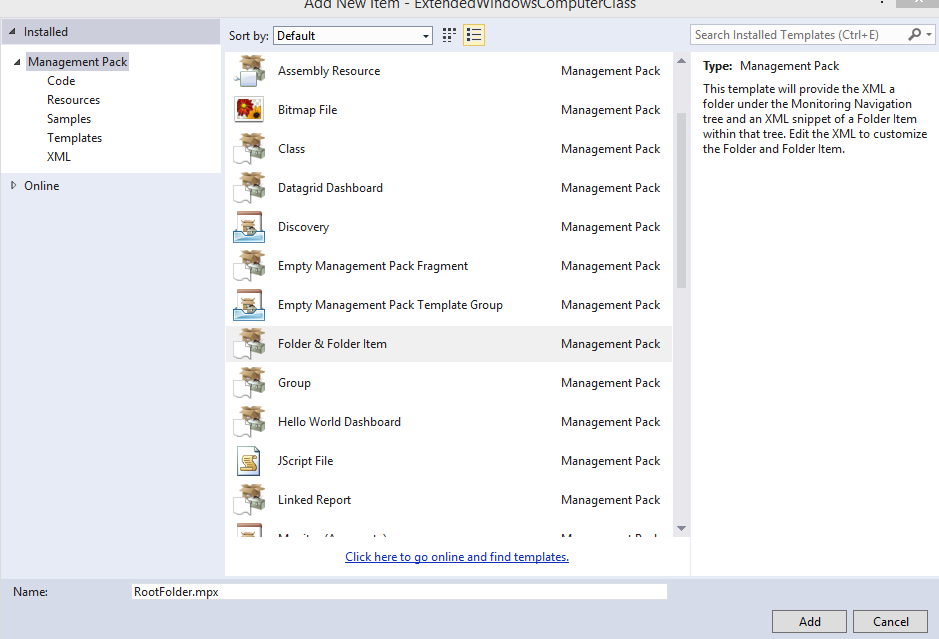
4. Create the folders under the project. These folders are used for arranging code in more structured way.
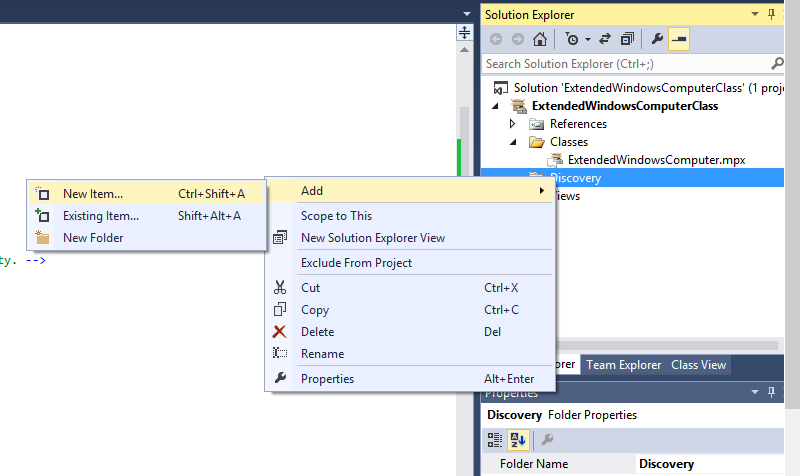
5. Right click on Project -> Add -> New Folder
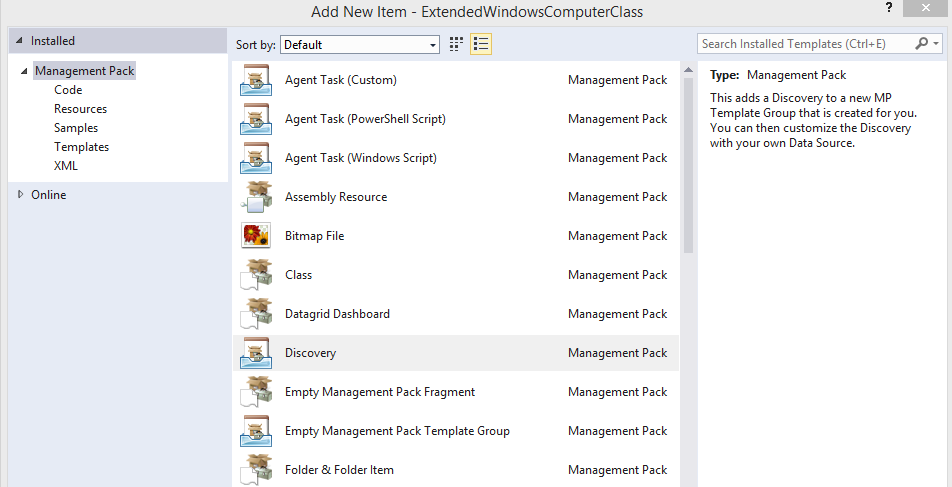
6. Add MP fragment for the class.
Right click on Classes folder -> Add -> New Item
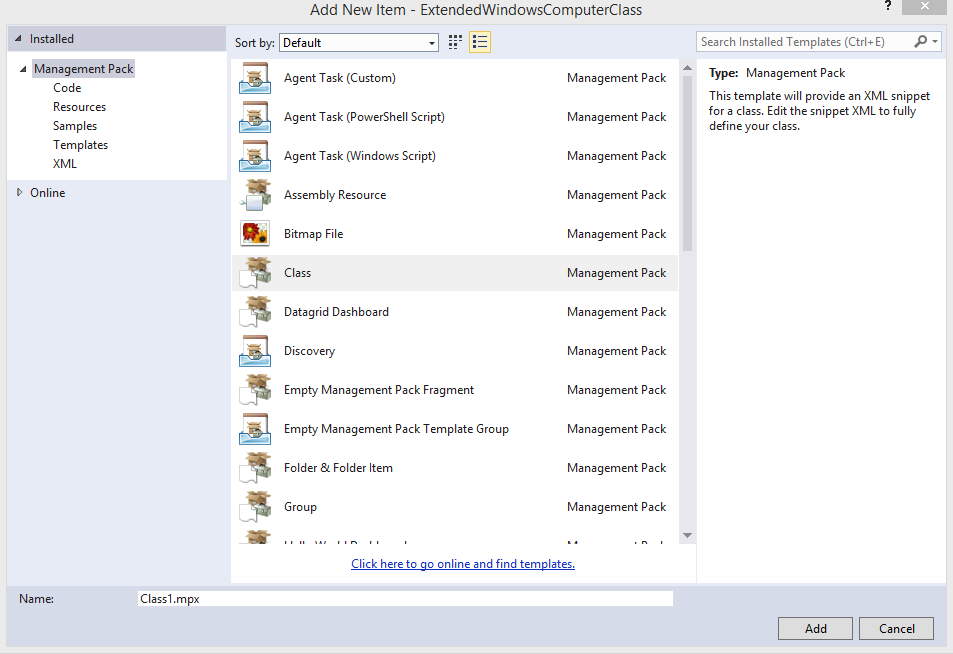
This will add the class syntax with the basic XML structure.
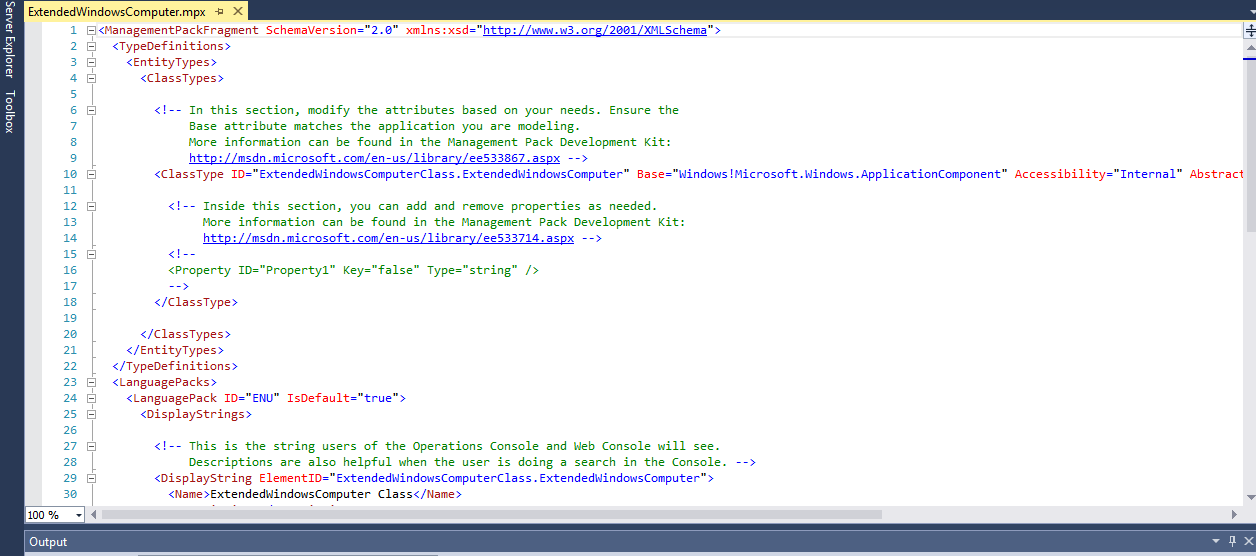
7. Make necessary changes to the class definition like ID, base, Accessibility etc.
8. I'll use Microsoft.Windows.Computer class as a base and it is defined in the Microsoft.Windows.Library MP.
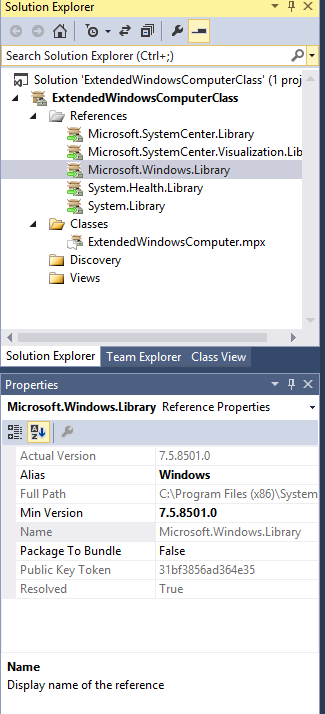
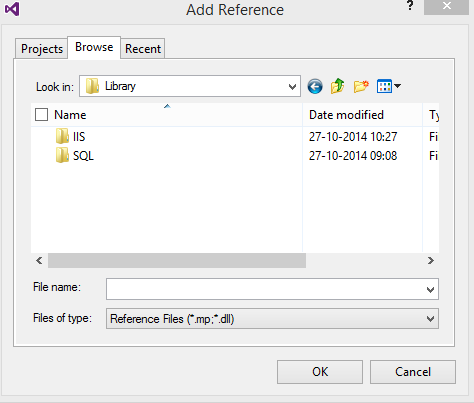
9. This will be part of default MPs added when we create the project. If you need to add mp reference here, then right click on the references -> Add reference … -> Browse and select the .mp file which you have downloaded.
10. Remove the default base class added. Move the cursor between the double quotes (Base = "") and press Control + Space (use this to find the next element or value for the element)

11. Select Windows --> Microsoft.Windows --> Computer


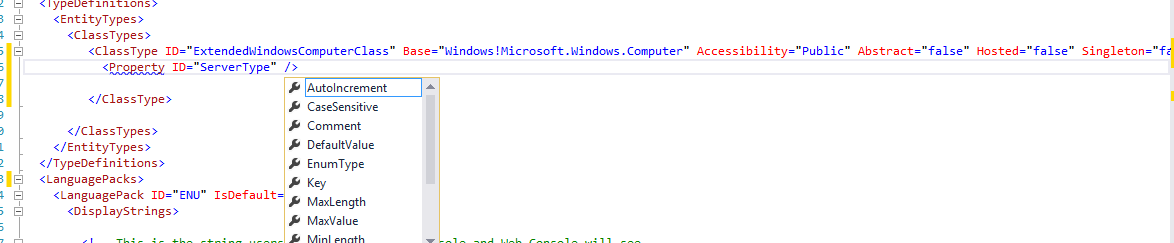
12. Now, add properties

13. Select property --> then press Space to get the next element.

14. Select ID and enter the value for ID element and press space

15. Select Key and set value to false
16. Class definition will look like this
<ClassType ID="ExtendedWindowsComputerClass" Base="Windows!Microsoft.Windows.Computer" Accessibility="Public" Abstract="false" Hosted="false" Singleton="false">
<Property ID="ServerType" Key="false" Type="string"/>
<Property ID="Application" Key="false" Type="string"/>
</ClassType>
Both the properties have key="false" as we already have the key property in the class hierarchy.
You can check the key property for the class from the MP.
Run this query against the Operations Manager DB to get the mpxml
SELECT convert(xml,mpxml) FROM ManagementPack WHERE MPFriendlyName like '%Microsoft Windows Library%'

17. Define the Language Pack.
<DisplayStrings>
<!-- This is the string users of the Operations Console and Web Console will see. Descriptions are also helpful when the user is doing a search in the Console. -->
<DisplayString ElementID="ExtendedWindowsComputerClass">
<Name>Extended Windows Computer Class</Name>
<Description>Windows Computer Class with additional properties</Description>
</DisplayString>
<!-- Uncomment the below section if you need to add a user friendly string for each property. -->
<DisplayString ElementID="ExtendedWindowsComputerClass" SubElementID="ServerType">
<Name>Server Type</Name>
<Description></Description>
</DisplayString>
<DisplayString ElementID="ExtendedWindowsComputerClass" SubElementID="Application">
<Name>Application</Name>
<Description></Description>
</DisplayString>
</DisplayStrings>
C. Design Discovery:
Let's create the discovery to discover the values from registry.
Steps to create the Discovery:
- Right click the name of the solution and select Add and then New Item.
- Select Discovery.
- In the Name box, type Discoveries.mptg and click Add.
Configure the Discovery Properties:
- Right click the entry for NewDiscovery and select Properties Window.
- Change the ID to Discovery.ExtendedWindowsComputer.
- Change the Display Name to Discover Extended Windows Computer.
Select the Discovery Target:
- Select Target and click the ellipse (...) button on the right of the field.
- Select Microsoft.Windows.Computer and click OK.
Discovery Targets : The target of a discovery determines where the discovery will run. Any agent managing an instance of the target class will run the discovery. In order to minimize overhead, the target for a discovery should represent the most specific class where the class being discovered may potentially be found.
Select and Configure the Discovery Data Source
1. Select Data Source Type ID and click the ellipse (...) button on the right of the field.
2. Select Microsoft.Windows.FilteredRegistryDiscoveryProvider and click OK.
The Microsoft.Windows.FilteredRegistryDiscoveryProvider module is a discovery data source module type that queries the Windows registry at a scheduled frequency and returns filtered results as System.Discovery.Data data.
Usage : Use this module when you want to query the Windows registry inside a discovery workflow. This module supports retrieving any key or value from the HKEY_LOCAL_MACHINE hive of the registry only. For multi-string values, only the first string is returned. This module allows you to specify a filter on the returned registry data before it is mapped to discovery data.
3. Select Data Source Configuration and click the ellipse (...) button on the right of the field.
4. Type < and select the tag (ComputerName)
5.Registry based discovery always starts with the computer name and value will be in the format
$Target/Property[Type="Windows!Microsoft.Windows.Computer"]/PrincipalName$ -- $Target variable resolves to the computer name of the target agent.
For authoring variables refer to this link https://social.technet.microsoft.com/wiki/contents/articles/15300.operations-manager-management-pack-authoring-variables.aspx
For registry base discoveries this table is very important.
Element |
Type |
Description |
AttributeName |
ID |
An identifier for the value in the output data item. This must be unique within the RegistryAttributeDefinitionsType element and must consist only of letters, numbers, the underscore, hyphen, and period. Digits, the hyphen, and the period cannot be used to start the name. |
Path |
String |
The path to collect in the registry under HKEY_LOCAL_MACHINE. This path can be a key or a value. |
PathType |
Integer |
Specifies whether the path is a key or a value.
|
AttributeType |
Integer |
The data type of the value to return:
Values 1, 2, and 3 are used only when the PathType is set to 1. |
6.The following code example of type RegistryAttributeDefinitions returns a registry value:
<RegistryAttributeDefinition>
<AttributeName>ServerType</AttributeName>
<Path>SOFTWARE\CONTOSO\ServerType</Path>
<PathType>1</PathType>
<AttributeType>1</AttributeType>
</RegistryAttributeDefinition>
But if you need to check if registry key exists.
<RegistryAttributeDefinition>
<AttributeName>ApplicationExists</AttributeName>
<Path>SOFTWARE\CONTOSO\ApplicationExists</Path>
<PathType>0</PathType>
<AttributeType>0</AttributeType>
</RegistryAttributeDefinition>
7. Define the frequency, choose as per your environment requirement. For my test lab, I'm using 1800 secs.
<Frequency>1800</Frequency>
Note: This value is in seconds
8. Define the class id
<ClassId></ClassId> This is the class id for the class which we are going to discover and syntax will be $MPElement[Name="Name of the Class"]$
You can use the $MPElement variable when you need to retrieve the GUID of any Management Pack element or sub-element of a Management Pack element. Some elements, such as the Discovery element, have to distinguish between several objects that are instances of a class, and each instance of a discovered class is assigned a GUID.
9. <InstanceSettings>
This will populate the values for the properties and key property of the class or any of its parent in the hierarchy
For each property format will be
<Setting>
<Name>$MPElement[Name="ExtendedWindowsComputerClass"]/ServerType$</Name>
<Value>$Data/Values/ServerType$</Value>
</Setting>
For registry based discoveries values collected will be always in the $Data/Values/NameOftheAttribute
And if you are checking if key exists or not. We need to create the expression after the instance settings (This is not required for our scenario)
This expression will start after the </InstanceSettings> tag
For below example
<RegistryAttributeDefinition>
<AttributeName>ApplicationExists</AttributeName>
<Path>SOFTWARE\CONTOSO\ApplicationExists</Path>
<PathType>0</PathType>
<AttributeType>0</AttributeType>
</RegistryAttributeDefinition>
Expression will be
<Expression>
<SimpleExpression>
<ValueExpression>Values/ApplicationExists</ValueExpression>
<Operator>Equal</Operator>
<ValueExpression>true</ValueExpression>
</SimpleExpression>
</Expression>
In our scenario expression tag will be empty
<Expression></Expression>
D. Create Views:
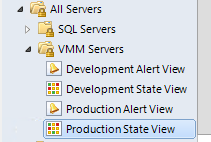
For our scenario, I'll create the folder and view structure
All Servers
--> SQL Application
PROD (Alert View)
PROD (State View)
Dev (Alert View)
Dev (State View)
--> VMM Application
PROD (Alert View)
PROD (State View)
Dev (Alert View)
Dev (State View)
1.Right click on Views - > Add -> New item
<Folders>
<Folder ID="ExtendedWindowsComputerClass.AllServers" Accessibility="Public" ParentFolder="SC!Microsoft.SystemCenter.Monitoring.ViewFolder.Root" />
<Folder ID="ExtendedWindowsComputerClass.AllServers.SQL" Accessibility="Public" ParentFolder="ExtendedWindowsComputerClass.AllServers" />
<Folder ID="ExtendedWindowsComputerClass.AllServers.VMM" Accessibility="Public" ParentFolder="ExtendedWindowsComputerClass.AllServers" />
</Folders>
2.Now let's create the views, right click on view folder and select property window
Display Name : SQL PROD State View
ID: State.SQLPROD
Target : ExtendedWindowsComputerClass
View Folder : ExtendedWindowsComputerClass.AllServers.SQL
View Type ID: Microsoft.SystemCenter.StateViewType
View Configuration:
Select PropertyCriteria

<PropertyCriteria>
<PropertyName>ServerType</PropertyName>
<Value>PROD</Value>
</PropertyCriteria>
<PropertyCriteria>
<PropertyName>Application</PropertyName>
<Value>SQL</Value>
</PropertyCriteria>
</Criteria>
Same way we can create all the other state views.
For Alert view
Display Name : SQL PROD State View
ID: Alert.SQLPROD
Target : ExtendedWindowsComputerClass
View Folder : ExtendedWindowsComputerClass.AllServers.SQL
View Type ID: Microsoft.SystemCenter.AlertViewType
For filtering we can use custom field values as property criteria is not available.
<Criteria>
<ResolutionState>
<StateRange Operator="NotEquals">255</StateRange>
</ResolutionState>
<SeverityList>
<Severity>Error</Severity>
</SeverityList>
<CustomField1>PROD</CustomField1>
<CustomField2>SQL</CustomField2>
</Criteria>
Please refer this blog for updating alert custom fields.
E. Generate the Management Pack and Import
To Seal the mp, first create the .snk file. (https://msdn.microsoft.com/en-us/library/k5b5tt23(v=vs.110).aspx)
Right click on project ->Properties -->Build and Select "Generate sealed and signed management pack"
Provide the .snk file path.
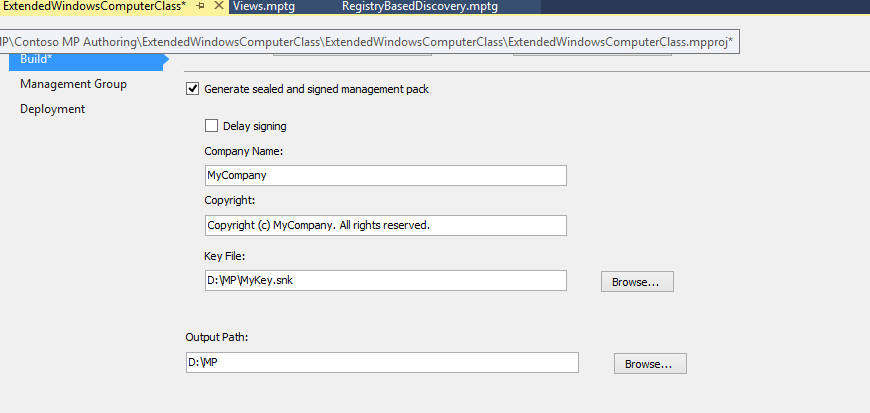
To Build the project, select Build → Build Solution. The solution will be verified with various Visual Studio tools and the MP Verify tool. If any errors are found, an error list will be generated. If there are no errors, the Output window will be displayed, indicating that the build was successful. Depending on the configuration you set in the properties, the .xml or .mp file will be found in the directory you set.
We can directly deploy the MP from VSAE or we can copy the .mp file created and import it.
Import Management Pack and verify the views
Here is the view that we designed.
Enjoy!