AD FS 2.0 Claims Rule Language Primer
Hi guys, Joji Oshima here again. On the Directory Services team, we get questions regarding the Claims Rule Language in AD FS 2.0 so I would like to go through some of the basics. I’ve written this article for those who have a solid understanding of Claims-based authentication. If you would like to read up on the fundamentals first, here are some good resources.
An Introduction to Claims
https://msdn.microsoft.com/en-us/library/ff359101.aspxSecurity Briefs: Exploring Claims-Based Identity
https://msdn.microsoft.com/en-us/magazine/cc163366.aspxAD FS 2.0 Content Map
https://social.technet.microsoft.com/wiki/contents/articles/2735.aspx
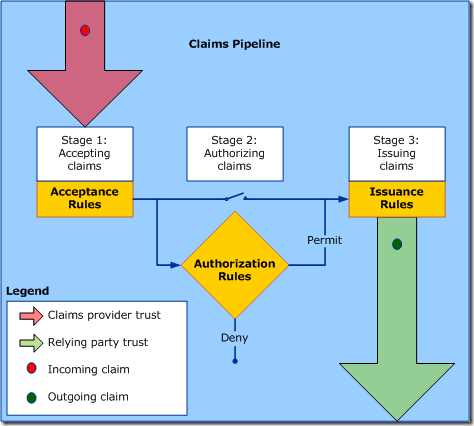
Claims Rules follow a basic pipeline. The rules define which claims are accepted, processed, and eventually sent to the relying party. You define claims rules as a property of the Claims Provider Trust (incoming) and the Relying Party Trust (outgoing).
There is also an authorization stage checks if the requestor has access to receive a token for the relying party. You can choose to allow all incoming claims through by setting the Authorization Rules to Permit All. Alternately, you could permit or deny certain users based on their incoming claim set. You can read more about authorization claim rules here and here.
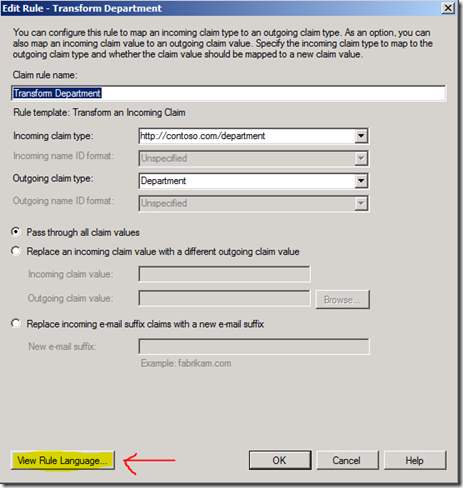
You can create the majority of claims issuance and claims transformations using a Claim Rule Template in AD FS 2.0 Management console, but there are some situations where a custom rule is the only way to get the results you need. For example, if you want to combine values from multiple claims into a single claim, you will need to write a custom rule to accomplish that. To get started, I would recommend creating several rules through the Claim Rule Templates and view the rule language generated. Once you save the template, you can click the View Rule Language button from the Edit Rule window to see how the language works.
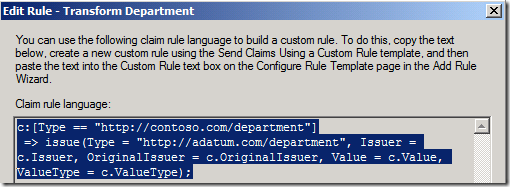
In the screenshot above, the rule translates as follows:
If (there is an incoming claim that matches the type "https://contoso.com/department")
Then (issue a claim with the type "https://adatum.com/department", using the Issuer, Original Issuer, Value, and ValueType of the incoming claim)
The claims "https://contoso.com/department" and "https://adatum.com/department" are URIs. These claims can be in the URN or HTTP format. The HTTP format is NOT a URL and does not have to specifically link to actual content on the Internet or intranet.
Claims Rule Language Syntax:
Typically, the claims rule language is structured similarly to an “if statement” in many programming languages.
If (condition is true)
Then (issue a claim with this value)
What this says is “if a condition is true, issue this claim”. A special operator “ => ” separates the condition from the issuance statement and a semicolon ends the statement.
Condition statement => issuance statement;
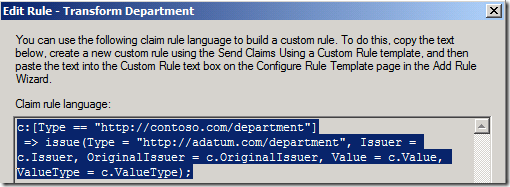
Review some of the claims you created and look at the structure. See if you can pick out each part. Here is the one we looked at in the first section. Let’s break it down in to the basic parts.
The “if statement” condition:
c:[Type == https://contoso.com/department\]
The special operator:
=>
The issuance statement:
issue(Type = "https://adatum.com/department", Issuer = c.Issuer, OriginalIssuer = c.OriginalIssuer, Value = c.Value, ValueType = c.ValueType);
For each rule defined, AD FS checks the input claims, evaluates them against the condition, and issues the claim if the condition is true. You probably notice the variable “C” in the syntax. Think of “C” as an incoming claim that you can check conditions against, and use values from it to add to an outgoing claim. In this example, we are checking if there is an incoming claim that has a type that is “https://contoso.com/department”. We also use the values in this claim to assign the value of Issuer, OriginalIssuer, Value, and ValueType to the outgoing claim.
There are exceptions to this that are discussed later (using ADD instead of ISSUE and issuing a claim without a condition statement).
Issue a claim to everyone:
In the Claims Rule Language, the condition part is optional. Therefore, you can choose to issue or add a claim regardless of what claims are incoming. To do this, start with the special operator “ => ”.
Syntax:
=> issue(type = "https://contoso.com/partner", value = "Adatum");
This syntax will issue a claim type “https://contoso.com/partner” with a value of “Adatum”
You could set similar rules for each Claims Provider Trust so that the Relying Party (or application) can know where the user came from.
Using a Single Condition:
In this example, we will look at a single condition statement. A basic claim rule checks to see if there is an incoming claim with a certain type and if so, issue a claim.
c:[Type == "https://contoso.com/role"]
=> issue(claim = c);
This syntax will check to see if there is an incoming claim with the type “https://contoso.com/role” and, if so, issue the exact same claim going out.
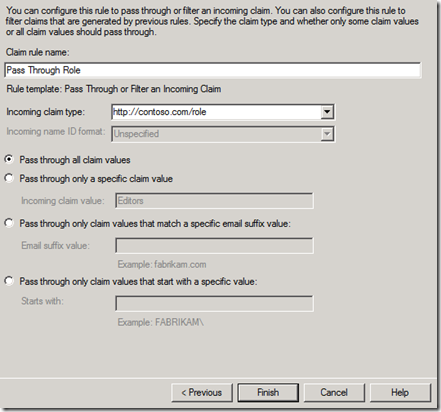
You can create this claim rule using the GUI. Choose the template named “Pass Through or Filter an Incoming Claim” and choose the appropriate incoming claim type.
You may also check for multiple values within your condition statement. For example, you can check and see if there is an incoming claim with a specific value. In the following example, we will check for an incoming claim with the type “https://contoso.com/role” that has the value of “Editors” and, if so, issue the exact same claim.
c:[Type == "https://contoso.com/role", Value=="Editors"]
=> issue(claim = c);
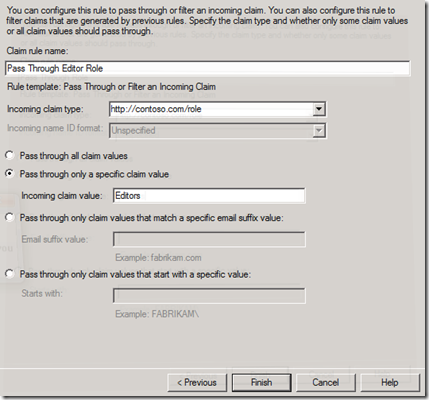
You can create this claim rule using the GUI as well. Choose “Pass Through or Filter an Incoming Claim”, choose the appropriate incoming claim type, select “Pass though only a specific claim value”, then enter the appropriate value.
Screenshot: Entries to pass through the Role claim if the value is “Editors”
Using Multiple Conditions:
Say you want to issue a claim only if the user has an Editor and has an Email claim and, if so, issue the Editor Role claim. To have multiple conditions, we will use multiple “C” variables. We will join the two condition statements with the special operator “ && ”.
c1:[Type == "https://contoso.com/role", Value=="Editors"] &&
c2:[Type == "https://contoso.com/email"]
=> issue(claim = c1);
The first condition (c1) checks to see if you have an incoming role claim with the value of Editors. The second condition (c2) checks to see if there is an incoming email claim. If both conditions are met, it will issue an outgoing claim identical to the incoming c1 claim.
Combining Claim Values:
Say you want to join information together from multiple incoming claims to form a single outgoing claim. The following example will check for an incoming claim type of "https://contoso.com/location" and “https://contoso.com/role”. If it has both, it will issue a new claim, “https://contoso.com/targeted”, combining the two values.
c1:[Type == "https://contoso.com/location"] &&
c2:[Type == "https://contoso.com/role"]
=> issue(Type="https://contoso.com/targeted", Value=c1.value+" "+c2.value);
The resulting value is the value of the first claim (c1), plus a space, plus the value of the second claim (c2). You can combine static strings with the values of the claims using the special operator “ + ”. The example below shows a sample set of incoming claims, and the resulting output claim.
Example Incoming Claims:
"https://contoso.com/location" is "Seattle"
"https://contoso.com/role" is "Editor"Example Outgoing Claim:
"https://contoso.com/targeted" is "Seattle Editor"
Using ADD instead of ISSUE:
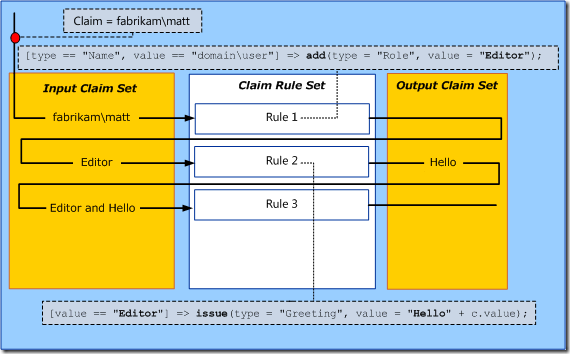
As mentioned in an earlier section, you can ADD a claim instead of ISSUE a claim. You may be wondering what the difference between these two statements are. Using the ADD command instead of the ISSUE command will add a claim to the incoming claim set. This will not add the claim to the outgoing token. Use this for adding placeholder data to use in subsequent claims rules.
This illustration was taken from a TechNet article. Here you can see that the first rule adds a role claim with the value of Editor. It then uses this newly added claim to create a greeting claim. Assuming these are the only two rules, the outgoing token will only have a greeting claim, not a role claim.
I’ve outlined another example below.
Sample Rule 1:
c:[Type == "https://contoso.com/location", Value=="NYC"]
=> add(Type = "https://contoso.com/region", Value = "East");
Sample Rule 2:
c:[Type == "https://contoso.com/location", Value=="LAX"]
=> add(Type = "https://contoso.com/region", Value = "West");
Sample Rule 3:
c1:[Type == "https://contoso.com/location"] &&
c2:[Type == "https://contoso.com/region"]
=> issue(Type="https://contoso.com/area", Value=c1.value+" "+c2.value);
In this example, we have two rules that ADD claims to the incoming claim set, and one that issues a claim to the outgoing claim set. This will add a region claim to the incoming claim set and use that to create combine the values to create an area claim. The ADD functionality is very useful with the next section for aggregate functions.
Using aggregate functions (EXISTS and NOT EXISTS):
Using aggregate functions, you can issue or add a single output claim instead of getting an output claim for each match. The aggregate functions in the Claims Rule Language are EXISTS and NOT EXISTS.
Say we want to use the location claim, but not all users have it. Using NOT EXISTS, we can add a universal location claim if the user does not have one.
In Sample Rule 1, we will add a location claim with the value of “Unknown” if the user does not have a location claim. In Sample Rule 2, we will use that value to generate the “https://contoso.com/targeted” claim.
Sample Rule 1:
NOT EXISTS([Type == "https://contoso.com/location"])
=> add(Type = "https://contoso.com/location", Value = "Unknown");
Sample Rule 2:
c1:[Type == "https://contoso.com/location"] &&
c2:[Type == "https://contoso.com/role"]
=> issue(Type="https://contoso.com/targeted", Value=c1.value+" "+c2.value);
This way, users without the "https://contoso.com/location" claim can still get the "https://contoso.com/targeted" claim.
Claims Rule Language, beyond this post:
There is more you can do with the Claims Rule Language that goes beyond the scope of this blog post. If you would like to dig deeper by using Custom Attribute Stores and using Regular Expressions in the language, I’ve put up a TechNet Wiki article that contains these advanced topics and other sample syntax. In addition, some other articles may help with these topics.
Understanding Claim Rule Language in AD FS 2.0:
https://social.technet.microsoft.com/wiki/contents/articles/4792.aspxWhen to Use a Custom Claim Rule:
https://technet.microsoft.com/en-us/library/ee913558(WS.10).aspxThe Role of the Claim Rule Language:
https://technet.microsoft.com/en-us/library/dd807118(WS.10).aspxThe Role of the Claims Engine:
https://technet.microsoft.com/en-us/library/ee913582(WS.10).aspxThe Role of the Claims Pipeline:
https://technet.microsoft.com/en-us/library/ee913585(WS.10).aspx
Conclusion:
Creating custom rules with the Claims Rule Language gives you more flexibility over the standard templates. Syntax familiarization takes a while, but with some practice, you should be able to write custom rules in no time. Start by writing custom rules instead of using the templates in your lab environment and build on those.
- Joji “small claims court” Oshima
