Replacing DFSR Member Hardware or OS (Part 2: Pre-seeding)
Ned here again. Previously I discussed options for performing a hardware or OS replacement within an existing DFSR Replication Group. As part of that process you may end up seeding a new server’s disk with data from an existing server. Pre-seeded files exactly match the copies on an upstream server, so that when initial non-authoritative sync is performed no data will be sent over the network except the SHA-1 hash of each file for confirmation. For a deeper explanation of pre-seeding review:
- Understanding DFSR debug logging (Part 15: Pre-Seeded Data Usage during Initial Sync)
- Get out and push! Getting the most out of DFSR pre-staging
In order to make this more portable I decided to make this a separate post within the series. Even if you are not planning a file server migration and just want to add some new servers to a replica with pre-seeding, the techniques here will be useful. I demonstrate how to pre-seed from Windows Server 2003 R2 to Windows Server 2008 R2 as this is the common scenario as of this writing. I also call out the techniques needed for other OS arrangements, and I will use both kinds of Windows backup software as well as robocopy in my techniques.
There are three techniques you can use:
- Pre-seeding with NTBackup
- Pre-seeding with Robocopy
- Pre-seeding with Windows Server Backup
The most important thing is to TEST . Don’t be a cowboy or get sloppy when it comes to pre-seeding; most cases we get with massive conflict problems were caused by lack of attention to detail during a pre-seeding that took a functional environment and broke it.
Read-Only Pre-Seeding
If using Windows Sever 2008 R2 and planning on using Read-Only replication, make sure you install the following hotfix before configuring the replicated folder:
An outgoing replication backlog occurs after you convert a read/write replicated folder to a read-only replicated folder in Windows Server 2008 R2 - https://support.microsoft.com/kb/2285835
This prevents a (cosmetic) issue where DFSR displays pre-seeded files as an outbound backlog on a read-only replicated folder. A read-only member cannot have an outbound backlog, naturally.
Pre-seeding with NTBackup
If your data source OS is Windows Server 2003 R2, I recommend you use NTBackup.exe for pre-seeding. NTBackup correctly copies all aspects of a file including data, security, attributes, path, and alternate streams. It has both a GUI and command-line interface.
Prerequisites
If pre-seeding from Windows Server 2003 R2 to Windows Server 2003 R2, no special changes have to be made. If pre-seeding from Windows Server 2003 R2 to Windows Server 2008 or Windows Server 2008 R2, you will need to download an out-of-band version of NTBackup to restore the data:
- Windows NT Backup - Restore Utility for Windows Server 2008
- Windows NT Backup - Restore Utility for Windows Server 2008 R2
More info on using NTBackup: https://support.microsoft.com/kb/326216/pl
Critical note: Restoring an entire volume (rather than specific folders like demonstrated below) with NTBACKUP will cause all existing replicated folders on that volume to go into non-authoritative sync. For that reason you should never restore an entire volume if you are already using DFSR on a server volume being pre-seeded. Just restore the replicated folders like I do in the examples.
Procedure
1. Start NTBackup.exe on the Windows Server 2003 R2 DFSR computer that has the data you are going to pre-seed elsewhere.
2. Select the Replicated Folder(s) you are going to pre-seed. In the example below I have two RF’s on my E: drive:
Note: When selecting the replicated folders, you can optionally de-select the DFSRPRIVATE folders underneath them to save time and space in the backup.
3. Backup to a flat file format (locally, if you have the disk capacity).
4. When the backup is complete, copy that file over to your new server that is going to replicate this data in the future. If the server is Win2008 or Win2008 R2, make sure you have the NT Restore tool installed.

Note: very large files – such as NTBackup BKF files that are hundreds of GB – can be copied much faster over a gigabit LAN by using tools that support unbuffered IO. A few Microsoft-provided options for this are:
5. Start the NTBackup tool on your new DFSR server that you are pre-seeding.
6. Select to restore data. In the Win2008/R2 restore tools, this is the only option available.
7. Select the backup file, then drill down into the backed up files so that you select the parent folders containing all the user data.
Note: You may need to select “Tools”, then “Catalog a backup file” to select a backup to restore.
8. Change the “Restore files to:” dropdown to “Alternate Location”
9. Specify the “Alternate Location” path to match what it should be on the new server. In my case the replicated folders had existed on the root of the drive, so I restored them to the root of the new servers data drive (E:\).
Note: By default the security and mount points will be restored. Security must be restored or file hashes will change and the pre-seeding operation will fail. DFSR doesn’t replicate junction points so there is no need to check that box.
10. At this point you are done pre-seeding. See section Validating Pre-Seeding. When that is complete you can proceed with replicating the data. You have the option to delete the DFSRPrivate folder that was restored within your RF(s) at this point, as it will not be useful for pre-seeding.


Pre-seeding with Robocopy
If your data source OS is Windows Server 2008, I recommend you use Robocopy for pre-seeding. While Windows Server 2008 supports Windows Server Backup, it lacks granularity in backing up files. Robocopy can also be used on the other operating systems but it is not as recommended as using a backup.
Prerequisites
Robocopy is included with Windows Vista and later, but there have been subsequent hotfix versions that are required for correct pre-seeding. It is not included with Windows Server 2003. You must install the following on your computer that will be pre-seeded, based on your environment (there is no reason to install on the server that currently holds the old data files):
- Download latest Windows Server 2008 R2 Robocopy (KB979808 or later - current latest as of this update is KB2639043)
- Download latest Windows Server 2008 Robocopy (KB973776 or later)
- Download Windows Server 2003 robocopy (2003 Resource Kit)
Note: Again, it is not recommended that you pre-seed a new Windows 2003 R2 computer using Robocopy.exe as there are known pre-seeding issues with the version included in the out-of-band Windows Resource Kit Tools. These issues will not be fixed as Win2003 is out of mainstream support. You should instead use NTBackup.exe as described previously.
More info on using robocopy: https://technet.microsoft.com/en-us/library/cc733145(WS.10).aspx
Procedure
1. Logon to the computer that is being pre-seeded with data from a previous DFSR node. Make sure you have full Administrator rights on both computers.
2. Validate that the Replicated Folders that you plan to copy over do not yet exist on the computer being pre-seeded.
Critical note: do not pre-create the base folders that robocopy is copying and copy into them; let robocopy create the entire source tree. Under no circumstances should you change the security on the destination folders and files after using robocopy to pre-seed the data as robocopy will not synchronize security if the files data stream matches, even when using /MIR.
Consider robocopy a one-time option. If you run into some issue with it, delete all the data on the destination and re-run the robocopy commands. Do not try to “fix” the existing data as you are very likely to make things worse.
3. Sync the folders using robocopy with the following argument format:
Robocopy.exe “\\source server\drive$\folder path” “destination drive\folder path” /b /e /copyall /r:6 /xd dfsrprivate /log:robo.log /tee
For example:
Note: You have the option to use the multi-threaded /MT option starting in the Win2008 version of Robocopy to copy more than one file at a time. The downside of /MT is that you cannot easily see copy progress.
Note: You also have the option to use the /LOG option to redirect all output to a file for later review. This is useful to see more specifics about errors if encountered. The downside is that you will see no console progress.
Note: These arguments use a backup API that can copy most in-use file types (/b), include subfiles and folders (/e), copy all aspects of a file (/copyall), retry 6 times if a file copy errors (/r:6), excludes folders called Dfsrprivate (/xd dfsrprivate), writes to a log (/log:robo.log), and also outputs to console (/tee). This DfsrPrivate exclusion can be changed to a full path as well if you suspect this is a legitimate user data folder name deeper in the Replicated Folder (typically it is not; if any copies exist they are usually from previously replicated folders that should have been cleaned up by a file server administrator).
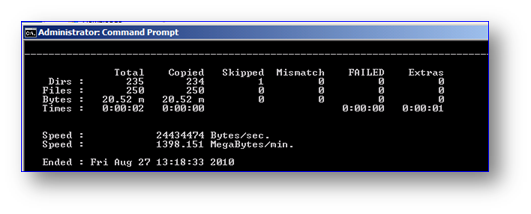
4. When the copy completes, validate that there were no errors and that only one folder was skipped (that will be the DFSRPrivate folder).
Note: if you find FAILED entries, you can review the log for specifics.
5. At this point you are done pre-seeding. See section Validating Pre-Seeding. When that is complete you can proceed with replicating the data.


Pre-seeding with Windows Server Backup
If your data source OS is Windows Server 2008 R2, I recommend you use Windows Server Backup (WSB) for pre-seeding. WSB correctly copies all aspects of a file including data, security, attributes, path, and alternate streams. It has both a GUI and command-line interface. I do not recommend WSB on Windows Server 2008 non-R2, as it lacks granularity in backing up files – refer to the Robocopy section of this article if your source computers are Win2008 non-R2.
Prerequisites
Windows Server Backup must be installed as a feature on the DFSR computers; it is not available by default. This can be done through ServerManager.msc or DISM.EXE.
More info on using Windows Server Backup: https://technet.microsoft.com/en-us/library/ee849849(WS.10).aspx
Procedure
1. Start Wbadmin.msc on the Windows Server 2008 R2 DFSR computer that has the data you are going to pre-seed.
2. Select “Backup Once” and then under “Select Backup Configuration” choose “Custom”.
3. Use “Add Items” to select the replicated folders that you will be pre-seeding.
Note: Do not attempt to exclude the DFSRPrivate junction point folders, as you will receive an error “one of the file paths specified for backup is under a reparse point”.
4. Select where to store the backup. This can be local if you have another disk with enough capacity, or a remote network location. It cannot be the same drive as the replicated folders being backed up.
5. If the backup was done locally, copy the WindowsImageBackup folder containing your backup to the location where you will restore the data. It could be a disk on the server you are pre-seeding or a central file share. It cannot be the actual disk(s) you are going to restore data to on the new computer.
6. Start Windows Server Backup on your server that you are pre-seeding with data and select “Recover”.
7. Select “A backup stored on another location”.
8. Select the correct location type. If the file was saved to this server, select “Local drives” and if it’s on another file share choose “Remote shared folder”.
9. You will see the old source data server in the list. Select the server and proceed.
10. The backup dates will be listed. By default the most recent will be displayed and this should be your backup; if not choose the correct one.
11. Select “Files and Folders” for the “Recovery Type”.
12. For “Items to Recover”, select the server node in “Available Items” tree. Whatever folder you select here, all of its child objects will be restored. For example, here I had two replicated folders on this server at the root of the drive that I backed up. If I just restore the “E” drive backup contents, both folders will be restored.
13. Under “Specify Recovery Options” select the destination path. Set “Overwrite the existing versions with the recovered versions”. Make sure that “restore access control list…” is enabled (i.e. checked ON).
Note: There should be no existing data to overwrite in this scenario typically; this radio button is selected for completeness. Pre-seeded data should win, that is why you are using it; existing data cannot be trusted.
14. Restore the data by selecting “Recover”.
15. At this point you are done pre-seeding. See section Validating Pre-Seeding. When that is complete you can proceed with replicating the data. You have the option to delete the DFSRPrivate folder that was restored within your RF(s) at this point, as it will not be useful for pre-seeding.


Validating Pre-seeding
Having theoretically pre-seeded correctly at this point, you need to spot check your work and validate that the file hashes are matching on the server. If a half dozen match up, you are usually safe to assume all the rest worked out – validating every single file is possible but in a large data set it will be very time consuming and of little value.
Prerequisites
You must have a Windows 7 or Windows Server 2008 R2 computer somewhere in your environment (even if it is not part of the DFSR environment being migrated) as it includes a new version of DFSRDIAG.EXE that has a filehash checking tool. If you do not have at least a Windows 7 computer running RSAT you will not be able to properly validate SHA-1 DFSR file hash data.
- If using Win7, install RSAT and add the Distributed File System tools.
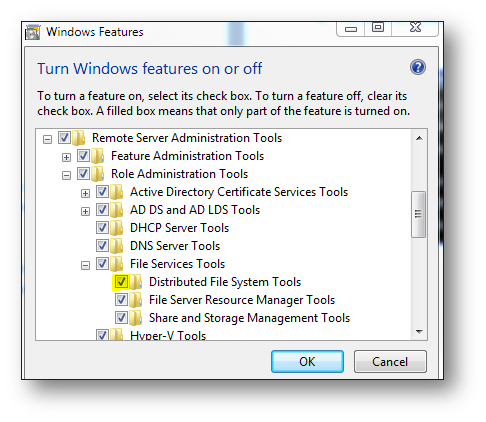
- If using Win2008 R2 servers, add the Feature of Distributed File System tools.

Note: If you have no copy of Windows 7 you must open a support case in order to gain access to an unsupported internal tool for file hash checking. The cost of this support case is at least the same as a copy of Windows 7 though and the tool you are provided will receive no support, so this is not as advisable as purchasing one Win7 license.
More info on using DFSRDIAG FILEHASH: https://blogs.technet.com/b/filecab/archive/2009/01/19/dfs-replication-what-s-new-in-windows-server-2008-r2.aspx
Procedure
1. Note the path of six files within the source data server. These should be scattered throughout various nested folder trees.
2. For one of those test files, use DFSRDIAG.EXE to get a hash from the source computer and the matching file on the pre-seeded computer:
DFSRDIAG.exe filehash /path:”source computer path file”
DFSRDIAG.exe filehash /path:”pre-seeded computer path file”
For example:
3. If DFSRDIAG shows the same hash value for both copies of the file, it has been pre-seeded correctly and matches in all file aspects (data stream, alternate data stream, security, and attributes). If it doesn’t match, you made a mistake in your pre-seeding or someone has changed the files after the fact. Start over.
4. Repeat for five more files (or more until you feel comfortable that pre-seeding was done perfectly).
Note: If you want to check every file, consider using DIR /B to build a list of all files on both servers, then using a FOR loop to export the hashes from all of them. But expect to wait a long time.
Update 03/04/2011: Paul Fragale has written a DFSRDIAG FILEHASH powershell script that does automated spot checking for you. Grab it here: https://gallery.technet.microsoft.com/scriptcenter/1de44cc1-ce79-4e98-9283-92548fc02af9

Final Considerations
Keep in mind that unless your data is 100% static or users are not allowed to modify files during pre-seeding and DFSR initial sync, some file conflicts are to be expected. These will be visible in the form of DFSR Event Log 4412 entries on the server that was pre-seeded. The point of pre-seeding is to minimize the amount of data to be replicated initially during the non-authoritative replication phase on the downstream server; unless data never changes there will always be a delta that DFSR will have to catch up after pre-seeding.
Series Index
- Replacing DFSR Member Hardware or OS (Part 1: Planning)
- Replacing DFSR Member Hardware or OS (Part 2: Pre-seeding)
- Replacing DFSR Member Hardware or OS (Part 3: N+1 Method)
- Replacing DFSR Member Hardware or OS (Part 4: Disk Swap)
- Replacing DFSR Member Hardware or OS (Part 5: Reinstall and Upgrade)
- Ned “beanstack” Pyle