Deploy Windows to Surface Pro 3 using Microsoft Deployment Toolkit
Hi, my name is Scott McArthur and I am Senior Support Escalation Engineer on the Deployment/Devices team. In today’s blog I am going to go over the steps to deploy Windows 8.1 Enterprise X64 Update to a Surface Pro 3. In this example I will be using the following deployment technologies
- Microsoft Deployment Toolkit 2013 Server
- Windows Server 2012 R2 WDS server
I will be using the Microsoft USB to Ethernet adapter to PXE boot the MDT 2013 Lite Touch Images from the WDS server. If you don’t have the adapter you could utilize a USB hard drive and Media Deployment from MDT (not covered in this blog). There are various ways to deploy Windows to a device so this is just one example.
Before starting you need to gather up the following:
- Required: Surface Pro 3 Firmware and Driver Pack
- Required: KB2968599: Quick Note-Taking Experience Feature for Windows 8.1
- Note: We are going to make the download of this update easier but in the meantime you can grab this update from this link.
- Optional: Existing Surface Pro 3 with OEM image installed. Used to gather files for Pen Pairing during OOBE
Note: In this blog I am using the Surface Pro 3 as the hardware to build the reference image on. In environment where you are building an image that will only go on a Surface Pro 3 this is generally not a problem but if you create reference image that is going to many different types of systems we recommend for you to build your reference image in a Generation 1 Hyper-V virtual machine so that the reference image is “clean” of any drivers and then you use the features of MDT or SCCM to layer the device specific drivers down during deployment. Since there are so many factors involved I opted to show the simpler of scenarios and then you can decide what fits best for your environment and goals.
Step #1: Extract the contents of the Surface Pro 3 Firmware and Driver pack
After downloading the Surface Pro 3 firmware and driver pack you will see the following files:
- Surface Ethernet Adapter.zip
- Surface Gigabit Ethernet Adapter.zip
- Surface Pro – July 2104.zip
- Surface Pro 2 – July 2014.zip
- Surface Pro 3 – July 2014.zip
Note: This package is updated on regular basis so the filenames be slightly different but overall package organization should be similar.
Extract the contents of the following files:
- Surface Pro 3 – July 2014.zip
- Surface Ethernet Adapter.zip
- Surface Gigabit Ethernet Adapter.zip
For the next steps we will assume they were extracted to the following locations
- C:\Surface_Pro3_July_2014
- C:\Surface_Ethernet_Adapter
- C:\Surface_Gigabit_Ethernet_Adapter
- C:\KB2968599
Step #2: Import OS
In this step we will import the OS. Surface Pro 3 only supports Windows 8.1 X64 Update. This can be Enterprise or Professional.
- Right click Operating Systems and choose import
- Browse to your location of your VL Windows 8.1 Enterprise Update X64 ISO
- Provide directory name such as “Windows 8.1 Enterprise Update X64”
- Click next and Finish
Step #3: Add the Surface Pro 3 Firmware and Driver pack drivers to MDT
In the Microsoft Deployment Toolkit Workbench create the following folder structure under Out-Of-Box Drivers
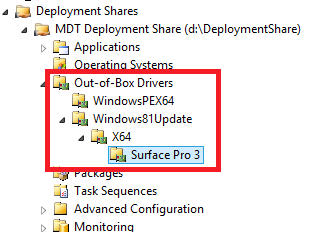

Note: The last folder must be called “Surface Pro 3”
- Right click Out-Of-Box Drivers\WindowsPEX64 folder and choose import drivers. Browse to C:\Surface_Ethernet_Adapter and import the driver
- Right click Out-Of-Box Drivers\WindowsPEX64 folder and choose import drivers. Browse to C:\Surface_Gigabit_Ethernet_Adapter and import the driver
- Right click Out-Of-Box Drivers\X64\Surface Pro 3 and choose import drivers. Browse to C:\Surface_Pro3_July_2014
Step #4: Create Selection Profile for Windows PE drivers
This still will create a selection profile for Windows PE drivers. This helps to ensure only the necessary drivers are imported into Lite Touch boot image.
- In the Microsoft Deployment Toolkit workbench navigate to Advanced Configuration\Selection Profiles.
- Right click and choose new selection profile
- Name the selection Profile WindowsPEx64
- Browse to Out-Of-Box Drivers\WindowsPEX64
- Select WindowsPEX64 folder

- Next
- Finish
Step #5: Assign Selection Profile for Windows PE
This step will assign the previously created selection profile to Windows PE Lite touch so that only the drivers under WindowsPEx64 are added to the boot image
- Right click the Deployment share and choose properties
- Choose Windows PE tab
- Choose Platform X64
- Choose Drivers and Patches tab
- For selection profile choose WindowsPEx64

Step #6: Import Updates
In this step we will import the update that enables the Pen button functionality with modern OneNote. In most cases you would probably add other security updates and other updates to your deployment at this point also.
In the Microsoft Deployment Workbench right click packages and choose import and then browse to C:\KB2968599\Windows8.1-KB2968599-x64.msu

Step #7: Create Task Sequence
In this step we will create a task sequence to deploy Windows 8.1 Enterprise Update X64
- In the Microsoft Deployment Workbench right click Task Sequences and choose new
- Task Sequence ID=BLDWin81ENTUPX64
- Task Sequence Name=Build Windows 8.1 Enterprise Update X64 reference image
- Choose Standard Client Task Sequence
- Choose the Windows 8.1 Enterprise Update X64 reference image OS
- Choose Do not Specify a product key at this time
- Fill out Organization and other information
- Fill out local administrator password
- Finish
Step #8: Edit Task Sequence for Drivers
In this step we will edit the task sequence to modify the driver injection step. There are a number of ways to address drivers in MDT. The key to preventing driver installation issues to make sure that the only drivers used during the deployment are the ones designed for the Surface. If your Out-Of-Box drivers contain drivers for other systems and you do not use one of the options below then you cannot control what drivers get used during the deployment. This can lead to problems so we would recommend you use Selection Profiles or other methods to ensure only the drivers designed for the Surface are used during the deployment. For additional reading on this topic I encourage you to take a look at this blog
Option #1: Create a selection profile for Out-Of-Box Drivers\Windows81Update\X64\Surface Pro 3 and then set the Inject Drivers TS step to this selection profile. It is recommended to choose the “Install all drivers from this selection profile option also. Disadvantage to this option is that this TS would be specific to Surface Pro 3. If you configure this option it will look like this in the task sequence

Option #2 (Recommended approach): Use the DriverGroup001 variable to set this based on the Model of the system. This is more flexible since it will take the Model (WMI variable from the BIOS) information and use this to decide which folder to use. This allows this task sequence to work for a variety of devices. The folder names have to match EXACTLY with the Model exposed by the system (MSINFO32 will show you the model)
We will use Option #2 for these steps
In Microsoft Deployment Toolkit workbench right click the task sequence you created earlier and choose properties
- Choose the Task Sequence tab
- Browse to the Preinstall phase and look for step called “Inject Drivers”
- Click the Enable Bitlocker step which is right before the “Inject Drivers” step
- Click Add, General, Set Task Sequence Variable
- Set the following:
Name: Set DriverGroup001 variable to Model
Task Sequence Variable: DriverGroup001
Value: Windows81Update\x64\%model%

- Choose the Inject Drivers step that occurs after this step and set the Selection profile to Nothing and choose “install all drivers from the selection Profile”. This is important so all the firmware updates and drivers for devices that are not present(for example keyboard) are added to the deployment

- Click apply and save the task sequence
Step #9: Modify the Unattend.xml
In this step we will modify the Unattend.xml to make sure OOBE is completely automated. There is additional prompt during OOBE to join wireless network if the wireless driver is available. The TS Unattend.xml does not contain the entry to automate this since this is a new setting with Windows and the template in MDT 2013 doesn’t contain it
- In Microsoft Deployment Toolkit workbench right click the TS and choose properties
- Choose OS info tab
- Choose Edit Unattend.xml
Note: This will take a while the first time a catalog is created. If you encounter error take a look at KB2524737.
- Navigate to 7 OOBESyetm\Microsoft-Windows-Shell-Setup\OOBE
- For HideWirelessSetupInOOBE choose True

Another option to consider modifying at this point is configuring whether or not the Power button shows on the start screen. The OEM image that ships with Surface Pro 3 is configured to show the Power button on the start screen. If you do a new install the default behavior is not to show the power button (by design). For additional information on this behavior and Unattend option to configure this see the following:
KB2959188: Power/shutdown button may be missing from the Windows 8.1 start screen

Step #10: Configure Image for Pen Pairing during OOBE (Optional)
During the 1st bootup of the OEM image that ships with the Surface Pro 3 you are prompted during OOBE to pair the pen. In most cases you will probably want to pairthe pen after the deployment is complete but if you would like to add this step to the deployment you can use the following instructions.
Note: The pairing prompt will occur during OOBE so it will interrupt MDT’s automated deployment. Once paired you must click next for it to continue. Ideally this is something IT person would handle for the user before handing over the device to the user.
1. Take one of your existing Surface Pro 3 devices that has the OEM image on it and copy the following files to USB flash drive or other location:
%windir%\system32\oobe\info\default\1033\oobe.xml
%windir%\system32\oobe\info\default\1033\PenPairing_en-US.png
%windir%\system32\oobe\info\default\1033\PenError_en-US.png
%windir%\system32\oobe\info\default\1033\PenSuccess_en-US.png
2. On the MDT server open Deployment and Imaging Tools Environment cmd prompt
3. Use the DISM command to mount the image you are deploying
Dism /mount-wim /wimfile:d:\deploymentshare\operating systems\<name of image>\sources\install.wim /index:1 /mountdir:c:\mount
4. Create the following pathing in the image
C:\mount\windows\system32\oobe\info\default\1033
5. Copy all the files from Step #1 above into this folder
6. Close any explorer Windows and switch to C:\ to make sure no open file handles to the c:\mount folder
7. Unmount the image and save changes
Dism /unmount-wim /mountdir:c:\mount /commit
Step #11: Configure Default Display Resolution
The default display resolution for the Surface Pro 3 is 2160x1440. To set this automatically you can add the following entry to your customsettings.ini (Right click the Deployment share, properties, rules):
[Settings]
Priority=Model, Default[Surface Pro 3]
XResolution=2160
YResolution=1440
This uses the MDT functionality of where it knows the Model (Surface Pro 3) and based on these entries adds the resolution settings to the Unattend.xml for you
Step #12: Update MDT server and WDS server
At this point you would want to do a full generation of the deployment share to create the Lite Touch boot images to ensure the Surface Ethernet Adapter driver is incorporated into the MDT Lite Touch boot images and then import these images to your Windows Deployment Service (WDS) server. I would recommend you utilize a 2012R2 WDS server. For additional information on support for UEFI in WDS take a look at KB2938884.
Step #13: PXE boot
The final step is to PXE boot the Surface Pro 3. To PXE boot do the following:
- Shut the device down
- Press and hold volume down button
- Press the Power button
- When you see the Surface Logo you can let go
- You should see prompt to PXE boot. The Surface Pro 3 supports a On Screen Keyboard(OSK)
- Press the Keyboard icon in upper right of screen
- Press Enter button on OSK
- Using arrow keys on OSK choose your MDT 2013 Lite Touch image from the WDS server
- Then follow the prompts during Lite Touch to initiate the deployment
If you can’t get the Surface Pro 3 to PXE boot check the following:
- Make sure you are using Microsoft USB to Ethernet Adapter. 3rd party adapters are not supported for PXE booting
- Check and make sure this issue does not apply to your environment
- 2602043: Invalid Boot File Received Error Message When PXE booting from WDS
Additional Notes
Some additional tips:
- Check out my other blog for some additional tips for the PEN at “Deploying Surface Pro 3 Pen and OneNote Tips”
- If you do not want to see the Deployment Summary at the end of the deployment you can add the following entries customsettings.ini:
[Default]
;Skip Final Summary Screen
SkipFinalSummary=Yes
;Control behavior after system is complete
FinishAction=Shutdown|Reboot|Restart|Logoff
- If you want to customize the image further you can use the Sysprep and Capture TS to capture the image then import into MDT and then create a TS that deploys that custom image. We normally recommend you automate the entire Build Reference Image TS as much as possible to remove any potential for user error or change in how the reference image is created
- Information on how to modify UEFI settings: https://www.microsoft.com/surface/en-us/support/warranty-service-and-recovery/how-to-use-the-bios-uefi
Thanks for reading this blog and good luck with your Surface Pro 3 deployments.
Scott McArthur
Senior Support Escalation Engineer