Expanding disks attached to Hyper-V VMs may not reflect adjusted size immediately on WS2008

If you Inspect the disk in Hyper-V Manager that you just altered it will show the correct new maximum size however.
![clip_image001[4]](https://msdntnarchive.blob.core.windows.net/media/TNBlogsFS/BlogFileStorage/blogs_technet/askcore/WindowsLiveWriter/ExpandingdisksattachedtoHyperVVMsmaynotr_6A1A/clip_image001%5B4%5D.jpg)
Even though the disk is a Dynamically Expanding type disk, we still need to tell the Operating System about the container size change. If you look in Storage Manager, you'll see the new unallocated space:
![clip_image001[6]](https://msdntnarchive.blob.core.windows.net/media/TNBlogsFS/BlogFileStorage/blogs_technet/askcore/WindowsLiveWriter/ExpandingdisksattachedtoHyperVVMsmaynotr_6A1A/clip_image001%5B6%5D.jpg)
To take advantage of the newly allocated space, simply right click on the container and choose Extend Volume:
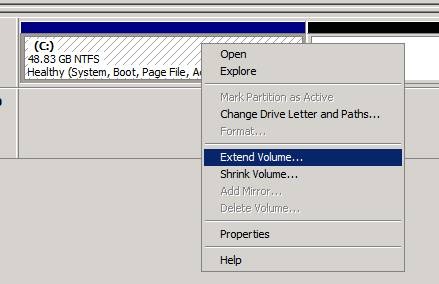
Make any size adjustments to the total space to extend, then choose Next
![clip_image001[8]](https://msdntnarchive.blob.core.windows.net/media/TNBlogsFS/BlogFileStorage/blogs_technet/askcore/WindowsLiveWriter/ExpandingdisksattachedtoHyperVVMsmaynotr_6A1A/clip_image001%5B8%5D.jpg)
Verify the total size is what you want, and click Finish
![clip_image001[10]](https://msdntnarchive.blob.core.windows.net/media/TNBlogsFS/BlogFileStorage/blogs_technet/askcore/WindowsLiveWriter/ExpandingdisksattachedtoHyperVVMsmaynotr_6A1A/clip_image001%5B10%5D.jpg)
Enjoy the extra new space on the VHD!
![clip_image001[12]](https://msdntnarchive.blob.core.windows.net/media/TNBlogsFS/BlogFileStorage/blogs_technet/askcore/WindowsLiveWriter/ExpandingdisksattachedtoHyperVVMsmaynotr_6A1A/clip_image001%5B12%5D.jpg)
Windows Server 2003 Scenario:
The same behavior can be seen in Windows Server 2003, however the method to extend the volume is different than in 2008.
So when looking in Disk Management, we see the unallocated space available to expand into:
![clip_image002[4]](https://msdntnarchive.blob.core.windows.net/media/TNBlogsFS/BlogFileStorage/blogs_technet/askcore/WindowsLiveWriter/ExpandingdisksattachedtoHyperVVMsmaynotr_6A1A/clip_image002%5B4%5D.jpg)
We have no Extend Volume option in 2003 though! Now what?
![clip_image002[6]](https://msdntnarchive.blob.core.windows.net/media/TNBlogsFS/BlogFileStorage/blogs_technet/askcore/WindowsLiveWriter/ExpandingdisksattachedtoHyperVVMsmaynotr_6A1A/clip_image002%5B6%5D.jpg)
What we need to do is boot to WinPE and run Diskpart. What we need to do is boot to WinPE and run Diskpart or the Microsoft Diagnostic and Recovery Toolkit. The key point is that in order to extend a System managed partition, we need to be OUTSIDE of the OS. Understanding that there are third party and freeware tools that can accomplish the same task as WinPE or MS-DART 5.0, those options are beyond the scope of this posting.
If you are not able to obtain a copy of WinPE, MS-DART may be a great option. The link below brings you to a 30-day Evaluation download page.
For information about obtaining WinPE visit https://www.microsoft.com/licensing/sa/default.mspx
For information about obtaining the MS-DART 5.0 product, visit https://www.microsoft.com/downloads/details.aspx?familyid=5D600369-0554-4595-8AB4-C34B2860E087&displaylang=en
Once booted into WinPE or MS-DART 5.0, open a command prompt and run Diskpart.
You’ll notice that Diskpart isn’t fooled, it sees the disk size as we intend it to be, 130gb.
![clip_image002[8]](https://msdntnarchive.blob.core.windows.net/media/TNBlogsFS/BlogFileStorage/blogs_technet/askcore/WindowsLiveWriter/ExpandingdisksattachedtoHyperVVMsmaynotr_6A1A/clip_image002%5B8%5D.jpg)
Now we select Disk 0 and then bring up the disk detail. (The Disk number may change obviously based on the disk you’re wanting to extend.)
![clip_image002[10]](https://msdntnarchive.blob.core.windows.net/media/TNBlogsFS/BlogFileStorage/blogs_technet/askcore/WindowsLiveWriter/ExpandingdisksattachedtoHyperVVMsmaynotr_6A1A/clip_image002%5B10%5D.jpg)
We see here that the actual volume size is smaller, only 127gb. Now we have to select the Volume we want. Volume 1 in this example.
![clip_image002[12]](https://msdntnarchive.blob.core.windows.net/media/TNBlogsFS/BlogFileStorage/blogs_technet/askcore/WindowsLiveWriter/ExpandingdisksattachedtoHyperVVMsmaynotr_6A1A/clip_image002%5B12%5D.jpg)
Now we extend the volume to encompass the newly added free space
![clip_image002[14]](https://msdntnarchive.blob.core.windows.net/media/TNBlogsFS/BlogFileStorage/blogs_technet/askcore/WindowsLiveWriter/ExpandingdisksattachedtoHyperVVMsmaynotr_6A1A/clip_image002%5B14%5D.jpg)
Just to make sure – we look…
![clip_image002[16]](https://msdntnarchive.blob.core.windows.net/media/TNBlogsFS/BlogFileStorage/blogs_technet/askcore/WindowsLiveWriter/ExpandingdisksattachedtoHyperVVMsmaynotr_6A1A/clip_image002%5B16%5D.jpg)
And we’re good to go! Simply reboot to the OS and enjoy the newly added disk space.
Sean Dwyer
Senior Support Engineer
Microsoft Enterprise Platforms Support