Error message when you try to configure Office 365 account in Outlook: "The security certificate was issued by a company you have not chose to trust"
[Symptoms]
When you configure a Microsoft Exchange Online account (Office 365 account) in Outlook client application, you receive a security alert after you enter your account credentials:
The security certificate was issued by a company you have not chose to trust. View the certificate to determine whether you want to trust the certifying authority.
Note: The issue typically occurs in an environment where Microsoft Exchange Online coexisting on-premise deployment.
[Cause]
The issue occurs because the network incorrectly redirects external auto-discover calls back to your Client Access Server(CAS) that are deployed on-premise. In a normal configuration, Office 365 domain autodiscover calls will simply hit the internet looking for the Microsoft Online DNS address. Since this call hits your CAS instead, and probably because the certificate that is installed on the CAS is not valid, you receive certificate authority (CA) validation errors.
[Resolution]
To resolve this issue, manually configure Outlook client with the following settings:
1. First log on to the Office 365 Outlook Web Access(OWA). Inside of OWA, go to help/about. Make a note of the first part of the "Host Name" entry (For example, SN1PRD0202) which is the server name and well as the first part of the external POP setting (ex. POD51008) which is the proxy name.
2. Log into Outlook and manually configure an Exchange connection with the following settings:
SERVER: the server name attached to .mailbox.outlook.com (ex. SN1PRD0202.mailbox.outlook.com)
CACHED MODE: Checked.
USER NAME: The full O365 email address of the account. Don't click "check name", click "more settings"
Go to the SECURITY tab.
Make sure the first box is checked, and security is set to "negotiate authentication"
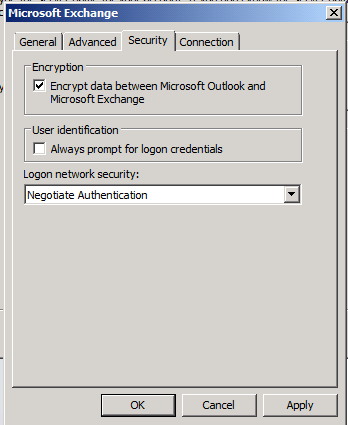
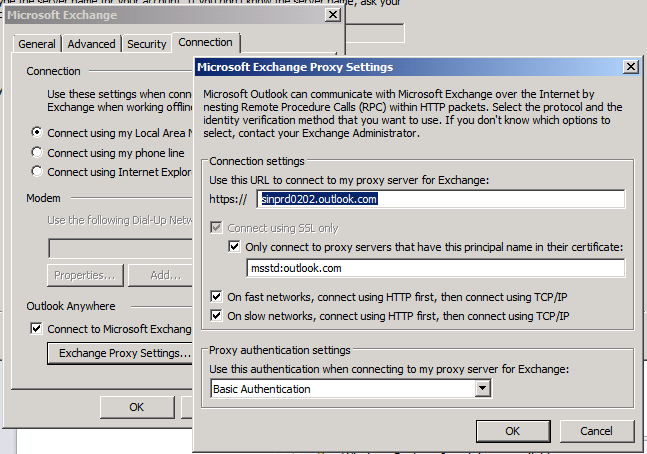
Go to the CONNECTION tab.
Check "connect to Microsoft Exchange using HTTP" then click the "Exchange Proxy Settings" button
In the connection settings box, enter the proxy name attached to .outlook.com(ex. POD51008.outlook.com)
In the 2nd box enter msstd: outlook.com
All four checks should be selected
Under "Proxy Authentication Settings" make sure that "Basic Authentication" is checked.
OK all the way back out to the first page (server name and user name) and hit next.