Configuring Windows Server 2008 Server Core
I'm currently preparing my demo machine that I will use during the roadshow next week. I wanted to have all my demo's running on Hyper-V Beta so I decided to start from scratch and create a complete new environment. I've installed the Hyper-V Beta and configured everything to start deploying my Virtual Machines.
I deployed a WS2008 DC, 2 WS2008 IIS server to show how the shared configuration works, one WS2008 Terminal Server, a TSGateway and as last machine a WS 2008 Server Core. If you're not used to use the command line to configure the different network settings like IP Address, DNS settings or changing the name of the server, adding the server to a domain, can be time consuming. So therefore to help you and have a reference for myself I will list all the steps and commands needed to configure a server core in an Active Directory domain.
So first thing first you install the Windows Server 2008 Server Core (SC) and at first login you need to change the password, very easy process to do using the GUI.
Now you have a SC up and running with the default settings after the installation. So let's configure this server step-by-step now:
- Configuring the Server Name
- Configuring an IP address
- Joining a domain
- Configuring Windows Updates
- Enabling remote functionality like MMC, Remote RDP, Windows Firewall and Remote Shell
- Activating the server
Configuring the Server Name
You can use different commands to identify the name of a server, I usually use the hostname command but you could also make usage of the environment variables and use for example set c and set u to find out the computer name and your username.
- Determine the computername with the hostname command
- Netdom renamecomputer <computername> /NewName:<newcomputername>
- Reboot the server by using shutdown /R /T 0
Configuring the IP Address
By default the IP Configuration will be DHCP based, so to change it to a static address we will need to use the netsh commandline tool
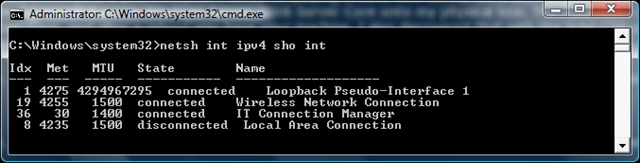
Netsh interface IPV4 sho interface (or use the shorter version netsh int IPV4 sho int)
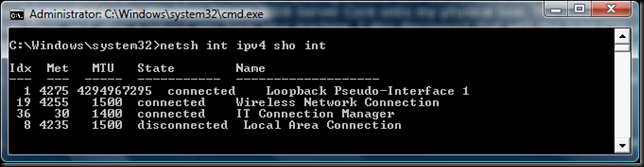
In the above screenshot you see the results of this command and you only need to remember the Idx number or using the complete name of the network you want to configure.
netsh interface ipv4 set address name="<ID>" source=static address=<StaticIP> mask=<SubnetMask> gateway=<DefaultGateway>
netsh interface ipv4 add dnsserver name="<ID>" address=<DNSIP> index=1
ID= Idx number of the Network Interface
Add a number to the index for each DNS Server that you want to add.
Joining a Domain
At this stage the server has the correct name and IP configuration the next step I usually do is adding this server to the domain by using the netdom command.
Netdom Join <machine> /Domain:<domain name> /UserD:<domain user name> /passwordd: *
No there is no typo in passwordd you need to add the second d, using the * means that you will be prompted to enter the password.
Restart the server shutdown /r /t 0
Configuring Windows Updates
To configure or view the settings of the Windows Updates you will need to use a script called Scregedit.WSF. Let's first have a look at the settings.
cscript C:\Windows\System32\Scregedit.wsf /au /v
By default you will get something like "Value Not Set".
Now let's configure the automatic updatescscript C:\Windows\System32\Scregedit.wsf /au 4
Enable Remote functionality
**Terminal Service settings**Again here we will use the script that we have used to configure the automatic updates.
To view current settings:
C:\Windows\System32>cscript SCregEdit.wsf /AR /v
If you see "1" in the script output, that means that TS connections will be denied. To change that you need to execute:
C:\Windows\System32>cscript SCregEdit.wsf /AR 0
Now we need to enable the inbound firewall rule to make sure you can connect through RDP port 3389
netsh advfirewall firewall show rule name=all
Find the name of the Remote Desktop Incoming rule.
netsh advfirewall firewall set rule name="Remote Desktop (TCP-IN)" new enable=yes
Enable Windows Remote Shell
If you want to be able to use the new tool called WinRS (Windows Remote Shell) to administer a Server Core you need to configure WS-Managenement listener. The easiest way to do it is by using following command
winrm quickconfig
Winrm /? Will show you all the various options if you want to configure the listener differently. I’m just going to cover the quick setup and let you all experiment.
You can also configure the listener through an unattend file, by adding the following in the <settings pass="specialize"> section:
<component name="Microsoft-Windows-Web-Services-for-Management-Core" publicKeyToken="31bf3856ad364e35" language="neutral" versionScope="nonSxS" processorArchitecture="x86">
<ConfigureWindowsRemoteManagement>true</ConfigureWindowsRemoteManagement>
</component>
Enable Remote Firewall Management
If you want to use the MMC snap in to remotely manage a SC firewall you need to enable the remoting first onto the SC box.
netsh advfirewall set currentprofile settings remotemanagement enable
Now you can add the Windows Firewall with Advanced Security snap in onto your managament machine and configure the firewall through this mmc instead of using the netsh command line tool.
Enable Remote MMC Management
To enable remote management for any MMC you just need to use the following command:
- netsh advfirewall firewall set rule group="Remote Administration" new enable=yes
Activate Server
To activate the server you can use the following command:
- slmgr.vbs –ato
You can also do it from a remote machine by using the same script:
- slmgr.vbs –ato <servername> <username> <password>
You're server is now up and running, the next step is to add roles and features to this server. I might explain this process in another post any soon.
Technorati Tags: Server Core,Windows Server 2008