How to create a Basic Configuration Item View and Type Projection showing Computers with their Primary User and Custodian (owner)
It has been a while since I last blogged, but I figured as I was sitting on an aeroplane yesterday, it would be a good time to get something out the door.
Out the box you get your handy dandy ‘All Windows Computers’ View that shows the following:

However, one cool view in Service Manager would be one showing computers together with their primary owner and custodian (also known as Owner sometimes in SCSM), like this:

So how do we go about making this view? Well first off, lets see how far we get in the UI using the OOB (out-of-the-box) Experience (I say this because some third parties and some of our partners out there have add-ins that will allow you to some of the below through their UI add-ins)
If I choose Windows Computer here, I can only select properties of the Windows Computer class.

To put together the view shown above with primary user and owner, I need the display name of the Primary User (User Class) and the display name of the Owner (User Class) which are properties of the related User class.
So then how do we have the ability to add properties from related classes into views? The answer is by using type projections. Type Projections combine classes using the relationships that exist between classes. In the Service Manager console, you will see these referred to as ‘Combination Classes’ which can be selected by changing the Dropdown from ‘Frequently Used basic classes’ to ‘Combination Classes’ as shown here;

One OOB (out of the box) type projection is ‘Computer (typical)’ which includes related data from the ‘Computer (deployed)’ Class (interestingly enough a class defined in the configuration management MP) and also from the ‘Windows Operating System’ Class. Therefore, using the type projection opens up the ability to add any properties from those related classes.
Another OOB type projection is ‘Computer (advanced)’ . This one will actually give me the ‘Primary User’ and ‘Owned by User’ (custodian) relationships:

Which is great, we can use it!! However we should not! You should be a little wary of anything where you see ‘(advanced)’ in parentheses like this (especially when creating views). It is somewhat of a temptation when you’re starting out with SCSM to go and create all sorts of views bringing useful data together from lots of related classes using these ‘Advanced’ Type Projections. However creating views using type projections is known to have a performance impact in terms of how long your views take to load.
If you go ahead and base your view off this computer advanced type projection, that means that regardless of how many related classes you add properties for, we will query all of the relationships that exist in the type projection which in the case of computer (advanced) is 13 relationships:


More about this and the performance impact can be found here in one of Travis Wright’s early blogs. Also many of my customers use this MP which combines many useful type projections into a single MP, including all of the below:

One of the most commonly used ones I see from the above is the ‘Incident (Assigned and Affected User)’ when creating Incident views (like ones based on support group where you want to show the affected and assigned user)
What the MP mentioned above does not have, is CI Type Projections which is what we need for our computer view. So what we’ll do is take one of the OOB type projections ‘computer (advanced)’ and modify it to make our own more granular type projection that only has the primary owner and owned by user relationships included. Once we have that, we’ll create a view based on it.
Here’s how to create a custom type projection from an OOB one. First of all we need to get the xml that defines the OOB Type Projection. Here’s 2 methods to do that:
METHOD 1) Figure out which MP the OOB type projection you want to use as a starting point is stored in, export the MP and then grab and hack the xml needed from that

Search up from the bottom of the MP for the Type Projection name:

This will give you the ID (Microsoft.Windows.Computer.ProjectionType ) in my case then search up for that ID until you find the typeprojection definition. For me it was the fourth occurrence. It is the one in the TypeProjections section, with ID before it like this:

Then this is the xml type projection definition:
</TypeProjection>
<TypeProjection ID="Microsoft.Windows.Computer.ProjectionType" Accessibility="Public" Type="Windows!Microsoft.Windows.Computer">
<Component Path="$Context/Path[Relationship='ConfigurationManager!Microsoft.SystemCenter.ConfigurationManager.DeployedComputerRunsWindowsComputer' SeedRole='Target']$" Alias="PhysicalComputer" />
<Component Path="$Context/Path[Relationship='Windows!Microsoft.Windows.ComputerHostsOperatingSystem']$" Alias="OperatingSystem" />
<Component Path="$Context/Path[Relationship='Windows!Microsoft.Windows.ComputerHostsLogicalDevice' TypeConstraint='Peripherals!Microsoft.Windows.Peripheral.NetworkAdapter']$" Alias="NetworkAdapter" />
<Component Path="$Context/Path[Relationship='Windows!Microsoft.Windows.ComputerHostsLogicalDevice' TypeConstraint='Peripherals!Microsoft.Windows.Peripheral.Processor']$" Alias="Processor" />
<Component Path="$Context/Path[Relationship='Windows!Microsoft.Windows.ComputerHostsLogicalDevice' TypeConstraint='Peripherals!Microsoft.Windows.Peripheral.PhysicalDisk']$" Alias="PhysicalDisk" />
<Component Path="$Context/Path[Relationship='Windows!Microsoft.Windows.ComputerHostsLogicalDevice' TypeConstraint='Peripherals!Microsoft.Windows.Peripheral.LogicalDisk']$" Alias="LogicalDisk" />
<Component Path="$Context/Path[Relationship='System!System.ComputerPrimaryUser']$" Alias="PrimaryUser" />
<Component Path="$Context/Path[Relationship='System!System.ConfigItemOwnedByUser']$" Alias="Custodian" />
<Component Path="$Context/Path[Relationship='WorkItem!System.WorkItemRelatesToConfigItem' SeedRole='Target']$" Alias="ImpactedWorkItem" />
<Component Path="$Context/Path[Relationship='WorkItem!System.WorkItemAboutConfigItem' SeedRole='Target']$" Alias="RelatedWorkItem" />
<Component Path="$Context/Path[Relationship='SupportingItem!System.ConfigItemHasFileAttachment']$" Alias="FileAttachment" />
<Component Path="$Context/Path[Relationship='System!System.ConfigItemRelatesToConfigItem']$" Alias="RelatedConfigItem" />
<Component Path="$Context/Path[Relationship='System!System.ConfigItemRelatesToConfigItem' SeedRole='Target']$" Alias="RelatedConfigItemSource" />
<Component Path="$Context/Path[Relationship='CoreKnowledge!System.EntityLinksToKnowledgeDocument']$" Alias="RelatedKnowledgeArticles" />
</TypeProjection>
METHOD 2) Get the type projection XML from SQL using one of the following queries (ran against the Service Manager DB in SQL Management Studio). The first query returns all type projections. The second one uses the matching criteria to only find type projections with the ENU English code and with the ‘computer (adv) ' in the display name (Display names are stored in the localized text table so the second part of this join is commonly needed for other queries):
QUERY TO RETURN ALL TPs with ‘FRIENDLY’ display name:
select ltvalue, typeprojectionid, typeprojectionname, convert(xml,componentxml)
from typeprojection tp
inner join localizedtext LT on LT.mpelementid = tp.TypeProjectionId
QUERY WITH CRITERIA TO RETURN ENGLISH TPs with something specific in ‘FRIENDLY’ display name:
select ltvalue, typeprojectionid, typeprojectionname, convert(xml,componentxml)
from typeprojection tp
inner join localizedtext LT on LT.mpelementid = tp.TypeProjectionId
where languagecode = 'ENU'
and
ltvalue like '%computer (ad%'

Click on the component path and you will be given the xml:

Now we can hack this down, by changing the ID, and removing the components we don’t want, leaving the ones we do, to create the type projection that we want:
</TypeProjection>
<TypeProjection ID="ContosoComputerAndPrimaryUserAndCustodian" Accessibility="Public" Type="Windows!Microsoft.Windows.Computer">
<Component Path="$Context/Path[Relationship='System!System.ComputerPrimaryUser']$" Alias="PrimaryUser" />
<Component Path="$Context/Path[Relationship='System!System.ConfigItemOwnedByUser']$" Alias="Custodian" />
</TypeProjection>
Now we have this, we can create an MP Containing it, and then seal it so we can reference it from other unsealed management packs where we will create our folders and views. Here is the full MP code (which can be saved as a ContosoCustomComputerTypeProjectionMP.xml file and then sealed) containing the one TP that we want to use.
Couple of items to note here,
1) REFERENCES – In a Management pack, wherever you see ALIAS! the Alias is one of the reference aliases in the References section. This means that you need to ensure your references in your type projection (and anywhere else in the MP they may be used, matches the Reference Alias in the reference section. I modified the type projection code above, with the reference aliases used in the reference section
2 ) TYPE PROJECTION ID - Make sure you have a display string that matches your type projection ID
3) MP ID and Name – Make sure you have a display string that matches your MP ID and also that you call the file MPID.xml where MPID is the ID you used below in the Identity section
<ManagementPack ContentReadable="true" SchemaVersion="2.0" OriginalSchemaVersion="1.1" xmlns:xsd="https://www.w3.org/2001/XMLSchema" xmlns:xsl="https://www.w3.org/1999/XSL/Transform">
<Manifest>
<Identity>
<ID>ContosoCustomComputerTypeProjectionMP</ID>
<Version>1.0.0.3</Version>
</Identity>
<Name>Contoso Custom Computer Type Projection MP</Name>
<References>
<Reference Alias="EnterpriseManagement">
<ID>Microsoft.EnterpriseManagement.ServiceManager.UI.Console</ID>
<Version>7.5.2905.0</Version>
<PublicKeyToken>31bf3856ad364e35</PublicKeyToken>
</Reference>
<Reference Alias="CustomSystem_Library">
<ID>System.Library</ID>
<Version>7.5.2905.0</Version>
<PublicKeyToken>31bf3856ad364e35</PublicKeyToken>
</Reference>
<Reference Alias="CustomMicrosoft_Windows_Library">
<ID>Microsoft.Windows.Library</ID>
<Version>7.5.2905.0</Version>
<PublicKeyToken>31bf3856ad364e35</PublicKeyToken>
</Reference>
</References>
</Manifest>
<TypeDefinitions>
<EntityTypes>
<TypeProjections>
<TypeProjection ID="ContosoComputerAndPrimaryUserAndCustodian" Accessibility="Public" Type="CustomMicrosoft_Windows_Library!Microsoft.Windows.Computer">
<Component Path="$Context/Path[Relationship='CustomSystem_Library!System.ComputerPrimaryUser']$" Alias="PrimaryUser" />
<Component Path="$Context/Path[Relationship='CustomSystem_Library!System.ConfigItemOwnedByUser']$" Alias="Custodian" />
</TypeProjection>
</TypeProjections>
</EntityTypes>
</TypeDefinitions>
<LanguagePacks>
<LanguagePack ID="ENU" IsDefault="true">
<DisplayStrings>
<DisplayString ElementID="ContosoCustomComputerTypeProjectionMP">
<Name>Contoso Custom Computer Type Projection MP</Name>
</DisplayString>
<DisplayString ElementID="ContosoComputerAndPrimaryUserAndCustodian">
<Name>Computer (Primary User, Primary Owner Custodian)</Name>
<Description>Custom Type Projection showing Computer, Primary User and Custodian relationship</Description>
</DisplayString>
</DisplayStrings>
</LanguagePack>
</LanguagePacks>
</ManagementPack>
NOTE: If you don’t like what only can be described as the ’frankly brilliant’ name of Contoso in the MP, then you can do a find / replace and change that to a word or organization name of your choice.
Then once happy with the above, we save it as ContosoCustomComputerTypeProjectionMP.xml and then it can be opened up in the Authoring tool, ready for sealing. Note the filename needs to be the same as the ID.
Now you have your unsealed MP, you can take the above and seal it in the Authoring Tool (Hey it may not be the most joyous tool to use for customizing forms, but it makes sealing MPs a breeze  .
.
NOTE: Please ensure you have the right version of the Authoring Tool as there are different versions for 2012 RTM, 2012 SP1 and 2012 R2.
Note if you need to know more about sealing MPs and where to get the sn.exe tool, look at this blog post and search for sn.exe. If you want to know more about sealed and unsealed, take a look at what I like to call ‘War and Peace’ on MP best practice which can be found here
This is the command I ran in sn.exe to create my contoso.snk key:

Now we have our key:

Open up your xml MP in the Authoring Tool:

Once opened, you will find the seal option in the top left:

REMEMBER to change output directory as shown below – that one will catch you out at least once as it is not highlighted in red like Key File and Company

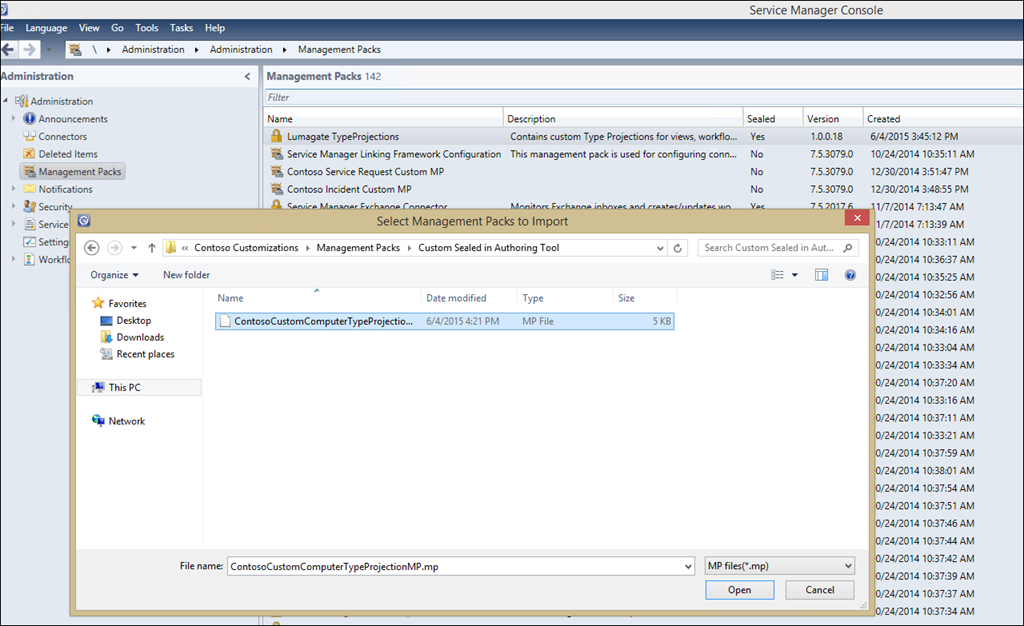
Now you have your Sealed MP, Import and remember to change the file type in the bottom right to MP files (*.mp):
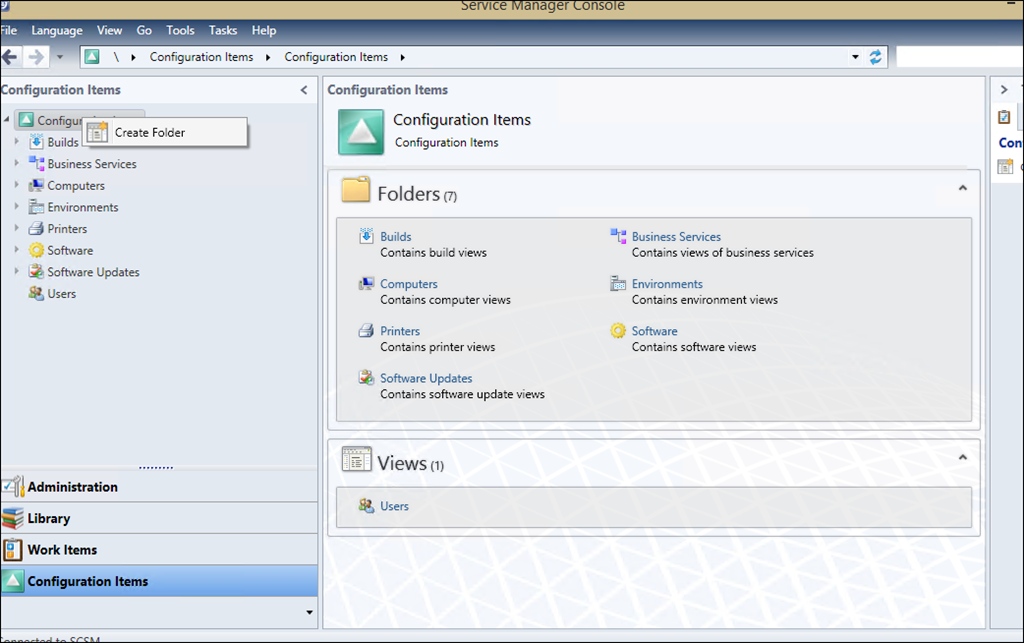
Next Create a Folder in the Configuration Itemsspace:
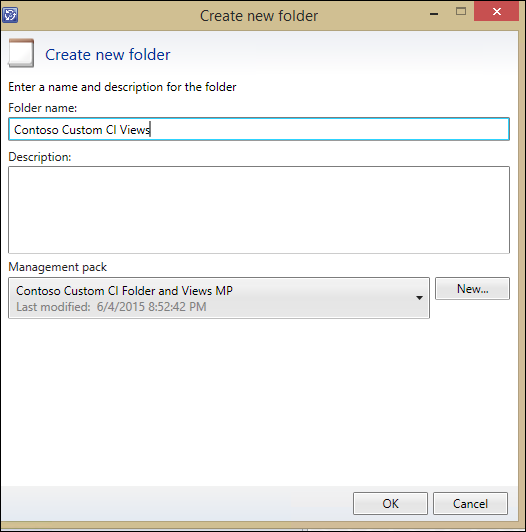
I recommend you create the folder in a new MP where we will store CI Folders and Views:
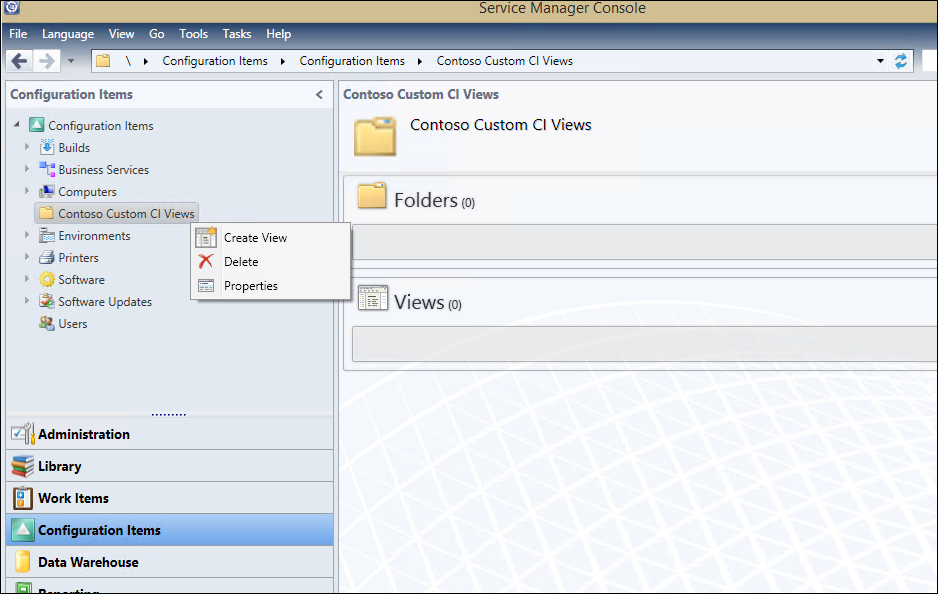
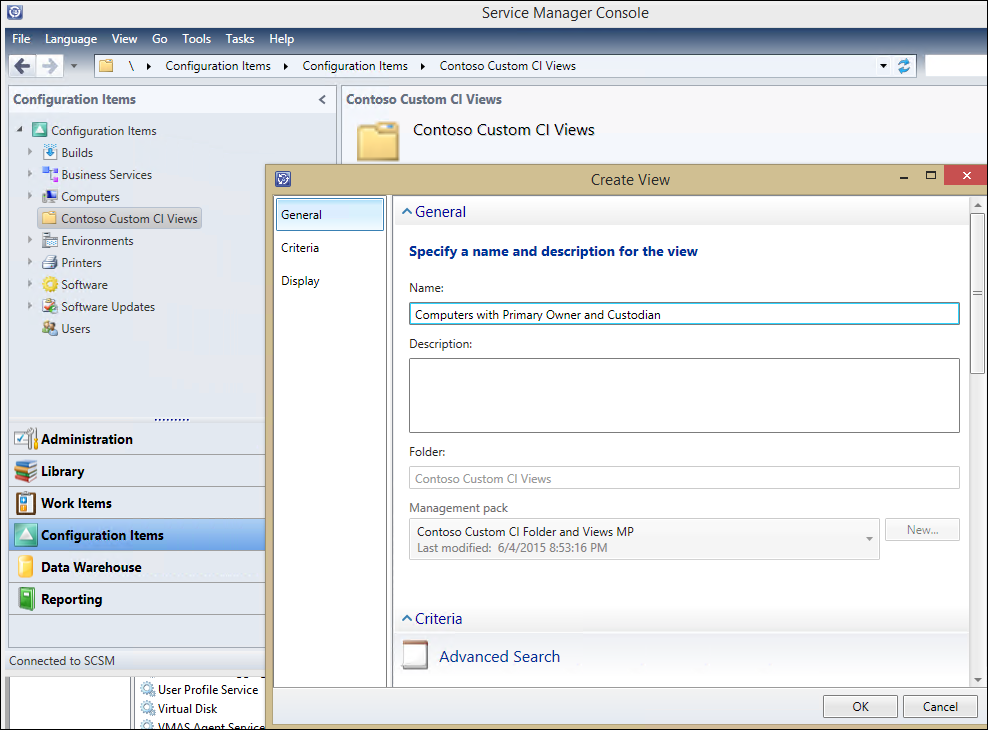
Next, Create the View:
You will need to store this in the same MP that you created the folder (there will be no choice)
Change ‘Frequently Used basic classes’ to ‘Combination Classes’ and now you should see your new Type Projection:

Now you will see Windows Computer with the 2 relationshipsthat we included in the type projection:

In the display tab, Select the properties from Windows Computerthat you want to include in the view:

Lower down in the display tab, you will find the related class propertiesand choose the ones you want from there:


Once created, your result should look something like this:

The one issue with this is that the label ‘Display Name’ shows twice in the column headers, which can be a little confusing, unless you created the view. Here are steps to change the column headers in the XML:
Changing View Column Headers
Use the following steps for changing View display headers:
(TIP: Some of our third parties and partners have released UI Add-ins, that allow you to change headers like this through the UI rather than having to change the xml)
Export the MP where you created your view and folder

Create a subfolder called backup, and save a copy into there, just in case you make a mistake when editing the XML.
Open up the xml in your text editor of choice:
1) Search from bottom of MP xml file for the display name of the view ( 'Computers with Primary Owner and Custodian' in my case)
2) Copy the View elementID
For instance:
<DisplayString ElementID="View.86cc80174bc9451b8a60d2461e419201">
<Name>Computers with Primary Owner and Custodian</Name>
</DisplayString>
3) From the top of the file, search for the View elementId (View.86cc80174bc9451b8a60d2461e419201) until you see View ID =“View.86cc80174bc9451b8a60d2461e419201” (will likely be the third hit if you search from the top) inside the Presentation>Views section:

Scroll down until you see the column headers:

4) Find the appropriate column and the respective DisplaynameID in the columns section:
<mux:Column Name="Custodian.DisplayName" DisplayMemberBinding="{Binding Path=Custodian.DisplayName, Mode=OneWay}" Width="100" DisplayName="DisplayName.bbbc2e3fea2b4dc6859e06084dd45406" Property="Custodian.DisplayName" DataType="s:String" />
<mux:Column Name="PrimaryUser.DisplayName" DisplayMemberBinding="{Binding Path=PrimaryUser.DisplayName, Mode=OneWay}" Width="100" DisplayName="DisplayName.5a097f20470b4c468826539e33522429" Property="PrimaryUser.DisplayName" DataType="s:String" />

5) Copy the display name and search from the bottom of the file for it
<DisplayString ElementID="DisplayName.bbbc2e3fea2b4dc6859e06084dd45406">
<Name>Display Name</Name>
<Description>Display name of the object.</Description>

6) Update the value ‘Display Name’ in between the <Name> tags to the display name you wish to see for the column header.
For example:

One last tweak is to make ‘office’ a little clearer, in that it is the office of the primary user, not necessarily the office where the computer is:

Increment the version in your MP in the Identity and category sections:


Optionally you could change the ID as described earlier in this blog too but if you do that, just remember to change the filename too to the same as the ID, and if you do that, Delete the current version of the MP from the SCSM console and close and re-open it, before importing this new version one.
Save your edited MP(We are leaving it as unsealed this time so we can make changes to it in the console later if we want to like adding fields etc.):

Import it into Service Manager

Close and Re-open your console
NOTE: Anything to do with views - adding / removing / changing columns - you normally have to close and re-open your console to see those changes take effect.
Now enjoy your Beautiful new view:

Some other related links you may like to check out on this:
https://scsmnz.net/type-projection-aliases/
https://blogs.technet.com/b/servicemanager/archive/2009/05/20/hacking-mp-xml-like-a-pro.aspx
Lumagate Type Projections MP: https://www.scsm.se/?p=1224