Deploying Windows 7
In the previous posts we discussed the path to deploying Windows 7, including application compatibility and image creation. In this post we’ll discuss the methods for deploying Windows 7 to clients.
First, let me explain the terms and tools you may have heard about. In the previous posts and other articles you will hear about the Windows Automated Installation Kit (AIK) for Windows 7 , and that the role this plays in the deployment process is primarily for tools. It is advertised as “tools and documentation”, and it does exactly what it says in that documentation. It’s also useful for low-volume deployments. The 3 scenarios within the documentation reflect this;
- Deploy from Media.
- Deploy from a Network.
- Deploy from a Server.
Unless you are performing the lowest of the low volume installs for example, a friend or families machine, you will need the WAIK.
Now, here’s the other tool you may read about, Microsoft Deployment Toolkit (MDT) 2010. The MDT is a solution accelerator and is different from the WAIK. So what does it provide? To quote a couple of paragraphs from the Windows 7 Resource kit, extracts of which can be download for free as an e-book,
“Microsoft Deployment Toolkit 2010 (MDT 2010) is a holistic approach to desktop deployment, bringing together the people, processes, and technology required to perform highly successful, repeatable, and consistent deployment projects….Although the Windows AIK 2.0 provides essential imaging tools, the Microsoft Deployment Toolkit (MDT) 2010 is a complete deployment framework that provides end-to-end guidance for planning, building, and deploying Windows 7 images. MDT 2010 takes full advantage of the Windows AIK 2.0”
So basically, WAIK provides the tools, and MDT takes those tools and reduces their complexity by integrating them into a wizard-based process. Now, how do you get Windows 7 onto a client? Let’s start with the basic scenario as scoped out in the WAIK and then we will build up and include the MDT.
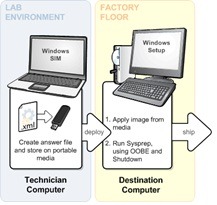
Install from Media.
 This is very straightforward and relies mainly on using the Windows 7 media to perform the install. Where this differs from say, installing a friend’s PC, is that the idea is to create a repeatable process. So the first step is to use the Windows System Image Manager (Windows SIM) tool within the WAIK to create what is called a configuration set. This set comprises an answer file and additional source files, such as custom drivers and applications, needed to complete your installation. You store this on removable media, such as a flash drive, insert it in the destination computer and boot from the media. Once installed, you use Sysprep to generalize the install ready for shipping. This method is very easy and straightforward, ideal for very low volume.
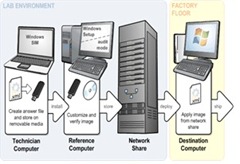
Installing from the Network
 Installing from the network has similarities with installing from media. You can use the Install from Media process to create the reference machine. At this point, instead of shipping the machine to the client you can customize the reference machine by installing applications for example. Once you are happy with the reference image, you simply use the capture tools in WAIK to copy the image to a network share. To install the image on a destination computer, boot that computer using Windows PE, connect to the share and use the image tool ImageX to apply the image. This is a little more hands on than the Media version, but you do get a much more customized image, and it can be quicker than installing from media. It is, however, the simplest network solution and does require hands on. As we move on you will be able to compare this to more automated deployments.
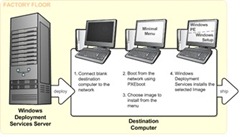
Deploy from Server
 Finally, the last scenario described in the WAIK is deployment from server. This scenario is more or less identical to the Network option above. The difference comes with the use of a server with the Windows Deployment Server (WDS) role installed. This role provides the ability to store images centrally and respond to client machine requests when booted using Pre-Boot Execution Environment (PXE). The client receives a menu showing them what images are available, they select the image and the installation proceeds. WDS provides the technology necessary to capture and remotely deploy custom operating system images. In some organizations this may be enough. What WDS does not provide is end-to-end technology or the guidance for high-volume deployment projects. It also does not provide tools or guidance for customizing the custom images you deploy with settings, applications, device drivers, and so on. Bridging this gap is where MDT 2010 comes in.
Using the Microsoft Deployment Toolkit 2010
 We have now covered the basic deployment scenarios, and we’ve also reached the limits of what the WAIK can do out of the box. So let’s discuss MDT and the functionality it brings. When I asked the Deployment team about this post and MDT they summed it up as, “It [MDT] is the integration of all disparate deployment and migration tools. It provides the glue to facilitate an end-to-end automated migration from Windows XP”.
The two major components MDT brings to the table are the documentation and the solution framework. The documentation has technical guides, references, and quick-start guides; the solution framework contains the files and tools that allow you to create highly customized deployments.
MDT supports 4 deployment scenarios:
- New Computer
- Upgrade Computer
- Refresh Computer
- Replace Computer
You can pick and choose the scenarios to use, and once chosen you have a choice of two deployment methods with MDT:
- Light Touch Installation (LTI) which requires just MDT 2010, WAIK, and potentially WDS. Everything you need to perform custom installs is then included with little or no infrastructure changes required.
- Zero Touch Installation (ZTI) requires MDT 2010 and WAIK as with LTI, but also System Center Configuration Manager 2007, and as such requires additional investment and infrastructure changes.
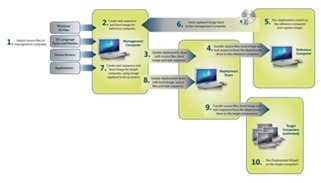
The initial process when using either LTI or ZTI is roughly the same, it’s also very similar to the process you would follow above when creating and deploying images from either a network location or from WDS.
- Collect the files necessary to perform a deployment, including:
- Windows operating system source files or images.
- Windows operating system language packs.
- Device drivers for reference and target computers.
- Create the system images, configuration settings, and task sequences to be used in deploying Windows and applications to the reference computers.
- Deploy the system images to the reference computer and capture an image of the reference computer.
- Create the configuration settings and task sequences that will deploy the captured images of the reference computers to the target computers.
- Deploy the captured images of the reference computers to the target computers.
What makes the MDT a must have for high-volume deployment scenarios is the inclusion of these scripts, and the wizard-based console. Together they take all the complexity out of the standard WAIK tools, and save you hours in building your deployment environment
Over the three posts we wanted to get over the massive changes there has been in the deployment resources and tools. We’ve covered the help available to plan deployments, how to get your applications to run on Windows 7, and the tools available to perform highly customized Windows 7 deployments of all sizes.