Setting up an ADFS environment - Part 2
This blog will build on my previous blog and walk you through the steps to getting your lab up and running.
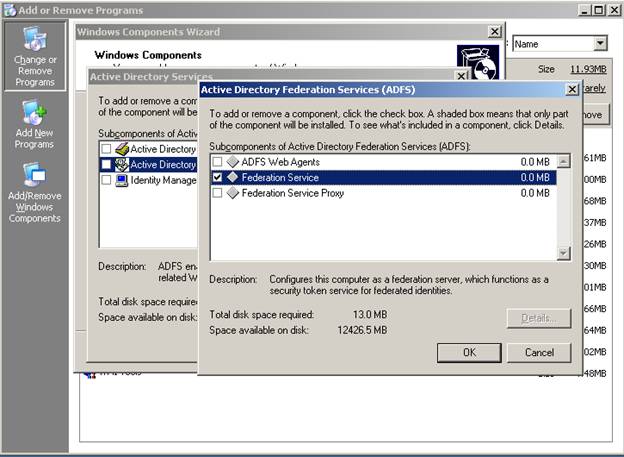
Let’s start on the Account side and install the Federation Server Service. Select add/remove programs, windows components, details of Active Directory Federated Services, then check the Federation Server checkbox
Setup does a check to make sure SSL has been enabled on the web site, then it will prompt you to select a token signing certificate and select an Trust Policy or create a new one.
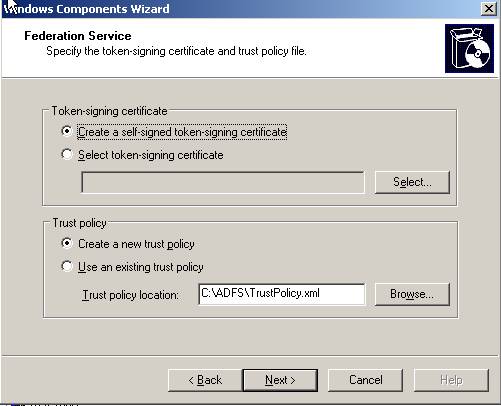
Instead of having setup create a self-signed token signing certificate (the default) – Choose “Select token-signing certificate” and hit the Select button
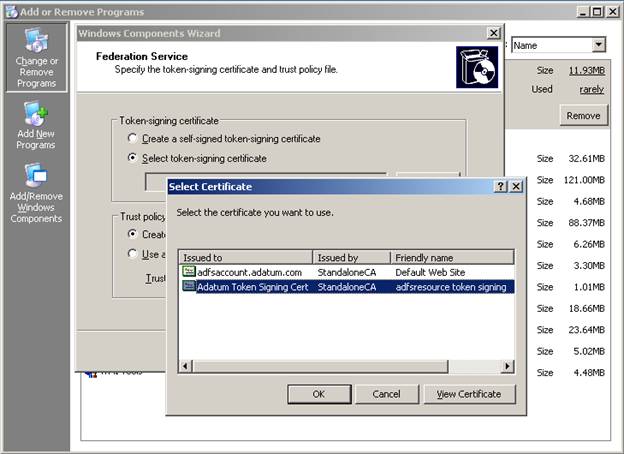
The select certificate dialog appears and displays the local computer personal certificate store. The Token signing certificate you downloaded and installed previously will be listed along with your SSL certificate for IIS. Choose the token signing certificate and complete the installation.
Repeat these steps on ADFSRESOURCE (the FS-R) and get it to same place.
Launch the ADFS snap-in (start/run/adfs.msc – or find it in the administrative tools folder). On both servers, we should now have the Federation Service installed and ready to begin the process of creating a Federation trust between the organizations.
I will start the configuration on the FS-A again and configure the information to reflect Adatum.
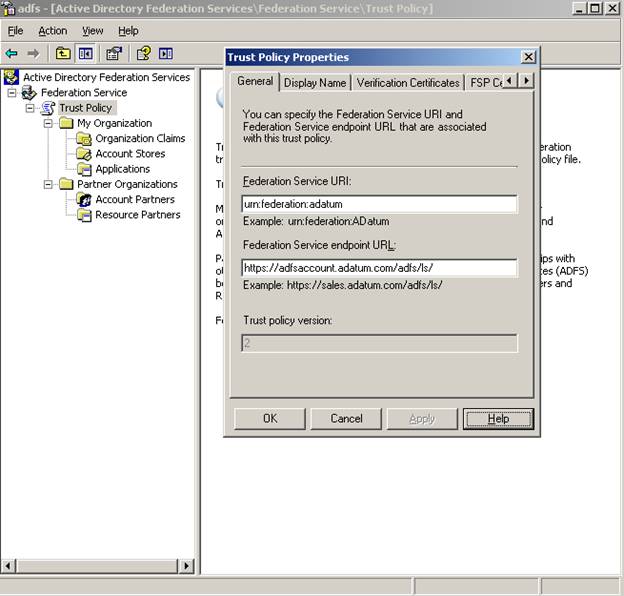
Right click on the Trust Policy node and choose properties. The general tab has two items of information which we will fill in to reflect “My Organization”
I recommend that you make all entries in lower case and keep the URI something short and meaningful.
Change the Federation Service URI to urn:federation:adatum
Change the Federation Service URL to https://adfsaccount.adatum.com/adfs/ls/
The display name tab can be changed if you wish. If you review the Verification Certificate tab, you will notice the same Token Signing Certificate you selected at setup is present. Each Federation Server will have a Token Signing certificate and this certificate will automatically be added to the list of verification certificates on the Trust Policy level.
Switch to the Resource side and perform the same steps on the FS-R. Populate it with the following information:
Change the Federation Service URI to urn:federation:treyresearch
Change the Federation Service URL to https://adfsresource.treyresearch.net/adfs/ls/
The next step is to configure an Account Store on the FS-A
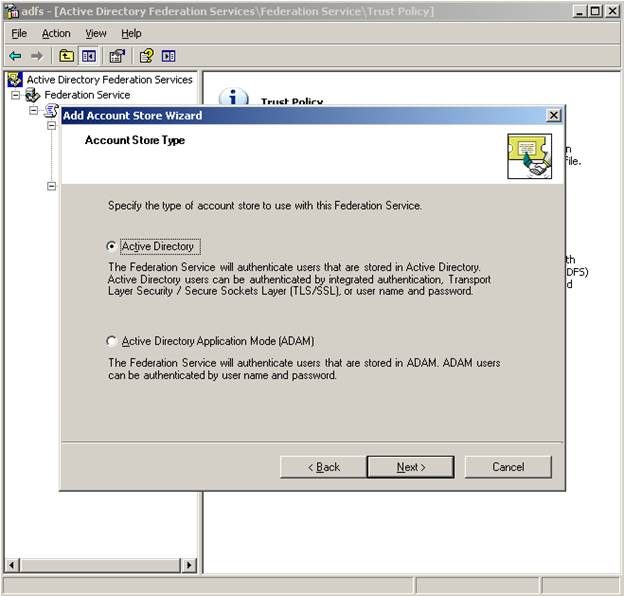
On your FS-A, right click on the Account Stores node under My Organization and choose New – Account Store. This will launch the Add Account Store Wizard. This lab example will use an Active Directory Account Store (ADAM as an account store is worthy of a different blog)
There isn’t any configuration left to do here so just hit next and complete the wizard.
We are now ready to complete the federation trust by using the import/export feature. I recommend you use this feature as it will eliminate any typo’s or mismatches that are common to initial installations of ADFS.
Start on the FS-A and right click the Trust Policy Node – choose Export Policy from the menu. I’m going to put it in my c:\certs folder (I know it’s not a certificate – just trying to keep things organized) and name it something descriptive.
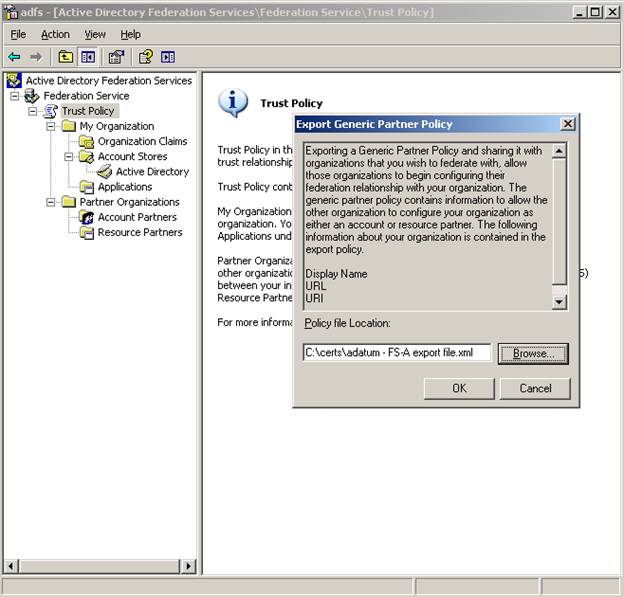
Notice the description of the Export Generic Partner Policy dialog – it tells you the following information is contained in the file:
Display Name, URL, URI, and Verification Certificate
It’s not a ton of information and it won’t help you import any claims you may configure (we will have to wait for the next version to get more options on import/export). But this does ensure the correct certificate is brought over and also URI and URL are usual suspects when initial setup doesn’t work. It really is a better way to go.
Repeat the export process on the FS-R and then copy each export file to the partner machine. The FS-A should have the “Treyresearch-FS-R export file.xml” and the FS-R should have the “Adatum-FS-A export file.xml” locally
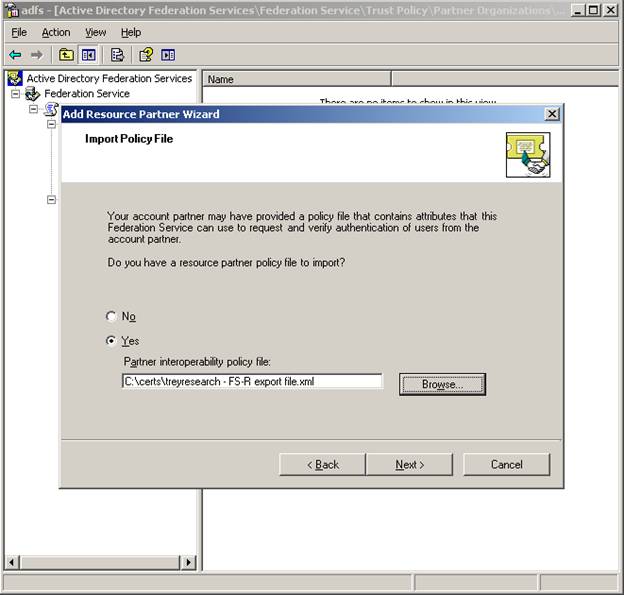
On the account side (FS-A) , expand and right click and choose new – resource partner. The Add Resource Partners wizard appears. The first page gives the option to import a Parnter interoperability policy file
On the next page – choose Federated Web SSO

Notice how you have two options – Federated Web SSO and Federated Web SSO with Forest Trust. There are three scenarios you can setup ADFS in. Federated Web SSO, Federated Web SSO, and Web SSO. The WebSSO scenario would only involve a single company – therefore, you would never add a partner in this scenario.
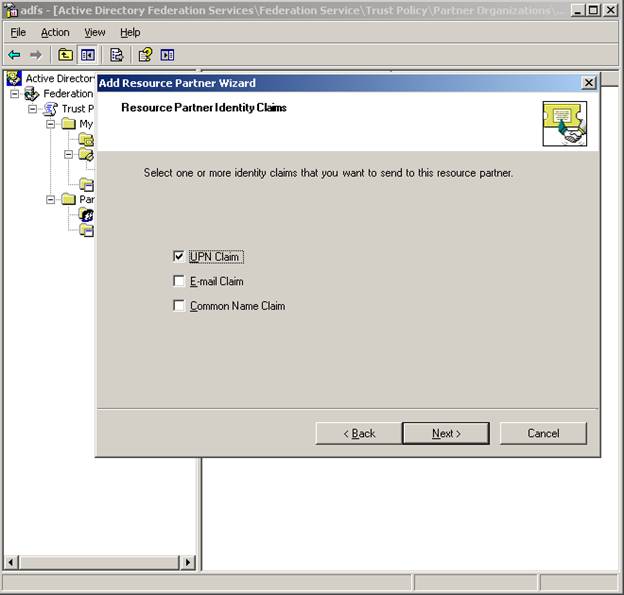
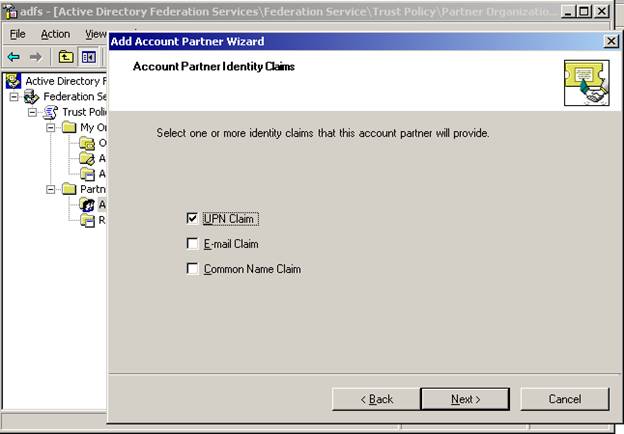
Next – select UPN as the identity claim you wish to send (these can be changed later – for now, just choose UPN)
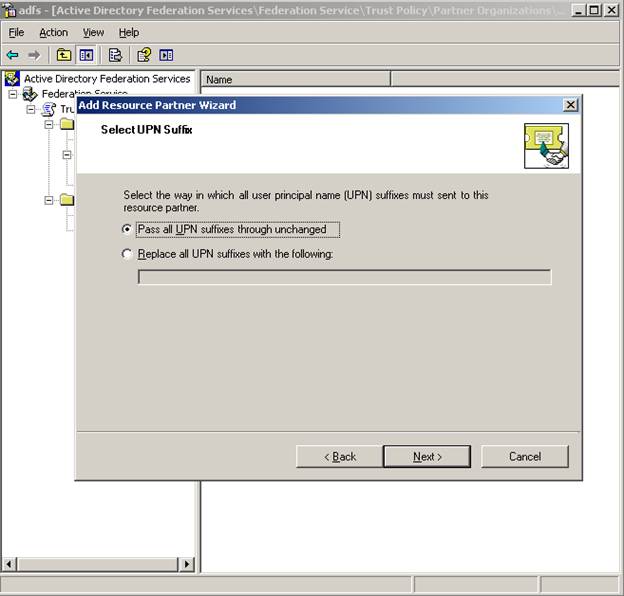
Let’s pass all UPN suffixes unchanged to the partner (again, we can change this later)
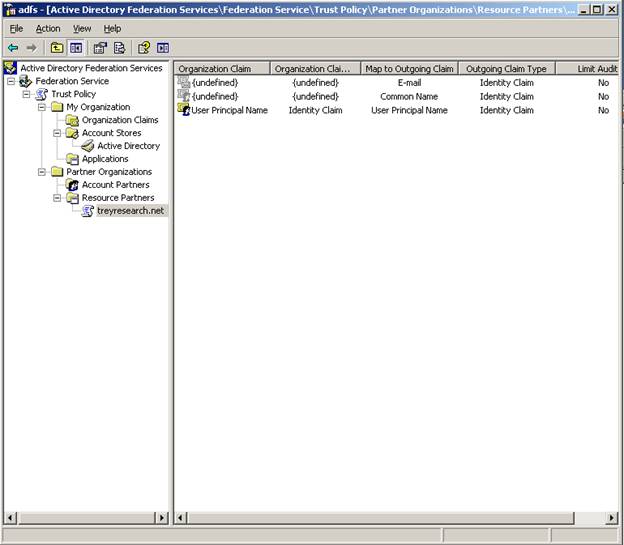
Keep the default to enable this partner and finish the wizard. Your account side ADFS snap-in should look like this:
Now – we will visit the Resource side (FS-R) and import the account partner with the file we copied over earlier.
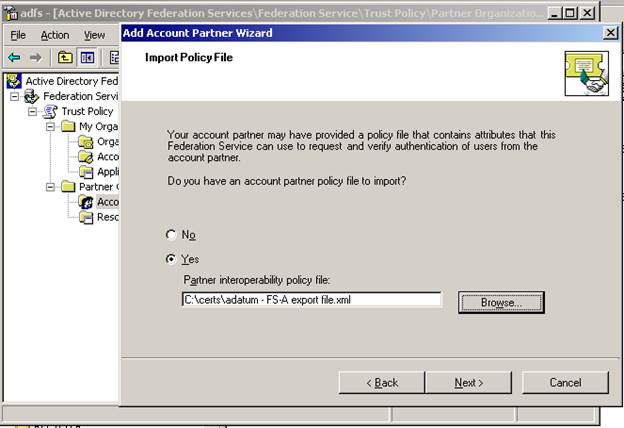
Right click the Account Partner node under Partner Organizations and choose New – this will launch the Add Account Partner Wizard. Browse to the export file on when prompted.
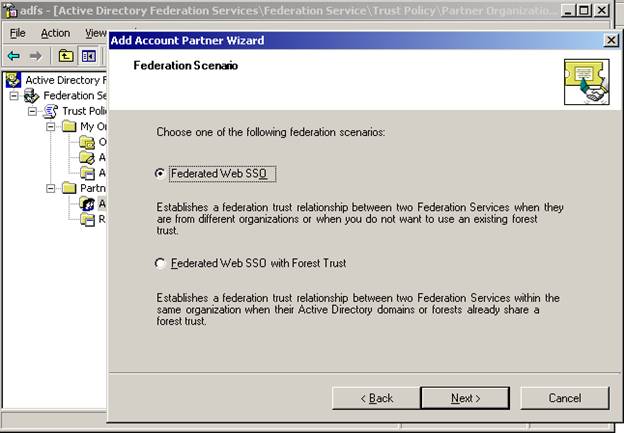
Again – choose Federated Web SSO as the scenario
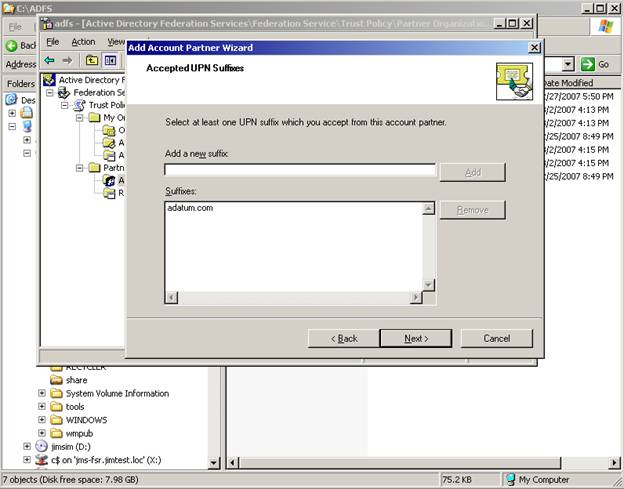
On the Accepted UPN suffix tab – we will enter adatum.com and choose add
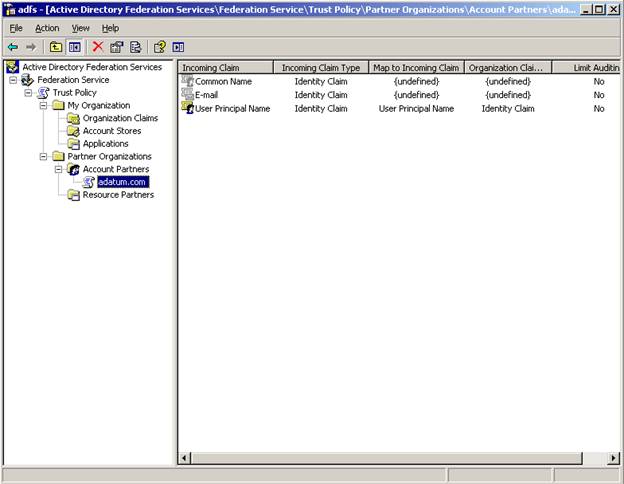
Choose next, enable the application, and complete the wizard. Your ADFS snap-in on the Resource side should look like this:
At this stage we have the Federation Trust established between the two organizations. Our next task is to configure an application on the resource side and “federate it” to users on the account side.
I know I said that I would do this in two steps – but this document has been just sitting here for quite some time - Part 3 (later) will wrap it up with the application installation/configuration.
The federation trust between partners is now established – the rest is fairly easy.
The reason I’m stopping here and posting this – is mainly to clear the way for a new project (which is almost fully understood!)
I will get the steps needed to setup/configure SQL Reporting Services and use ADFS on the SSRS site. We have been heads down on this for a while now – and today we finally made some real progress!
Since my lab environment is already setup – I can get some screen shots and show you all the places to go to install/configure this.