Installing MOSS as a claims aware application in ADFS
Hi, this is Jim Simonet from the Enterprise Platform Support team and Steve Peschka from the SharePoint Ranger team. In this blog we’re going to talk about how to configure Active Directory Federated Services (ADFS) with SharePoint 2007. We have actually been working on this document for a few weeks now. The TechNet team has leveraged this document and will be publishing their content very soon. There are a few screen shots in this doc that couldn’t make it into the Technet document, also the format and order of steps will be slightly different.
Prior to beginning this blog, you should read a couple of related materials. They contain content that is too verbose to include here, but that will be valuable in helping you understand the concepts presented here.
- Information about configuring the authentication provider in MOSS is here.
- This install guide is built with server names from the Adatum-Trey Research step-by-step guide for setting up ADFS in a small lab environment. In this example a new server named Trey-MOSS was joined to the Treyresearch forest instead of using ADFSWEB as described in the step-by-step document. You will need to follow the steps in this step-by-step guide to configure your ADFS infrastructure. SharePoint 2007 is a claims-aware application though, so you don’t need to implement all of the steps for building NT token agent applications. The new server, Trey-MOSS will need to be Windows Server 2003 R2 (STD or ENT) and will need to have the Claims Aware Web Agent installed.
In addition, before you start you need to download and install a hotfix for ADFS. Without this hotfix, the information below will not work. You can find information about this hotfix at https://support.microsoft.com/kb/920764/en-us.
The steps in this blog will help you configure MOSS with the WebSSO provider. It is setup in a typical Extranet scenario that Steve discusses in his blog.
The site will exist in two zones – the default zone and an extranet zone. The same content will be in both, but the intranet zone will use the Windows Authentication Provider and the Extranet zone will use the WebSSO provider.
- Install MOSS and successfully complete the Configuration Wizard
- Launch Sharepoint Central Admin Site
- From Application Management – choose Create or Extend Web Application,
- Choose Create a new web application. This is how the initial web application that uses Windows authentication will be created.
- Complete the steps in the page by extending the existing IIS web site on port 80.
- Choose Create or Extend Web Application again, this time choose Extend an existing Web Application
- Choose the web application you previously created using Windows authentication to extend
- Add a host header – this is the DNS name by which the site will be known to users in the Extranet (extranet.treyresearch.net)
- Change the zone to Extranet
- Select the radio button that says “Use Secure Sockets Layer (SSL)”, and change the port number to 443. ADFS will only work with a site that is configured to use SSL.
- Remove the “:443” text from the end of the “Load Balanced URL” edit box. IIS will automatically use port 443 since you specified the port number above.
- Complete the rest of the steps in the page and finish extending the web application
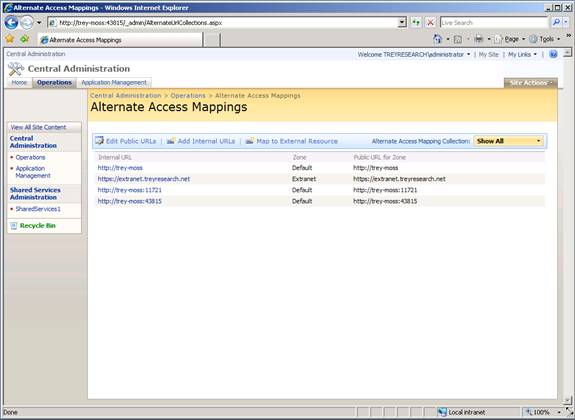
If you look at the Alternate Access Mappings (AAM) page it should look something like this:
Add an SSL certificate to the Extranet Web Site in IIS. Make sure this SSL certificate is issued to extranet.treyresearch.net – this is the name which will be used by the clients when accessing the sites. Here is an example of how the certificate looks:
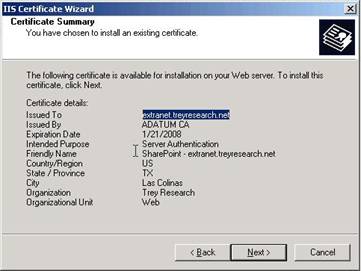
At this point – you should have a web site extended to the Extranet zone, a SSL certificate installed, and the AAM should show both the default Windows authentication site URL and Extranet zone SSL site URL.
Working with Groups
In SharePoint rights are typically provisioned using groups – Active Directory groups are added to SharePoint Site Groups. Those site groups have a set of permissions associated with them, so your membership in a given Active Directory and Site Group determines what rights you have within a site.
When you use ADFS as a role provider in SharePoint, the process needs to change. The reason for that is because there isn’t a way for the WebSSO provider to directly resolve an Active Directory group – instead it resolves membership through something in ADFS called Organizational Claims. You will need to do some work to create a set of Organizational Claims in ADFS that map to the SharePoint Site Groups into which you want to add users; you can then associate multiple Active Directory groups with an ADFS Organizational Claim on the account partner. The key take away here is – when you add permissions on SharePoint, you will add and associate Group Claims with the SharePoint Roles – not Windows Security Groups. This is very important to keep in mind as you go through the rest of the document.
Here is the process in ADFS for creating the new Organizational Claims and associating the account side Active Directory Groups with them:
In the Adatum Forest (Account Forest)
- Create a Windows Group called Trey MOSS Readers
- Create a Windows Group called Trey MOSS Contributors
- Add Alansh to the MOSS readers group and Adamcar to the contributors group
- Launch ADFS.MSC
- Create an Organizational Group Claim called Trey MOSS Readers
- Create an Organizational Group Claim called Trey MOSS Contributors
- Right click the Active Directory account store and choose New Group Claim Extraction
- Choose the Trey MOSS Readers Group Claim and associate it with the Trey MOSS Readers Windows Group
- Do another group claim extraction and associate the Contributor claim with the Contributor Group
- Right click the Trey Research Resource Partner and create the outgoing claim mappings
- Choose the Trey MOSS Reader claim and map to outgoing claim adatum-trey-readers
- Choose the Trey MOSS Contributor claim and map to outgoing claim adatum-trey-contributors
NOTE: The claim mapping names in step 8 must be agreed upon between the organizations and must match exactly.
On the Trey Research side – launch ADFS.MSC
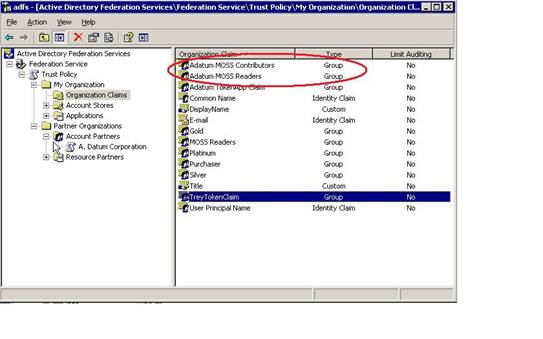
- Create an Organizational Group Claim called Adatum MOSS Readers
- Create an Organizational Group Claim called Adatum MOSS Contributors
- Create incoming group mappings for your claims
- Right click the Adatum account partner and choose Incoming Group Claim Mapping
- Choose Adatum MOSS Readers and map it to incoming claim name adatum-trey-readers
- Choose Adatum MOSS Contributors and map it to incoming claim name adatum-trey-contributors
- Enable the claims for the MOSS application
- Click on the MOSS application – right click and choose enable on both the Reader and Contributor claims
Now we are ready to modify SharePoint so that we will be able to add the Claims to the Extranet site that has been extended
Change the web.config on the Central admin site and web.config on the Sharepoint 80 (Windows Authentication site)
In both web.config files add this section directly below the <authentication mode> section
<membership>
<providers>
<add name="SingleSignOnMembershipProvider2" type="System.Web.Security.SingleSignOn.SingleSignOnMembershipProvider2, System.Web.Security.SingleSignOn.PartialTrust, Version=1.0.0.0, Culture=neutral, PublicKeyToken=31bf3856ad364e35" fs="https://fs-server/adfs/fs/federationserverservice.asmx" />
</providers>
</membership>
<roleManager enabled="true" defaultProvider="AspNetWindowsTokenRoleProvider">
<providers>
<remove name="AspNetSqlRoleProvider" /> <add name="SingleSignOnRoleProvider2" type="System.Web.Security.SingleSignOn.SingleSignOnRoleProvider2, System.Web.Security.SingleSignOn.PartialTrust, Version=1.0.0.0, Culture=neutral, PublicKeyToken=31bf3856ad364e35" fs="https://fs-server/adfs/fs/federationserverservice.asmx" />
</providers>
</roleManager>
Change fs-server to reflect your resource Federation Server (i.e. adfsresource.treyresearch.net) and take note of the membership provider and role provider names because you will need to add these exact names on the Central Admin Page.
This change is necessary so that the web sites can resolve users and groups using the WebSSO/ADFS provider. One of the reasons you may do this is to be able to configure Policies for the web application for different ADFS users and groups, or for users that are authenticating with Windows to be able to provision permissions for ADFS users. One thing to note in the example above, since both of these sites using Windows authentication, they always use Windows authentication for the role provider -- that’s why the AspNetWindowsTokenRoleProvider is set as the default role provider.
Configure the Authentication provider for the extranet web application to use WebSSO.
Open your browser and navigate to the Central Administration site, click on Application Management and then on Authentication Providers. Make sure that you are working on the web application for which you wish to enable WebSSO.
You should see a list of two zones that are mapped for this web application; both should say Windows. Click on the link that says Windows for the web application in the Extranet zone and do the following:
- In the Authentication Type section, click on the Web Single Sign On radio button. The page will post back and expose two new edit boxes.
- In the Membership provider name edit box, type in the name of your web application’s Membership provider for the current zone. That is the name attribute value that was highlighted in the Membership element (SingleSignOnMembershipProvider2)
- In the Role manager name edit box, type in the name of your web application’s Role provider. That is the value that was highlighted in the name attribute value of the roleManager element (SingleSignOnRoleProvider2)
- Click the Save button.
Modify the web.config file for the Extranet site:
Add the following entry within the <configSections> node
<sectionGroup name="system.web">
<section name="websso" type="System.Web.Security.SingleSignOn.WebSsoConfigurationHandler, System.Web.Security.SingleSignOn, Version=1.0.0.0, Culture=neutral, PublicKeyToken=31bf3856ad364e35, Custom=null" />
</sectionGroup>
Add the following entry to the <httpModules> node
<add name="Identity Federation Services Application Authentication Module" type="System.Web.Security.SingleSignOn.WebSsoAuthenticationModule, System.Web.Security.SingleSignOn, Version=1.0.0.0, Culture=neutral, PublicKeyToken=31bf3856ad364e35, Custom=null" />
The ADFS authentication module should always be specified after the sharepoint SPRequest module in the in the <httpModules> section of the web.config file. It is safest to add it as the last entry in that section.
Add the following entry to the directly after the <authentication mode> node
<membership defaultProvider="SingleSignOnMembershipProvider2">
<providers>
<add name="SingleSignOnMembershipProvider2" type="System.Web.Security.SingleSignOn.SingleSignOnMembershipProvider2, System.Web.Security.SingleSignOn.PartialTrust, Version=1.0.0.0, Culture=neutral, PublicKeyToken=31bf3856ad364e35" fs="https://fs-server/adfs/fs/federationserverservice.asmx" />
</providers>
</membership>
<roleManager enabled="true" defaultProvider="SingleSignOnRoleProvider2">
<providers>
<add name="SingleSignOnRoleProvider2" type="System.Web.Security.SingleSignOn.SingleSignOnRoleProvider2, System.Web.Security.SingleSignOn.PartialTrust, Version=1.0.0.0, Culture=neutral, PublicKeyToken=31bf3856ad364e35" fs="https://fs-server/adfs/fs/federationserverservice.asmx" />
</providers>
</roleManager>
<websso>
<authenticationrequired />
<auditlevel>55</auditlevel>
<urls>
<returnurl>https://your_application</returnurl>
</urls>
<fs>https://fs-server/adfs/fs/federationserverservice.asmx</fs>
<isSharePoint />
</websso>
Change the fs-server to your resource Federation Server (i.e. adfsresource.treyresearch.net) and change your_application to reflect your application. Your application is going to be the MOSS URL that Federated Users will access. In this example, we will change this to https://extranet.treyresearch.net
Modify the Windows authentication web site so ADFS users can be granted rights to the site collection
There are two ways in which you can grant rights to ADFS users into the SharePoint site; one is by using a Policy. In this case, we are not going to use that method for a couple of reasons:
- Granting rights by policy is a very coarse operation. It would allow the user (or group) to have the same set of rights in every web site, in every site collection, in the entire web application. It should be used very judiciously, and in this particular scenario we can grant access to ADFS users without resorting to this method
- Once the site(s) are in use, in an extranet scenario it is quite likely that the internal users will be responsible for granting access to sites and content. For that to happen, one of two things needs to happen – either those users need to be given an ADFS login name or they need to be able to select ADFS users and Organizational Claims (analogous to Active Directory groups) from the Windows site. Obviously, it makes the most sense for the Windows users to continue to be able to use their existing credentials, rather than provision a new identity for Windows users – that would essentially defeat the purpose of supporting Windows authentication users.
This is also an opportunity to explore one of the neat features about SharePoint related to security. As you extend web applications with different providers, you can configure one or all of them to be able to find user and groups from providers you are using. So in this scenario, we are going to configure our site that uses Windows authentication, and let users of that site be able to select other Windows users, Windows groups, and ADFS Organizational Claims all from one site.
In order to do that, the Windows site has to “know” about the other providers it can use. The way to do that is to edit the web.config file for the Windows site. Those are the steps already completed and covered above in the section titled Change the web.config on the Central admin site and web.config on the Sharepoint 80 (Windows Authentication site) .
Now you can add ADFS Claims to SharePoint site groups so that federated users have access to the site. Start by navigating to the Windows authentication site as an account that has administrative rights in there. Click on Site Settings, People and Groups. You will see a list of the SharePoint site groups.
Remember at the beginning of this document – you created a couple of Organizational Group Claims on Treyresearch
<snip>
On the Trey Research side – launch ADFS.MSC
- Create an Organizational Group Claim called Adatum MOSS Readers
- Create an Organizational Group Claim called Adatum MOSS Contributors
</snip>
You can click on any of the Sharepoint groups, and then click on the Add button. Use the People Picker to type in the name of any ADFS Organization Group Claims that you want to add to the group and click the OK button. Those ADFS users will now be able to access the site via the external https URL. The People Picker will not do wildcard searches for the claims – so type the claim in here exactly as you typed it in while creating the claim in ADFS.
Browse to the https://extranet.treyresearch.net web site as an ADFS user you added to a SharePoint Site Group in the previous section. You should be able to authenticate to and see the site.
One gotcha that came up from the review process...If you install SharePoint with a domain service account running the Application Pool, this domain service account must be granted the “generate security audit” user right for ADFS to function properly.