Publishing Office Web Apps Server in Lync Server 2013 using F5 Local Traffic Manager (LTM)
This article provides step-by-step instructions on how to publish Office Web Apps Server in Lync Server 2013 for external meeting participants (that is, users joining Lync meetings from outside your organization's firewall) using F5's BIG-IP LTM. There is an iApp template for Office Web Apps Server that you can use, but in some cases, it's necessary to set it up manually.
Before we can start working with BIG-IP LTM, we need to know the external URL used by the Office Web Apps Server farm.
Below is the Office Web Apps Server farm settings in my lab:

You must use the FQDN published under "InternalURL" when configuring Office Web Apps Server though the Topology Builder:

Initially, I wasn't sure as to which URL was needed to be published in Lync topology, but I soon found that the external participants are provided with the "ExernalURL" configured in the Office Web Apps Server farm in order to view the PowerPoint presentation. The "ExernalURL" DOES NOT need to be published in Lync topology. However, you have to make sure to create a DNS (A) record for the external URL and that it's pointing to the reverse proxy IP address.

In my lab environment, owaext.acme.com is the external URL that needs to be published through the reverse proxy using F5 BIG-IP LTM.
These are the steps involved in configuring BIG-IP LTM as a Lync Reverse Proxy:
- Creating a new server-side (LAN) TCP profile
- Creating a new client-side (WAN) TCP profile
- Importing Office Web Apps Server certificate
- Creating a new SSL Server profile
- Creating a new SSL Client profile
- Creating a new HTTPs Monitor
- Creating a new Lync Front End Pool
- Creating a new Cookie Persistence profile
- Creating a new Source Address Persistence profile
- Creating a new Virtual Server
1. Create a new server-side (LAN) TCP profile
1.1 From the main menu, navigate to Local Traffic – Virtual Servers – Profiles – Protocol – TCP
1.2 Click Create on the top right
1.3 Type in the name of the profile (e.g., Lync_WAC_tcp_lan)
1.4 Select tcp-lan-optimized as the Parent Profile
Note: This will import all the values from the tcp-lan-optimized baseline(parent) profile.
1.5 Click Repeat at the bottom of the screen

2. Create a new client-side (WAN) TCP profile
2.1 Type in the name of the profile (e.g., Lync_WAC_tcp_wan)
2.2 Select tcp-wan-optimized as the Parent Profile
Note: This will import all the values from the tcp-wan-optimized baseline(parent) profile.
2.3 Click Finished at the bottom of the screen

3. Create a new HTTP profile
3.1 From the main menu, navigate to Local Traffic – Virtual Servers – Profiles – Services – HTTP
3.2 Click Create on the top right
3.3 Type in the name of the profile (e.g., Lync_WAC_http)
3.4 Select http as the Parent Profile
Note: This will import all the values from the http baseline(parent) profile.
3.5 Check the Custom box on the top right
3.6 Change the Redirect Rewrite value from None to Matching
3.7 Click Finished at the bottom of the screen

4. Import Office Web Apps Server certificate
4.1 From the main menu, navigate to System – File Management – SSL Certificate List
4.2 Click Import on the top right
4.3 Select PKCS 12 (IIS) as the Import Type
4.4 Type in the certificate name (e.g., wacext_acme.com)
4.5 Click Browse to locate the certificate/private key (.pfk file) that you exported from the Office Web Apps Server
4.6 Enter the password
4.7 Click Import to complete the importing process

5. Create a new SSL Server profile
5.1 From the main menu, navigate to Local Traffic – Virtual Servers – Profiles – SSL – Server
5.2. Click Create on the top right
5.3 Type in the name of the profile
5.4 Select serverssl as the Parent Profile
Note: This will import/keep all the values from the serverssl baseline(parent) profile.
5.5 Click Finished at the bottom of the screen

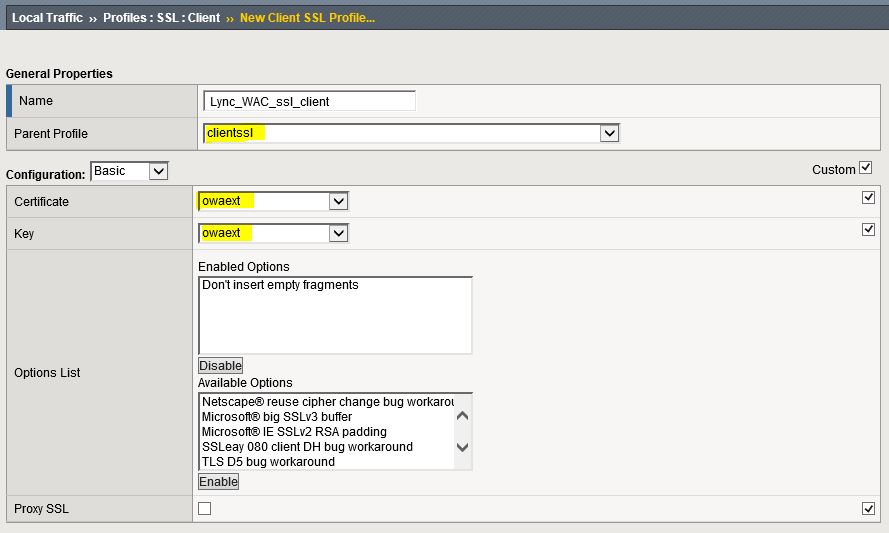
6. Create a new SSL Client profile
6.1 From the main menu, navigate to Local Traffic – Virtual Servers – Profiles – SSL – Client
6.2 Click Create on the top right
6.3 Type in the name of the profile
6.4. Select clientssl as the Parent Profile
Note: This will import/keep all the values from the clientssl baseline(parent) profile.
6.5 Check the Custom box on the top right
6.6 Select the certificate and key that you imported in Step 4
6.7 Click Finished at the bottom of the screen
7. Create a new HTTPS monitor
7.1 From the main menu, navigate to Local Traffic – Monitors
7.2. Click Create on the top right
7.3 Type in the name of the profile
6.4 Select HTTPS as the Type and https as the Parent Monitor
Note: This will import/keep all the values from the https baseline(parent) monitor.
7.5 Enter 30 secondsfor the Interval
7.6 Enter 91 secondsfor the Interval
7.7 Enter GET /hosting/discovery HTTP/1.1\r\nHost: owaext.acme.com\r\nConnection: Close\r\n\r\n for the Send String
7.8 Enter wopi-discovery for the Receive String
7.9 Click Finished at the bottom of the screen

8. Create a new Pool
8.1 From the main menu, navigate to Local Traffic – Virtual Servers – Pools – Pool List
8.2 Click Create on the top right
8.3 Type in the name of the pool (e.g., Lync_WAC_pool)
8.4 Select the Health Monitor that you created in Step 7 and move it over to Active
8.5 Select Least Connections (member) as the Load Balancing Method
Note: The Least Connections load balancing method determines the member/node with the least connections to pass the service request. Thus, the service requests are evenly distributed among poor members. This method is recommended for supporting long-lived connections.
8.6 Select Node List to see the list of available nodes (click New Node and enter the IP address of each Office Web Apps Server if the servers are not in the list)
8.7 Select the IP address of each Office Web Apps Server
8.8 Enter 443 as the Service Port and click Add
8.9 Click Finished at the bottom of the screen once all the servers have been added

9. Create a new Cookie Persistent profile
9.1 From the main menu, navigate to Local Traffic – Virtual Servers – Profiles – Persistence
9.2. Click Create on the top right
9.3 Type in the name of the profile
9.4 Select Cookie as the Persistent Type
9.4 Select cookie as the Parent Profile
Note: This will import/keep all the values from the cookie baseline(parent) profile.
9.5 Click Finished at the bottom of the screen

10. Create a new Source Address Persistent profile
10.1 From the main menu, navigate to Local Traffic – Virtual Servers – Profiles – Persistence
10.2 Click Create on the top right
10.3 Type in the name of the profile
10.4 Select Source Address Affinity as the Persistent Type
10.4 Select source_addr as the Parent Profile
Note: This will import/keep all the values from the source_addr baseline(parent) profile.
10.5 Click Finished at the bottom of the screen

11. Create a new Virtual Server
11.1 From the main menu, navigate to Local Traffic – Virtual Servers – Virtual Server List
11.2 Click Create on the top right
11.3 Type in the name of the virtual server (e.g., Lync_WAC_vs)
11.4 Select Host as the Destination Type
11.5 Enter the IP address of the external URL
11.6 Enter 443 as the Service Port
11.7 From Configuration, select Advanced
11.8 Select the TCP client profile that you created in Step 2 as the Protocol Profile (Client)
11.9 Select the TCP server profile that you created in Step 1 as the Protocol Profile (Client)
11.10 Select the SSL client profile that you created in Step 6 as the SSL Profile (Client)
11.11 Select the SSL server profile that you created in Step 5 as the SSL Profile (Server)
11.12 Select the HTTP profile that you created in Step 3 as the HTTP Profile
11.13 Select Auto Map for the Source Address Translation
11.14 From the Resources section, select the pool you previously created in Step 8 as the Default Pool
11.15 Select the Cookie Persistent profile that you created in Step 9 as the Default Persistent Profile
11.16 Select the Source Address profile that you created in Step 10 as the Fallback Persistence Profile
11.17 Click Finished at the bottom of the screen


Once all above steps have been completed, you can validate the configuration by navigating to the WOP URL: