Release Management Client Silent Installation and Automatic Configuration
There has been asks from customer on how to perform an unattended or silent installation of Release Management Client and get it automatically pre-configured with the desired Release Management server url without a need to launch Release Management client and feed the server url manually. Below are the steps which one can follow to get this done.
How to Perform an unattended/silent installation of Release Management Client
1. Download “Release Management for Visual Studio 2013 with Update 4 RTM” from your MSDN subscription using link
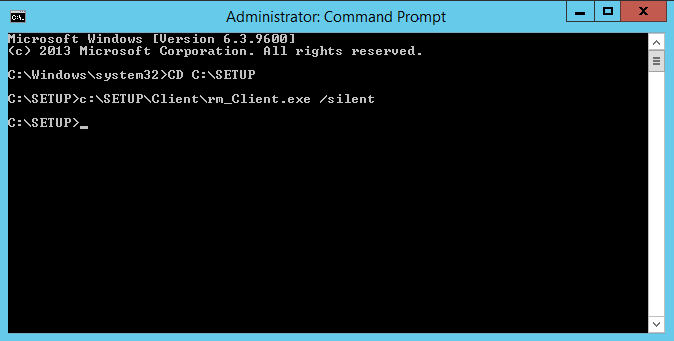
2. Launch admin command prompt and run below command
[PathToRMSetup]\rm_Client.exe /silent
How to Perform an unattended/silent installation of Release Management Client on large number of machines
1. Download “Release Management for Visual Studio 2013 with Update 4 RTM” from your MSDN subscription using link
2. Copy above setup on all remote machines where Release Management client installation is needed
a. Launch “Windows Powershell” as different user(user who has admin permissions on all desired remote machines)
b. Run below powershell command:-[ C:\setup in below command should be available on machine from where the command is being run]
foreach ($name in "Remote-Machine1",”Remote-Machine2") { Copy-Item "C:\setup" –Destination ” \\$name\c$" -Recurse -force }
3. Run below powershell command targeting multiple remote machines:-
foreach($name in "Remote-Machine1",”Remote-Machine2"){invoke-command -computername "$name" -scriptblock {&cmd.exe /c "C:\setup\rm_Client.exe /silent"}}
Note. The highlighted path is remote machine local path.
How to Automatically Pre Configure Release Management Client with desired Release Management Server
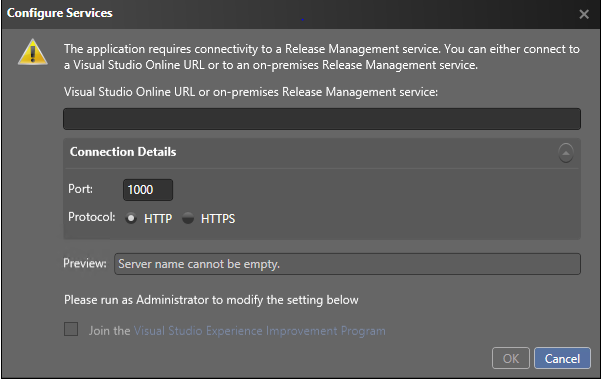
When user install Release Management Client and launch it for the first time, below client configuration UI is launched and user need to configure the client with Release Management server. If user wants to get it auto configured without doing it manually, below are the steps for it.
Steps
- Install Release Management Client
- Take backup & Edit "[ProgramFilesX86]\Microsoft Visual Studio 12.0\Release Management\Client\bin\Microsoft.TeamFoundation.Release.Data.dll.config"
a. Replace all instances of “https://localhost:[0-9]*/” with “https://[RMServerName]:[port]/”
b. Set highlighted value to False
<setting name="RequestServerLocation" serializeAs="String">
<value>True</value>
</setting>
c. Save the file
Note. You can use below powershell script to do edit the file as well rather than doing it manually
$configFile = Join-Path ([Environment]::GetFolderPath('ProgramFilesX86')) 'Microsoft Visual Studio 12.0\Release Management\Client\bin\Microsoft.TeamFoundation.Release.Data.dll.config'
(Get-Content $configFile) | ForEach-Object {$_ -replace "https://\w+:\d+/", 'https://hostname:port/'} | Set-Content $configFile
$xml = [XML](Get-Content $configFile)
$requestServerLocation = $xml.configuration.applicationSettings.'Microsoft.TeamFoundation.Release.Data.Properties.Settings'.ChildNodes | Where-Object { $_.name -eq 'RequestServerLocation' }
$requestServerLocation.value = 'false'
$xml.Save($configFile)
3. Launching client will auto connect with the specified RM server.
Note. You can edit one such file and push it in all machines where you installed RM Client
a. Launch Windows PowerShell as an user who has admin access on desired remote machines
foreach ($name in "Remote-Machine1",”Remote-Machine2"){ Copy-Item "C:\temp\Microsoft.TeamFoundation.Release.Data.dll.config" -Destination "\\$name\c$\Program Files (x86)\Microsoft Visual Studio 12.0\Release Management\Client\bin" -force -recurse}