Kubernetes - Overview
"Containerization of applications" undoubtedly is one of the most recurrent subjects discussed during meeting tables with customers. The reasons for this are clear. Just to mention some of those: infrastructure costs reduction, improvement on the applications maintenance process, division of system responsibilities in small and cooperative parts, more efficiency on the autoscaling process, etc. Of course there are many advantages to breaking applications in small parts and put it together running in containers, however, there problems too.
Orchestrate microservices distributed across containers inside a cluster isn't a easy task. There's a lot of technical challenges that rises from this scenarios and therefore, must be surpassed. Only to mention some of those, take a look in the following questions:
- What's is the best approach to dispatchcontainers?
- How can we scale containers in a dynamic way inside the cluster?
- How can we build an efective load balancing between containers inside a cluster?
- What's the best security model to be applied in container-based applications?
So, in order to help professionals and companies with demands regarding distributed environments based in containers, a lot of orchestrating solutions was developed. Currently are considered the majors:
- Kubernetes. Orchestrator built by Google engineers. The solution is almost a unanimity between professionals that has been working in a professional (production environments) way with containers. Kubernetes will be the technology target of our studies not only in this post, but along the entire posts serie.
- DC/OS. Orchestrator built by Apache Foundation. Robust solution, however, bring a great complexity and needs a lot of beside solutions to work appropriately. Used widely in professional environments container-based as well. To know more about DCOS, follow this link.
- Swarm. Orchestrator built and sustained by Docker. Whether compared with the other two ones, is the one that presents more simplicity regarding the management of the clustered environment itself. Swarm uses the same dictionary that Docker does, so, this is the "why" Swarm is considerable more easy to use. If you would like to learn more about Swarm, follow this link.
There's a lot of other orchestration mechanisms available in the market, however, this three are the most popular among them. Just as quick reminder: starting here (and along the entire posts serie), we will keep our focus exclusively in Kubernetes. We will pass through the plenty resources available in that solution in practical way. So, fasten your seat belt!
First things first, right? This way, today we will talk about what Kubernetes is, how it works, we'll understand what kind problems it solves and we'll configure our local environment to start with some "kidding". Let's go?
Why Kubernetes is so cool?
Scaling applications is the kind of task that, in general, the cloud platforms are currently solving very well with platform services (PaaS) or virtual machines (IaaS). However, in a container level, execute this task becomes a bit more complex. This is due the model through the container processes (sharing resources and generating coupling between the "containerized" applications, etc.). In addition, there are other issues, some of which we mentioned earlier in this post.
Kubernetes is very interesting because it provides efficient answers to each of these technical challenges and beyond, provides a very useful graphical interface for those professionals who prefer to monitor the behavior of the environment in a visual way. Some critical problems inherent to the cluster of containers solved by Kubernetes:
- Allows deploy of applications in Docker containers (but not restricted to it) in a efficient and easy way.
- Efficient auto-scaling across containers.
- Built-in features for updating existing applications.
- Debugging of applications already "containerized" in the cluster.
- Load balancing between equivalent containers.
An important concept at this point: Kubernetes implements all the mechanisms of high availability, isolation and high performance of traditional clusters but this time, applied to containers environment. This way, Kubernetes makes possible the creation of critical and highly concurrent environment (from the perspective of microservices, of course) 100% on top of containers. Not cool?
Another very interesting feature regarding Kubernetes: it implements a high level of abstraction. This abstraction (called Pods - don't worry, we'll talk about it with details in a future article) makes the containers completely independent of the machine node. Among the many other advantages, this approach makes ease having one container "see" the other (s) within the cluster.
Kubernetes is also open source and its code is available on GitHub: https://github.com/kubernetes/kubernetes.
How Kubernetes works?
A cluster managed by Kubernetes basically has two large operational units: Master and Nodes. Figure 1 presents a conceptual view of a cluster managed by Kubernetes.
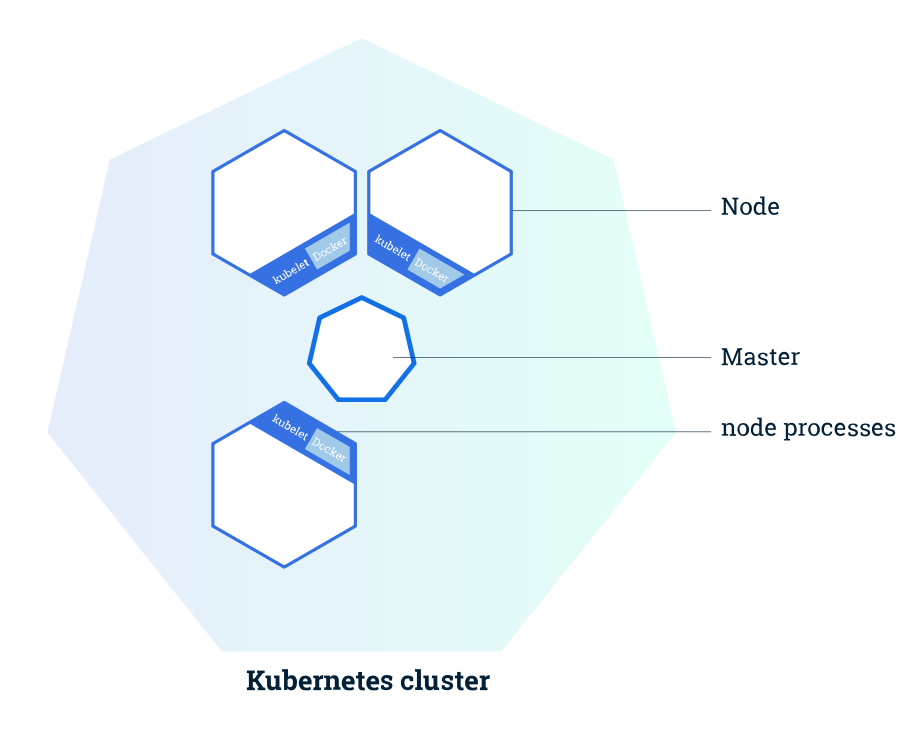
Figure 1. General view about Kubernetes cluster
The "Master" is the element in charge for orchestrating all activities related to containers that run on top of nodes. He is responsible, for example, for scheduling a requested deploy from a clustered application, obtaining information about nodes and pods, among many other occurrences.
"Nodes" are machines (which can be either physical or virtual) where effectively the containers managed by Kubernetes run. To be managed by Kubernetes (and therefore be part of the cluster), the nodes must "run" Kubernetes agents (or client extensions) in each instance. It is through this agent that all communication with the master is performed and as a consequence, cluster operations are performed.
It's important to mention that each node have at least two memory process:
- Kubelet (Kubernetes agent process).
- Docker (or other container hypervisor that you want).
We'll talk more about Kubelets in more detail soon, don't worry. The Figure 2 provides an overview of the master upgrade when a new container deployment is requested.
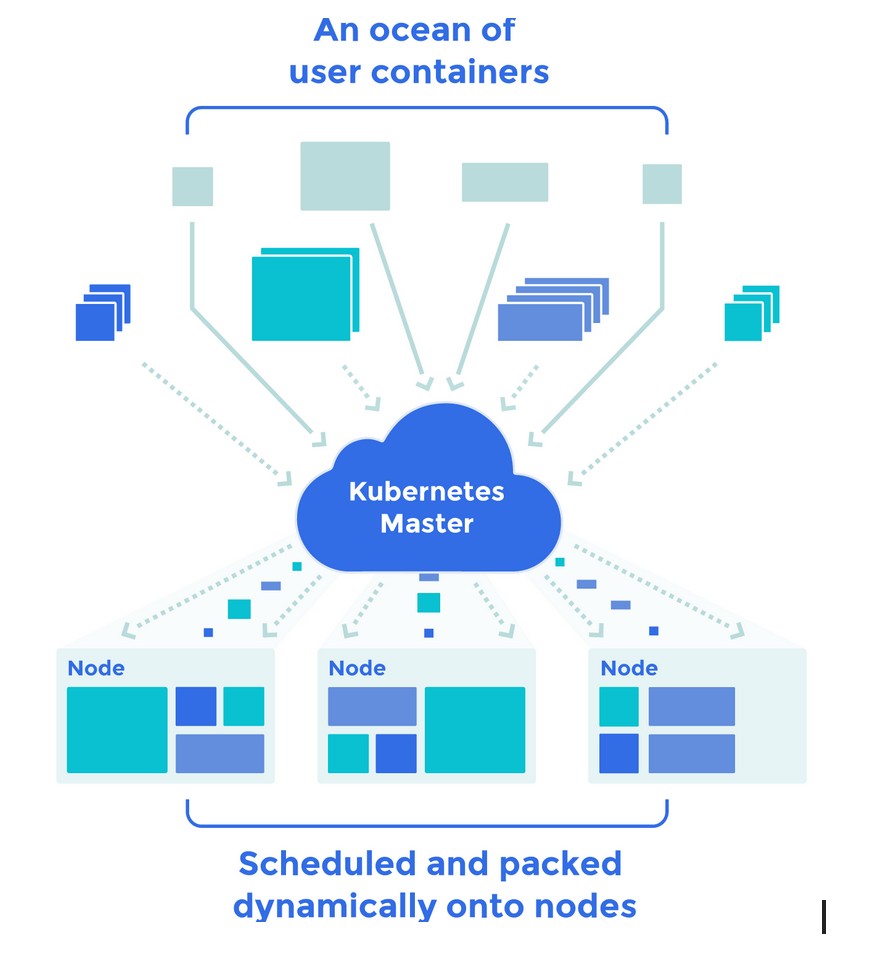
Figure 2. Containers being delivered by master on the cluster
In the figure above, each of the "rectangles" in olive green and with solid arrows pointing to the Kubernetes master, represents an containerized application that must be delivered in the cluster by the orchestrator. The colored rectangles pointing to the master with dotted arrows are the deployment requests that are made to the master. With these requests, the master is able, in a continuous deployment flow, to schedule the publishing process of the incoming containers.
After receiving the deployment request and indicating the containers, the master then schedules and synchronizes their publication in Pods on available nodes (yes, there is an availability check that is also performed by Kubernetes).
An important observation at this point: each cluster node communicates with the master by consuming a Kubernetes API exposed by master itself. Who connects to this API is the agent that runs on the node.
Preparing a local environment to run Kubernetes
As mentioned earlier, Kubernetes is a container orchestration solution that implements cluster behavior. As you already know, a cluster must necessarily have nodes (physical or virtual) below it. Only then, above these nodes, can we put the Kubernetes to run. In this way, we need to emulate a cluster-like environment on our local machine to perform the first tests with Kubernetes.
Disclaimer: the process described here will not work for virtualized environments. That's because Minikube does not support nested virtualization. If you running in a environment like this, you should check out another ways to install Kubernetes in your computer.
1. Minikube
In order to emulate such environment, we will use an open source solution called Minikube. Basically what it does is create a virtual cluster with only 1 node using Kubernetes on it to perform the management of the containers at local machine. We can say that Minikube is for the Kubernetes stack just as Lamp is for the PHP stack. Got it? Let's move forward.
2. Setting up Minikube
For this article I will use Linux Ubuntu 16.04 LTS as local operating system environment. If you prefer, you can use other operating environments such as Windows and Linux.
These are the minimum requirements for Minikube to work properly on Ubuntu:
- Mac
- VirtualBox or KVM installed.
- VT-x/AMD-v virtualization support must be enabled at BIOS.
kubectlmust be configured in your path. Currently Minikube does support any version ofkubectlas long this version is higher than 1.0, however, Minikube team's do recommend the last stable version. You can install kubectl in your computer as pre-req following this steps.- Robust internet connection (remember: you'll need to execute images pulling from Docker Hub or other private registry if you do prefer).
3. Installing KVM
Let's start with the KVM installation process on local machine. I'll start verifying if my machine has the virtualization features described in the earlier pre-req list enabled. I'll do that running the command presented by listing 1. If the answer to execution to this command is the number "0" it means that features are not available. If the response is the number "2" , it means that these features are available and enabled.
egrep -c ‘(svm|vmx)’ /proc/cpuinfo
Listing 1. Verifying if virtualization support is enabled on local machine
In order to install KVM and associated packages, run the command presented by Listing 2.
sudo apt-get install qemu-kvm libvirt-bin bridge-utils virt-manager
Listing 2. Installing KVM on Ubuntu
Only admin users in "libvirtd" group has permission to manipulate KVM (creating VMs, etc.). In a general way, when KVM installs, the installation process automatically adds the current user as admin in that group, however, if you would like to add another user as admin in "libvirtd" group, uses the command below (Listing 3) to do that.
sudo adduser {your-user} libvirtd
Listing 3. Adding a new admin user to libvirtd group
Done. Now we can test KVM in order to know if the installation process ran correctly. To do that, execute the command presented by Listing 4.
virsh -c qemu:///system list
Listagem 4. Verifying if KVM installation ran correctly
If everything went well, as a result of executing the command above, you will see a table in the shell indicating that doesn't exist machine created or in execution at this time, as illustrated by Figure 3.
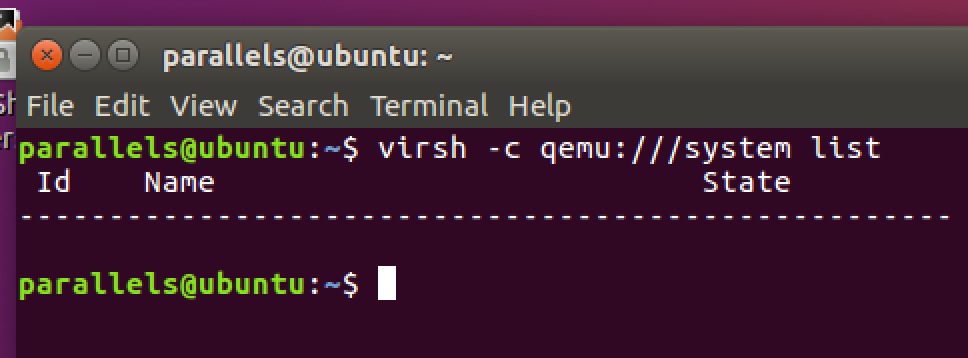
Figure 3. KVM installed successfully
4. Installing and configuring kubectl
Kubectl is a CLI (Command Line Interface) for Kubernetes. This means that it brings with a broad vocabulary of commands and associated parameters to interact with the Kubernetes APIs. We will use Kubectl to do practically everything in our cluster with Kubernetes: creating deployments, publishing containers, getting information about the environments, etc.
In order to install Kubectl on Ubuntu we will use the "curl" method, traditionally known from Linux users. Listing 5 shows the command to perform this task.
curl -LO https://storage.googleapis.com/kubernetes-release/release/$(curl -s https://storage.googleapis.com/kubernetes-release/release/stable.txt)/bin/linux/amd64/kubectl
Listing 5. Installing Kubectl
Done. Kubectl was successfully installed. Now, we need to give the "execute" permission to the Kubectl (which is in the current user directory structure) and also put this executable in the system PATH. Listing 6 presents this process.
chmod +x ./kubectl sudo mv ./kubectl /usr/local/bin/kubectl
Listing 6. Giving permissions to kubectl executable
Once again, done. To verify that Kubectl is working properly, go to the terminal and type "kubectl cluster-info". You should receive the following error message in response: "The connection to the localhost server: 8080 was refused - did you specify the right host or port? ". The occurrence of this error is completely normal since we haven't deployed the emulated cluster with Minikube yet. To know which cluster it should manage, kubectl expects a configuration file called "kubeconfig". This file is generated at cluster deployment time. Since we don't have the cluster yet, we don't have this file as well and therefore, we receive the previous error message.
5. Installing Minikube cluster
Now we have the prerequisites already in place, it's time to install Minikube, a tool that will emulate the Kubernetes cluster in my computer. To do this, use the command provided by Listing 7.
curl -Lo minikube https://storage.googleapis.com/minikube/releases/v0.18.0/minikube-linux-amd64 && chmod +x minikube && sudo mv minikube /usr/local/bin/
Listagem 7. Installing Minikube
Done. Minikube installed. Now, to check if tool is operational, go to the terminal and enter the "minikube start" command. By doing this, you can see minikube download the default image to the cluster and perform it startup flow.
I will stop here for while. In the next post we will see in a practical way some fundamental resources related to Kubernetes and so that it is possible to orchestrate the container cluster in an effective way. See you there!