Offloading Excel workbook to Azure worker roles
1 Introduction
HPC services for Excel support offloading a Microsoft Excel workbook to a cluster. In a burst-to-Windows Azure cluster with Microsoft HPC Pack 2008 R2 onwards, you can now use Windows Azure worker role instances (worker nodes) for Excel offloading instead Azure IaaS VMs.
This blog walks you through the steps to run an Excel workbook in a burst-to-Windows Azure scenario, where the HPC head node runs on Azure IaaS VM while the Compute Nodes are Windows Azure Worker Roles.
This blog covers the steps for running and Excel Workbook in Azure worker role; in summary the list of actions:
1. Create a VHD which contains un unattended installation of Excel office installation files
2. Upload the VHD to the storage which the burst nodes will deploy into using “hpcpack upload”
Example:
hpcpack upload OFFICE.VHD /account:[[storageAccount]] /key:[[storageAccessKey]]
3. Create a cmd to install Excel in unattended mode and copying some HPC DDLs on the worker role
F:\setup.exe /adminfile F:\Updates\ExcelOnly.msp
robocopy F:\ E:\approot Microsoft.Hpc.Excel.dll Microsoft.Hpc.Excel.ExcelService.dll Microsoft.Hpc.Excel.ExcelService_1.0.config
4. Create and upload the cmd to storage
Example:
hpcpack create InstallExcel.zip InstallExcel.cmd
hpcpack upload InstallExcel.zip /account:[[storageAccount]] /key:[[storageAccessKey]]
5. Create Azure Node Template to mount the VHD and set the startup script to install excel when the work role start
6. Add Azure worker roles using the HPC Azure Node Template, the worker role will install excel automatically
7. To run the Excel workbook, you should pack and upload the workbook the Azure storage
Example:
hpcpack create xxx.zip xxx.xlsm
hpcpack upload xxx.zip /account:[[storageAccount]] /key:[[storageAccessKey]]
8. When the Azure nodes are ready, start the workbook in client machine.
Note: In HPC2012 and later releases, you need to add an excel.exe.config in the same folder with excel.exe on client machine
Content of excel.exe.config file |
<?xml version="1.0"?> <configuration> <startup useLegacyV2RuntimeActivationPolicy="true"> <supportedRuntime version="v4.0" sku=".NETFramework,Version=v4.0"/> </startup> </configuration> |
2 Install Windows HPC Head Node on Azure IaaS VM
In Azure image gallery is available an image with Windows 2012 R2 Datacenter OS with embedded Windows HPC PACK 2012 R2 Update1. In this image is also pre-installed Microsoft SQL Server 2014 Express, to host the HPC DBs. This image can be used to create the HPC head node in Azure IaaS VM. Recommended VM size for the HPC is A4, but for testing purpose, you can use smaller VM.
Before creating the HPC head node in Azure IaaS VM it is good practice:
- Define an Azure affinity group (logical group associated with a specific Azure datacenter)
- Create an Azure Storage Account in the same datacenter where you spin up the HPC head node
- Create an Azure Virtual Network associate with the affinity group defined before.
Steps to create a HPC head node in IaaS VM has been described in the blog.
At this point of time, this blog assume that you have the HPC head node up and running. If you deploy an HPC head node using the PACK 2012 R2 Update1 available in the Azure image gallery you might check the version of HPC PACK by the HPC Management console:

Figure 1: PACK 2012 R2 Update1
3 Install Excel on Windows Azure nodes
Running an Excel workbook requires Excel to be installed on each compute node. However, an HPC compute node deployed ad Azure worker role is stateless, which means it could be recycled and redeployed in Windows Azure from time to time, and all settings will be discarded. Fortunately, the HPC Windows Azure Node Template provides a way to mount a VHD and execute a startup script when the worker node is started.
3.1 Create an unattended Excel installer
On your local desktop/laptop you can create an unattended Excel installer. To install Excel in unattended mode follow the official guideline Office Customization Tool.
Unattended Office installer produces a .MSP file; we choice as name of the MSP file “ExcelOnly.msp” and store it in root folder with the Office setup.exe file.
In my blog
I have shown how to create a custom unattended installation of Excel.
- open the command shell with Administrator right, move in the root folder where Office2010 Administrator credential, run the command: setup /admin
- Follow the instruction as in the blog and store the outcome file ExcelOnly.msp in root installation directory of Office package.
When the operation is completed, you can create a VHD containing all the installation files along with the “ExcelOnly.msp” file and then upload the VHD file to Windows Azure storage blob.
3.2 Create a VHD file
On your local desktop/laptop, open Disk Management (click Start, type diskmgmt.msc, and then press ENTER; this operation open the Disk Management MMC snap-in).

Figure 2: Disk Management snap-in
Select Create VHD from the Action menu

Figure 3: Create a new VHD

Figure 4: specify the format of VHD file
- Location: This is the location and file name where the new VHD will be saved when it is created
- Virtual hard disk size: This is the size of the VHD; keep the default (Fixed size)

Figure 5: define location and size of VHD
At this stage, the VHD is attached and appears as an uninitialized disk.

Figure 6: Volume before initialization
To initialize the disk, right-click the disk name in the Disk Management pane and click Initialize Disk
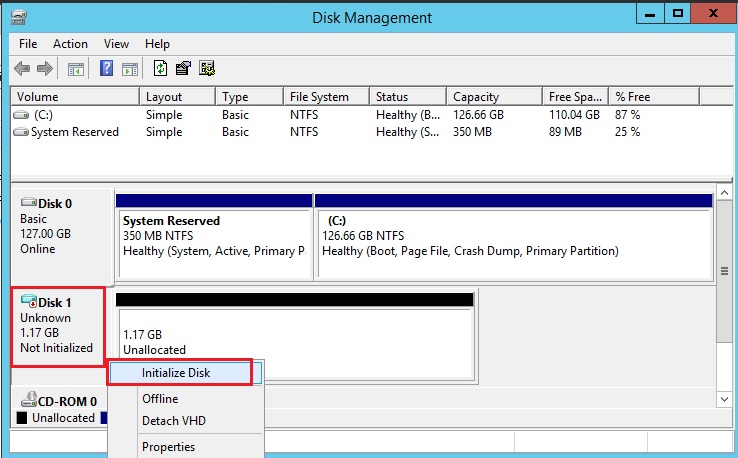
Figure 7: initialize the VHD disk

Figure 8: define the partition style of VHD
After initializing the VHD, you can format and assign a drive letters to the volume.

Figure 9: VHD volume after initialization
Right-click on the unallocated space and choice New Simple Volume. Follow the instructions in the New Simple Volume Wizard to select the volume size, drive letter, format, and disk block size.

Figure 10: create a new Simple Volume

Figure 11: define volume size

Figure 12: assign a drive letter to the volume

Figure 13: specify the file system for the volume

Figure 14: new volume online
3.3 Copy the Office package in the VHD Volume
Copy all the Office installation package (including the file ExcelOnly.msp) inside the VHD Volume.

Figure 15: copying the Office installation package in the VHD volume
3.4 Move the VHD volume offline and detach
The volume needs to be move in offline and therefore detached
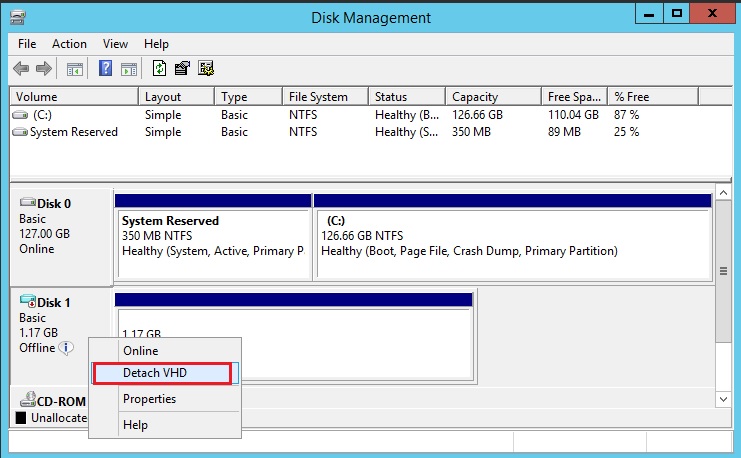
Figure 16: Detach the VHD volume
3.5 Copy the .VHD file in Azure storage blob
To copy the OFFICE.VHD file (containing the Office installation package) in Azure storage, you can use AZCOPY command line https://aka.ms/AzCopy:
AzCopy /Source:C:\tmp /Dest:https:// <NameStorageAccount> .blob.core.windows.net/excel /DestKey: <AzureStorageKey> /pattern:Office.VHD
To run the command you need to replace with name and key of your Azure Storage Account:
- <NameStorageAccount> : your Azure Storage account name
- <AzureStorageKey >: primary key of your Azure Storage account
3.6 Move the VHD in the HPC head node an add some .DLL to it
Now that OFFICE.VHD is in Azure Storage account use AZCOPY to transfer the VHD file from the Azure storage blob to the HPC head node. (Note: AZCOPY is already installed by default in the HPC head node, in the folder C:\Program Files (x86)\Microsoft SDKs\Azure\AzCopy ):
AzCopy /Source:https:// <NameStorageAccount> .blob.core.windows.net/excel /Dest:C:\Users\toor\Desktop\Office1 /SourceKey: <AzureStorageKey> /pattern:Office.VHD
3.7 Add some .DLL to the VHD file
To run Excel you need to copy some .DLLs in the VHD.
On the HPC head node you can simply mount the OFFICE.VHD with simple click-on from Windows explorer.

Figure 17: double click on the OFFICE.VHD to mount the volume

Figure 18: list of files in OFFICE.VHD mounted on the head node
The OFFICE.VHD is automatically mounted ad driver F:
Here a list of DDL files for Excel to be considered:
%systemroot%\Microsoft.NET\assembly\GAC_MSIL\Microsoft.Hpc.Excel\v4.0_2.0.0.0__31bf3856ad364e35\Microsoft.Hpc.Excel.dll<br>%ccp_home%bin\Microsoft.Hpc.Excel.ExcelService.dll<br>%ccp_home%bin\Microsoft.Hpc.Excel.Internal.dll<br>%ccp_home%bin\Microsoft.Hpc.Excel.tlb<br>%ccp_home%bin\Microsoft.Hpc.Trace.dll<br>%ccp_home%bin\CosmosLoggingManaged.dll<br>%ccp_home%bin\XLL64\Microsoft.Hpc.Excel.XllContainer64.dll<br>%ccp_home%bin\XLL64\Microsoft.Hpc.Excel.XllConnector.dll<br>%ccp_home%ServiceRegistration\Microsoft.Hpc.Excel.ExcelService_1.0.config<br>%ccp_home%ServiceRegistration\Microsoft.Hpc.Excel.XllContainer64_1.2.config
Only three DLLs need to be copied in root of VHD volume:
%systemroot%\Microsoft.NET\assembly\GAC_MSIL\Microsoft.Hpc.Excel\v4.0_2.0.0.0__31bf3856ad364e35\Microsoft.Hpc.Excel.dll<br>%ccp_home%bin\Microsoft.Hpc.Excel.ExcelService.dll<br>%ccp_home%ServiceRegistration\Microsoft.Hpc.Excel.ExcelService_1.0.config
To copy the DLLs you might use the robocopy command:
robocopy %systemroot%\Microsoft.NET\assembly\GAC_MSIL\Microsoft.Hpc.Excel\v4.0_2.0.0.0__31bf3856ad364e35\ F:\ Microsoft.Hpc.Excel.dll<br>robocopy "%ccp_home%bin" F:\ Microsoft.Hpc.Excel.ExcelService.dll <br>robocopy "%ccp_home%ServiceRegistration" F:\ Microsoft.Hpc.Excel.ExcelService_1.0.config

Figure 19: list of DLL files copied in OFFICE.VHD
We can now dismount the OFFICE.VHD volume by eject:

Figure 20: Eject the volume OFFICE.VHD
3.8 Create a script to install Excel
You need to create a script to install OFFICE.VHD when the worker nodes start up. If “setup.exe” and “ExcelOnly.msp” are in the root directory of the OFFICE.VHD you can simply use the following command line:
%CCP_APPDRIVE%setup.exe /adminfile %CCP_APPDRIVE%ExcelOnly.msp<br>robocopy %CCP_APPDRIVE% %CCP_HOME% Microsoft.Hpc.Excel.dll Microsoft.Hpc.Excel.ExcelService.dll Microsoft.Hpc.Excel.ExcelService_1.0.config
Uses the environment variables %CCP_APPDRIVE% and %CCP_HOME%
Save the above command line to installExcel.cmd.
3.9 Use the hpcpack to package the script
On the HPC head node use the hpcpack command to package the script “installExcel.cmd”:
hpcpack create installExcel.zip installExcel.cmd
3.10 Use the hpcpack to upload the script and VHD file in Azure Storage account
Upload the “installExcel.zip” to the Azure storage account that is used for deploying the Azure nodes:
hpcpack upload installExcel.zip /account:<NameStorageAccount> /key:<AzureStorageKey>
Upload the “OFFICE.VHD” file containing the Office installation package in Azure Storage account
hpcpack upload Office.VHD /account: <NameStorageAccount> /key:<AzureStorageKey>
3.11 Create an Azure Cloud Services to guest HPC worker role
To host the HPC worker role is required a new Azure Cloud Services.
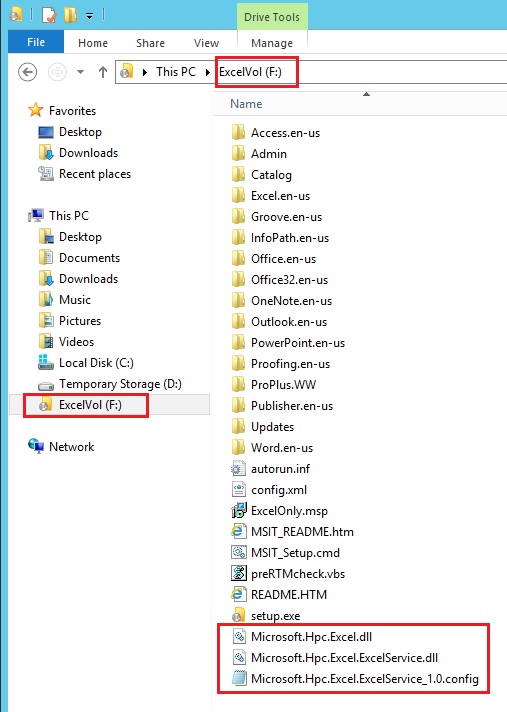
Figure 21: Create a new Cloud Services to host the HPC worker roles

Figure 22: name and affinity associated with the new cloud Services

Figure 22: name and affinity associated with the new cloud Services

Figure 23: new available Azure Cloud Service
3.12 Create an HPC Azure node template to mount the VHD and execute the startup script
Open the HPC management console and create a Windows Azure node template (i.e. assign the name “AzureNodeExcel”). You can just follow the guidance of the Create Node Template Wizard as usual, as long as you specify the same storage account that you used for uploading the Excel installer. When configuring the HPC worker role in the HPC Node Template, you should choose to mount the VHD you just made.

Figure 24: choice “New” in actions pane to create a new Node template

Figure 25: select the Windows Azure Node Template

Figure 26: specify a name for the new Node Template

Figure 27: browse in the list of management certificate
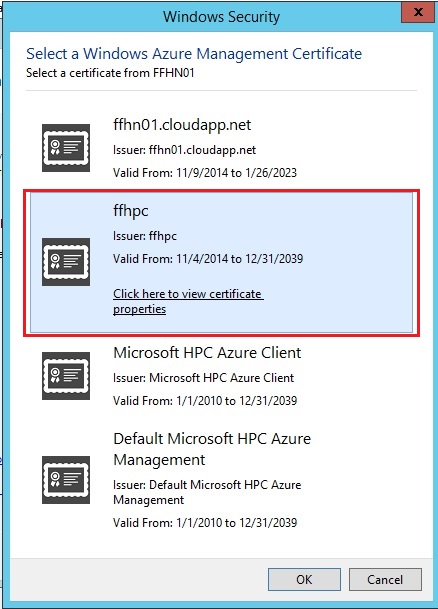
Figure 28: select a digital certificate loaded in the Azure subscription

Figure 29: specify the Azure subscription ID where we want spin up the HPC worker roles
The same digital certificate selected in the Azure node template need to be loaded in the Azure subscription


Figure 30: select the cloud service and storage account used to deploy Azure worker roles

Figure 31: specify the size and number of proxy nodes

Figure 32: select the OFFICE.VHD available in Azure storage and the OS version used to deploy the HPC worker roles
On the Specify startup script page, fill in “installExcel.cmd”.

Figure 33: specify the command to install on the HPC worker roles Excel in unattended mode

Figure 34: specify an optional virtual network where HPC worker roles needs to be attached

Figure 35: specify the administrator credential for the HPC worker roles

Figure 36: select the way to spin-up the Azure worker roles

Figure 37: summary of the new Node Template for the worker roles

Figure 38: Node template used to deploy worker roles with Excel
After Azure Node template is created, you can add HPC worker roles to the HPC cluster using the template.
3.13 Add Node
In the HPC Management Console select Node Management and therefore in Actions pane choice Add Node

Figure 39: add a new Compute Nodes to the HPC cluster

Figure 40: option to add new HPC worker roles to the cluster

Figure 41: select the Azure Node Template, number and size of the worker roles

Figure 42: worker roles appear as un-deployed in list of nodes

Figure 43: click-on Start command to deploy the worker roles with policy define in Azure Node Template

Figure 44: after successful deployment of HPC worker roles the nodes are move in Offline state

Figure 45: list of nodes belonging to the cloud service (proxies and worker roles)
In the table below a successful deployment of an HPC worker role.
Time Message 11/12/2014 7:37:00 PM Moving node AZURE\AzureCN-0004 from state Provisioning to state Offline 11/12/2014 7:37:00 PM Node AZURE\AzureCN-0004 has become available 11/12/2014 7:36:00 PM Moving node AZURE\AzureCN-0005 from state Provisioning to state Offline 11/12/2014 7:36:00 PM Node AZURE\AzureCN-0005 has become available 11/12/2014 7:32:01 PM Updating scheduler data for node AZURE\AzureCN-0004 11/12/2014 7:32:01 PM Updating the scheduler configuration for node AZURE\AzureCN-0004 11/12/2014 7:32:01 PM Updating scheduler data for node AZURE\AzureCN-0005 11/12/2014 7:32:01 PM Updating the scheduler configuration for node AZURE\AzureCN-0005 11/12/2014 7:32:00 PM Updating the scheduler configuration for creating deployment a122af35-b0f5-4fed-af16-cc2b49f75809. 11/12/2014 7:32:00 PM Windows Azure operation succeeded 11/12/2014 7:31:04 PM Waiting for Windows Azure deployment to start 11/12/2014 7:31:04 PM The Operation Id for transitioning Windows Azure deployment to state Running is bdf62bcf89232ca4992bbbaa8a7beb72 11/12/2014 7:31:03 PM Transitioning Windows Azure deployment to the Running state 11/12/2014 7:31:00 PM Windows Azure operation succeeded 11/12/2014 7:30:04 PM Waiting for Windows Azure deployment creation to complete 11/12/2014 7:30:03 PM Configuring HPC cluster storage in Windows Azure 11/12/2014 7:30:02 PM Windows Azure deployment started: a122af35-b0f5-4fed-af16-cc2b49f75809. Operation Id for this deployment is 5b6d4602717a24d08f63c1491919ff2f 11/12/2014 7:30:02 PM Deployment a122af35-b0f5-4fed-af16-cc2b49f75809 is locked. 11/12/2014 7:29:54 PM Starting Windows Azure deployment 11/12/2014 7:29:54 PM Creating snapthot for VHD blob https://ffhpcstorage01.blob.core.windows.net/hpcpackages-36a153ea-f6f6-4df2-924c-4262851cf440/office.vhd 11/12/2014 7:29:47 PM Uploading HPC cluster certificate to Windows Azure storage 11/12/2014 7:29:41 PM Uploading Windows Azure proxy certificate to the Windows Azure certificate store 11/12/2014 7:29:39 PM HPC runtime uploaded successfully 11/12/2014 7:29:38 PM Uploading the HPC cluster runtime package to Windows Azure storage 11/12/2014 7:29:38 PM HPC runtime is missing from Windows Azure storage 11/12/2014 7:29:38 PM Generated HPC runtime package 11/12/2014 7:29:28 PM Moving node AZURE\AzureCN-0004 from state Not-Deployed to state Provisioning 11/12/2014 7:29:28 PM Moving node AZURE\AzureCN-0005 from state Not-Deployed to state Provisioning |

Figure 46: Bring the HPC worker roles Online
When the entire HPC node are Online, the cluster is ready to run HPC jobs.

Figure 47: all the HPC nodes are Online

Figure 48: connect to the Azure worker role through Remote Desktop

Figure 49: GUI to connect via RDP to the HPC worker roles
3.14 Install Excel 2010 on the HPC client
In production environment is recommended run HPC head node and HPC client node on different hosts. In our case HPC client runs on the HPC head node.
To install Excel mount the OFFICE.VHD, open a command shell and change the driver (F:)
Run the command for unattended Excel 2010 installation:
setup.exe /adminfile ExcelOnly.msp |
After unattended installation, eject the OFFICE.VHD volume
3.15 Create a file in HPC client
For HPC 2012 and later version, you need to add an excel.exe.config in the same folder with excel.exe on HPC client.
The content of excel.exe.config is:
<?xml version="1.0"?> <configuration> <startup useLegacyV2RuntimeActivationPolicy="true"> <supportedRuntime version="v4.0" sku=".NETFramework,Version=v4.0"/> </startup> </configuration> |
excel.exe file is located by default in the folder: C:\Program Files\Microsoft Office\Office14
Run our Excel workbook without this file causes the following message:

Figure 50: error in Excel worksheet due to missing excel.exe.config file in the HPC client
3.16 Deployment of Excel workbook on the worker role
hpcpack is a tool provided with Windows HPC Server which packages files for staging on Azure worker roles. You can use it to package HPC services or regular files. A “package” is just a zip file with some additional metadata used for installation. The hpcpack tool is used both to create packages and to upload those packages to Azure storage.
When you start Azure worker nodes in the HPC Cluster Manager, any software which has been previously staged – including SOA services and file packages – will be automatically installed on the nodes. This is done when the nodes are started, using a tool called hpcsync. Any package which has been created and uploaded using hpcpack will be automatically installed on startup.
If the nodes are already running, using hpcpack you can create or modify a package, and therefore by hpcsync you can ensure that the latest package version is installed on your HPC worker Roles. We will use hpcpack and hpcsync to move files to the Azure cloud and configure the Azure worker roles.
After you create an Excel workbook to run on the HPC cluster, you should pack it (by the command “hpcpack create”), upload it to Windows Azure storage (by the command “hpcpack upload” ), and sync it to all Windows Azure worker roles (by the command “clusrun hpcsync” ).
3.16.1 Package the Excel file
Packaging is done on the HPC client. In our setup the HPC client is the head node, but in production you can use a different host join to the AD DC. In our case the Excel workbook is named CP1.xlsb
hpcpack create CP1.zip CP1.xlsb |
3.16.2 Transfer the package in Azure Storage
Command to transfer the package to the Azure Storage
hpcpack upload CP1.zip /account: <NameStorageAccount> /key: <AzureStorageKey > |
3.16.3 Synchronization between Azure Storage and HPC Worker Roles
To sync all HCP worker roles with Windows Azure Storage runs the command:
clusrun /nodegroup:AzureNodes hpcsync |
Then you can run the Excel workbook in the usual way and the calculation will be distributed on the cluster. Whenever if you modify the workbook, or create a new one, you need to repeat the steps to package, upload to Azure Storage and synchronizing the package from the Azure Store to HPC worker roles.
3.17 Run a basic multiplication table on HPC cluster
The primary benefit of this model is that it requires no extra software (just Excel and the HPC client utilities). The main limitation of this model is that it requires Administrator permissions to move the spreadsheet to the cloud. That means that regular users won’t be able to install new or modified spreadsheets themselves. Another benefit of this approach is that in many cases it will be the fastest way to use Excel and Azure. Because the spreadsheet is already present on the worker roles, the calculation can start almost immediately – it does not have to copy the spreadsheet before it starts running.
As basic example to run an Excel cluster on HPC, we use the same Excel workbook described in the blog:
To run the Excel workbook in Azure worker roles, you need to change the VM macro: HPCControlMacros
 '==========================================================
 ' This is a skeleton macro file for using the HPC/Excel
 ' VBA macros with an HPC cluster.
 '
 ' Be sure to add references to the required component:
 ' Microsoft_Hpc_Excel
 ' using the VBA editor menu Tools -> References.
 '
 '==========================================================
 Option Explicit

 '----------------------------------------------------------
 ' This is the cluster scheduler, or head node.
 '----------------------------------------------------------
 Private Const HPC_ClusterScheduler = "HEADNODE"

 '----------------------------------------------------------
 ' Job Template
 '----------------------------------------------------------
 Private Const Azure_JobTemplate = "Default"

 '----------------------------------------------------------
 ' This object is our client for connecting to the HPC
 ' cluster and running calculations.
 '----------------------------------------------------------
 Private HPCExcelClient As IExcelClient


 '----------------------------------------------------------
 '
 ' This is the main calculation function, which connects
 ' to the client object and runs a calculation. The method
 ' can run both desktop and cluster calculations, controlled
 ' by the function parameter "CalculateOnDesktop".
 '
 ' You'll see below two functions that run calculations
 ' by calling this method, with the parameter set for either
 ' cluster or desktop calculation.
 '
 '----------------------------------------------------------
 Private Sub CalculateWorkbook(CalculateOnDesktop As Boolean)

 Dim HPCWorkbookPath As String
 On Error GoTo ErrorHandler

 ' Create a new excelCient instance per session
 Set HPCExcelClient = New ExcelClient

 ' Initialize the excel client object with the current workbook
 HPCExcelClient.Initialize ActiveWorkbook

 If CalculateOnDesktop = False Then
 ' Create a cluster session with the desired options. Here, we're
 ' just using the scheduler name and (optionally) a job template.
 If Azure_JobTemplate <> "" Then
 HPCExcelClient.OpenSession HPC_ClusterScheduler, "Multi.xlsb", 1, 128, SessionUnitType_Core, jobTemplate:=Azure_JobTemplate
 Else
 HPCExcelClient.OpenSession HPC_ClusterScheduler, "Multi.xlsb"
 End If
 End If

 ' Run on local machine or cluster as chosen in workbook
 HPCExcelClient.Run CalculateOnDesktop
 Exit Sub

 ErrorHandler:
 ' Notify user of error and clean up any allocated resources
 MsgBox Prompt:=Err.Description, Title:="HPC Calculation Error"
 If Not HPCExcelClient Is Nothing Then
 HPCExcelClient.Dispose
 End If
 End Sub

 '----------------------------------------------------------
 ' This is a public method for running a calculation on the desktop.
 '----------------------------------------------------------
 Public Sub CalculateWorkbookOnDesktop()
 CalculateWorkbook (True)
 End Sub

 '----------------------------------------------------------
 ' This is a public method for running a calculation on the cluster.
 '----------------------------------------------------------
 Public Sub CalculateWorkbookOnCluster()
 CalculateWorkbook (False)
 End Sub

 '----------------------------------------------------------
 ' This method is used to clean up a calculation after it's finished;
 '----------------------------------------------------------
 Public Sub CleanUpClusterCalculation()
 On Error Resume Next
 HPCExcelClient.CloseSession
 HPCExcelClient.Dispose
 On Error GoTo 0
 End Sub
Before run the Multi.xlsb file you need to deploy the Excel on the worker roles:
hpcpack create Multi.zip Multi.xlsb<br>hpcpack upload Multi.zip /account: <AzureStorageAccount> /key: <AzureStorageKey> <br>lusrun /nodegroup:AzureNodes hpcsync

Figure 52: multiplication table in Excel workbook running on the HPC cluster
You can download the Excel workbook here:
 Multi.xlsb
Table multiplication
3.18 Run Excel bond price model file on HPC cluster
As a second example we can run an HPC cluster an Excel workkook with bond price model. This example is more complex of the simple multiplication table, but has the same structure in HPC VB macro.
You can download the Excel workbook here:
CP1.xlsb
Bond price model

Figure 53: press the button “Calculate on Cloud” to run on HPC worker roles

Figure 54: job is composed by two tasks (task 1.1 and task 1.2)

Figure 55: every task runs on one HPC worker role

Figure 56: Task1.1 runs on AzureCN-0004

Figure 57: task 1.2 runs on the AzureCN-005
3.19 Description of the Excel workbook
The primary benefit of this model is that it requires no extra software (just Excel and the HPC client utilities). The main limitation of this model is that it requires Administrator permissions to move the spreadsheet to the cloud. That means that regular users won’t be able to install new or modified spreadsheets themselves.
Another benefit of this approach is that in many cases it will be the fastest way to use Excel and Azure. Because the spreadsheet is already present on the worker roles, the calculation can start almost immediately – it does not have to copy the spreadsheet before it starts running.
3.19.1 Configuring the Example
To run the example, open the spreadsheet file “CP1.xlsb” on your desktop. Before running on the cloud, we need to make one change to the spreadsheet. The spreadsheet VBA code connects to the cluster using the name of the cluster head node. Open the VBA editor (From Excel, press Alt+F11). In the VBA editor, in the tree view on the top of the left-hand side, double-click the module named “HPCControlMacros” to open it.
In this file, locate the line
Private Const HPC_ClusterScheduler = "HEADNODE"
Change the value of HEADNODE to match your cluster head node. This should be the machine name.
The file also specifies the name of the Job Template, which we used above when installing the spreadsheet on the cloud. The file uses the name we suggested, “Default”. If you used a different job template name, then find the line
Private Const Azure_jobTemplate = "Default"
and change the value “Default” to match your HPC job template name; remember that this is the job template, not the node template.
3.19.2 Note
In Excel burst scenario, the max allowed length of Excel workbook file name is 39.
The root cause of this issue is Excel file path can’t exceed 218 characters:when you save or open a file if the path to the file (including the file name) exceeds 218 characters an error occurs. This limitation includes three characters representing the drive, the characters in folder names, the backslash character between folders, and the characters in the file name. The file path pattern of the hpcpack is very long, the following is one example:
C:\Resources\Directory\c49f08fea9464edc901ed3c52ae8cb98.HpcWorkerRole1.Microsoft.Hpc.Azure.LocalStorage.Application\convertiblepricing_azurecloud_static\2013-06-04T083747.0000000Z\ConvertiblePricing_AzureCloud_Static.xlsb.