Simplifying the Dial Tone Database Recovery Process in Exchange 2007
For a while now, I have wanted to write a post on how to do a recovery in Exchange 2007 using a dial tone database and a Recovery Storage Group. There is some existing documentation on this, but I haven’t found anything that walks you through the entire process in detail. I also prefer to do this from the Exchange Management Shell (EMS), rather than using the Database Recovery Management tool in the Exchange Management Console’s (EMC’s) Toolbox, as I think the shell is simpler and quicker.
Just to clarify what a dial tone database is, this is a blank database you create to allow your users to send and receive new e-mails while a failed database is being recovered. To create it, you simply move or rename the original database file (with a .edb extension) and then mount the database from EMC or EMS. When the Information Store fails to find the .edb file in the specified location, you will be prompted to create a blank database. If you agree, the dial tone database will be created.
For purposes of these instructions, let’s assume you have already created the dial tone database and are ready to restore the failed database from backup.
Create the Recovery Storage Group
To create the Recovery Storage Group,use the New-StorageGroup cmdlet, as follows:

Note that we had to specify the Name of the storage group, as well as the path. The system folder path contains the checkpoint file and the log folder path contains the transaction logs for the storage group. I recommend making both the same. The –Recovery parameter is necessary to make this storage group a Recovery Storage Group.
Create the RSG database
Now, we must add the database that we are going to recover. Similar to creating the RSG itself, this is done by using the same cmdlet used to create a normal database, with an additional switch:

The -MailboxDatabaseToRecover parameter specifies the database we are restoring.
Allow the database to be restored from backup
This should be set automatically when the database is added to the RSG, but just to be safe, I always run the cmdlet:

Restore the database
You are now ready to proceed with restoring your database from backup. Steps here will vary, depending on your software. Once the restore is complete, you may choose to mount the database in the Recovery Storage Group:

Once the RSG database is mounted, you can use Get-MailboxStatistics to confirm that the databases are present in this database (this information will not be listed by the Get-Mailbox cmdlet):

Swap the databases
Dismount the dial tone database and the RSG database using the Dismount-Database cmdlet, then swap the RSG database with the dial tone database by moving the files via Windows Explorer. When you’re finished, the dial tone database will be in the RSG folder and the recovered database will be in the production folder that the dial tone database was previously in. Your users will now have access to their old mail, but the newly received mail will be unavailable to them, since the database containing it is now in the Recovery Storage Group. We do this swap so that when we merge the data from the two databases, the process will take the minimum amount of time.
Merge the databases
Of course, we have to mount the databases first, using the Mount-Database cmdlet . To confirm that both databases are mounted, use this syntax:

Now that both database are mounted, you’re ready to merge the dial tone data back into the recovered database. To merge a single mailbox, use this syntax:
Restore-Mailbox –Identity <username> -RSGDatabase <RSG db name>
More likely, though, you would like to select mailboxes in bulk to recover. To do that, use this syntax:
Get-Mailbox –Database <production db name> | Restore-Mailbox –RSGDatabase <RSG db name>
For example:

Notice that even though this is a bulk operation, we will be prompted for each mailbox individually. In order to avoid this, just type A (for “Yes to All”) and press Enter here.
You will see the progress bar for multiple users as they are being restored:

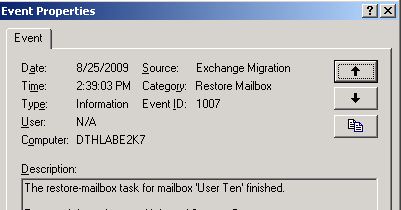
The EMS will display results for each user, but I find it much simpler to check the Application Log on the Exchange server to verify that each mailbox was successfully restored. The event you’re looking for is as follows:
Cleanup
Once you are certain you have finished with the Recovery Storage Group, the best practice is to remove it. The steps are as follows:
1. Dismount with the Dismount-Database cmdlet.
2. Remove the database, using this syntax:
Remove-MailboxDatabase –identity <Server_Name>\<RSG_Name>\<Database_Name>
3. Remove the RSG, using this syntax:
Remove-StorageGroup –identity <Server_Name>\<RSG_Name>
I hope this helps to simplify the process if you’re ever in need of a dial tone database in Exchange 2007.