Step-by-step: Highly available Site server
The release of ConfigMgr 1806 introduced the concept of high availability of the Site server by adding an additional primary site as passive node.
This post takes you through a step by step journey in configuring a highly available Site Server.
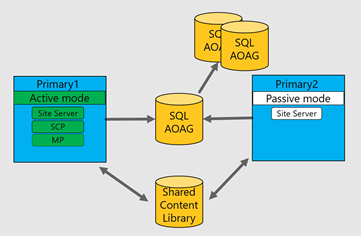
Here's a high-level architecture overview of the configuration which depicts a remote SQL AlwaysOn availability group hosting the ConfigMgr database and a remote shared Content Library.
Prerequisites and Recommendations–
Remote SQL
As you plan to prepare your site for HA, the first thing to ensure is your SQL is also HA. This can be a SQL AlwaysOn or a SQL Cluster.
You can also start with a remote standalone SQL and later add it to an Availability Group. Refer this link for guidance.
Remote Content Library
Note - Make sure the Distribution Point role is not installed locally on the primary site and needs to be removed before proceeding.
The Content Library also needs to be moved off the primary to a centralized location which can be a network/SAN share.
Moving Content Library –
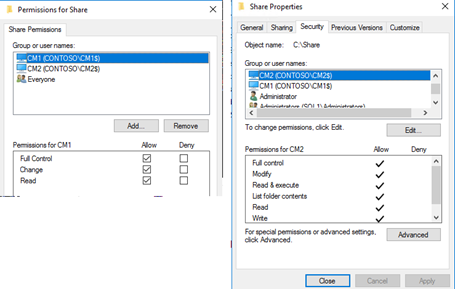
Create a Shared Folder
Add the System/Computer Accounts of the both the Site Server (Active and Passive) with full permissions to this share.
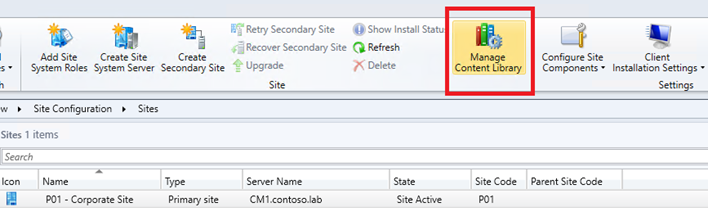
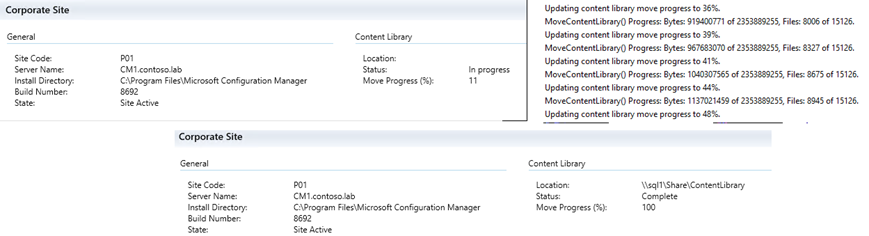
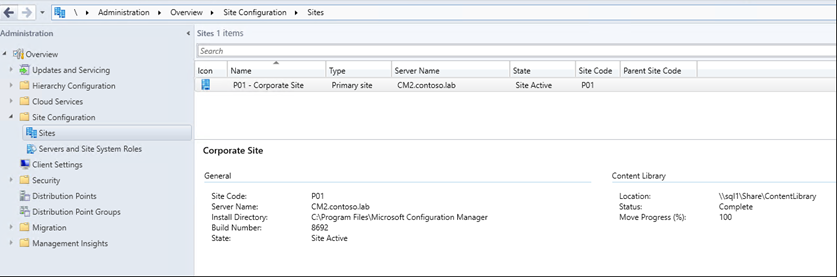
Open ConfigMgr Console > Administration > Site Configuration > Sites
Click Manage Content Library from the ribbon menu
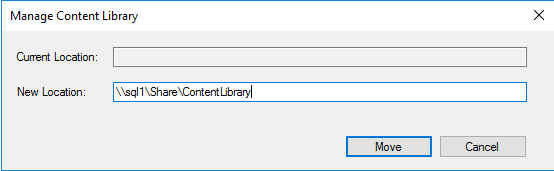
From the dialog, specify a folder inside the share (Not the root of the share) and click Move.
Selecting the root of the share will result in the following error - CContentDefinition::SyncFolder failed; 0x800700a1 SMS_DISTRIBUTION_MANAGER
The console will show the move in-progress. You can also refer to the DistMgr.log
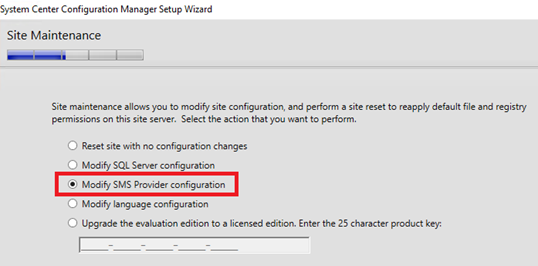
Remote SMS Provider
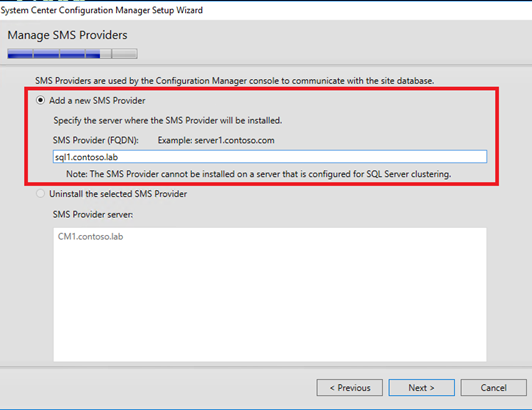
If the SMS provider is not already remote, install an additional SMS Provider [do not choose the passive site server] which is not local to the Primary Site.
Note – ADK is a prerequisite for SMS Provider
- Run the ConfigMgr setup and choose Modify SMS Provider configuration
- Add the FQDN of the remote server [do not choose the passive site server] where you plan to install the SMS Provider and click Next
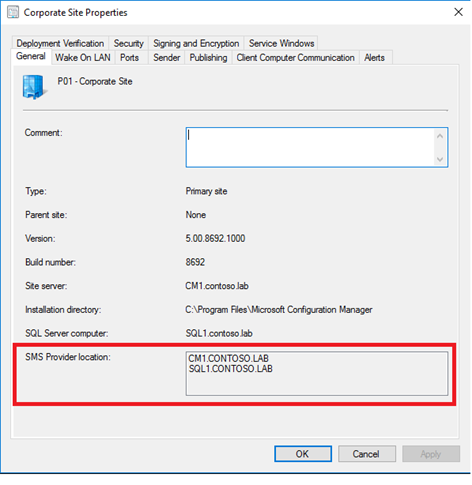
- Validate a successful install from the console.
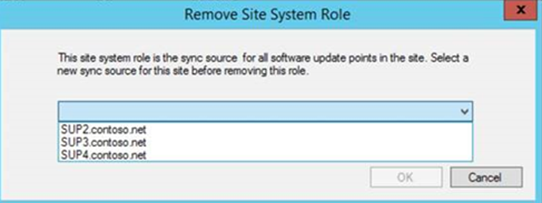
Remote SUP
If the SUP role is not already remote, do plan to offload it from the Primary Site Server to a remote Server.
- Add additional SUP Server/s
- Remove SUP role from Primary Site and choose one of the remote SUP's as the new active source.
Passive Site Server - Prerequisites
Operating System:
The passive site server can run any supported OS and doesn't need to match the existing Primary Site Server OS.
This enables the scenario where you might want to move to a new OS for your Primary Site without performing an in-place upgrade or a backup/restore.
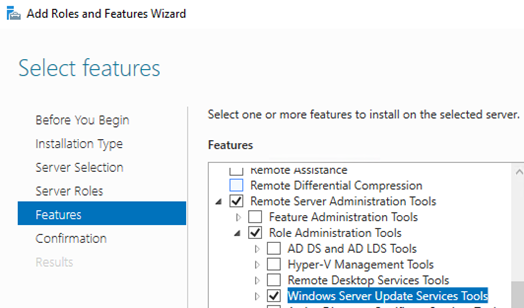
OS Features and ADK
- Download and Install ADK
Install the following features –
- Remote Differential Compression
- Remote Server Administration Tools > Windows Server Update Services Tools [WSUS sync will fail without this]
Permissions:
Add the System/Computer account of the Passive Site Server to the following locations –
- Content Library Share – In case you missed from the previous step of moving the content library.
- Administrators Group of Active/Current Primary Site Server.
- Administrators Group of SQL Server (All nodes for SQL Clusters/AlwaysOn).
- SMS Admins group on all SMS Providers.
- System Management Container in AD.
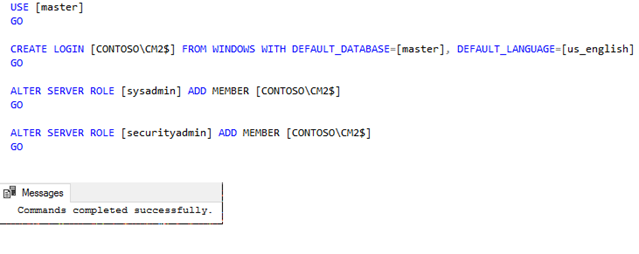
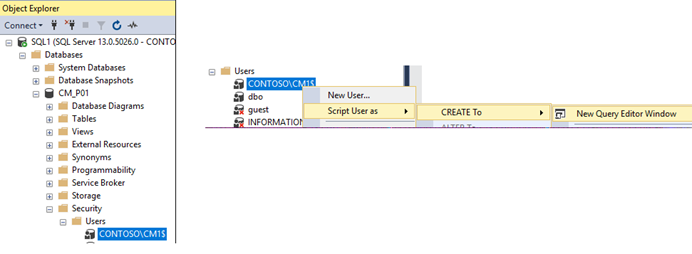
- SysAdmin on SQL Server (All nodes for SQL AlwaysOn). – Follow the instructions below –
- Launch SQL Server Management Studio
- Expand Security and select the machine account of the current Active Primary Site (Contoso\CM1$ )
- Right click and choose Script Login as > CreateTo > New Query Editor Window
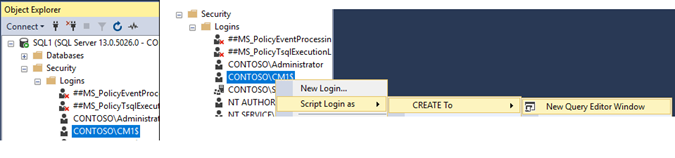
- Replace the computer account of the Active Primary Site to the Passive Primary Site and click Execute.
- Expand Databases > ConfigMgr DB CM_P01 > Security
- Select the machine account of the current Active Primary Site (Contoso\CM1$ )
- Right click and choose Script Login as > CreateTo > New Query Editor Window
- Replace the computer account of the Active Primary Site to the Passive Primary Site and click Execute.

Installing Passing Site Server
Adding the Passive Site Server system is straight forward.
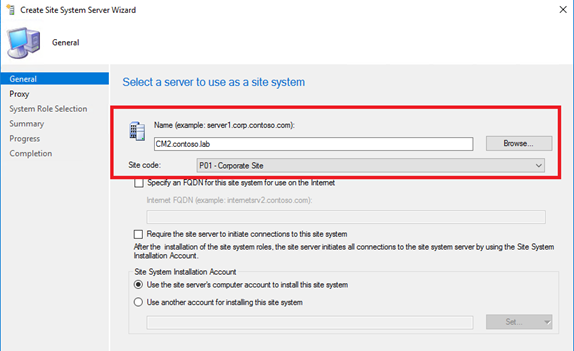
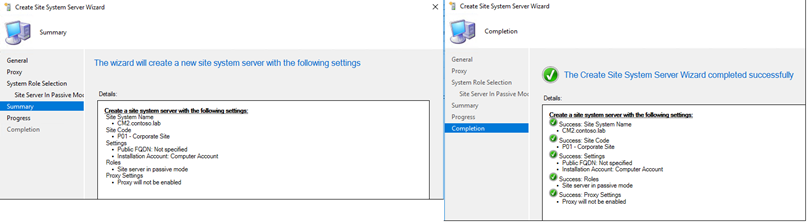
- Create a new Site System Server from the Administration node.

- Browse the desired Passive Primary Site Server FQDN and click Next
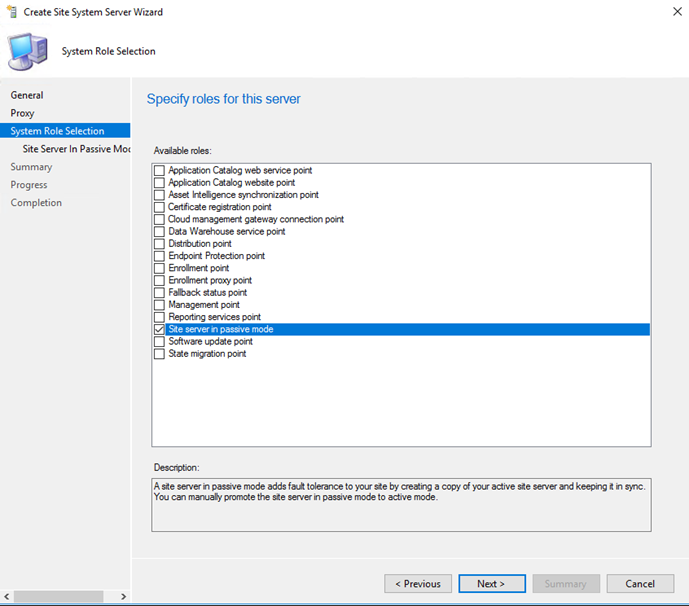
- From the Role Selection page, choose Site server in passive mode and click Next
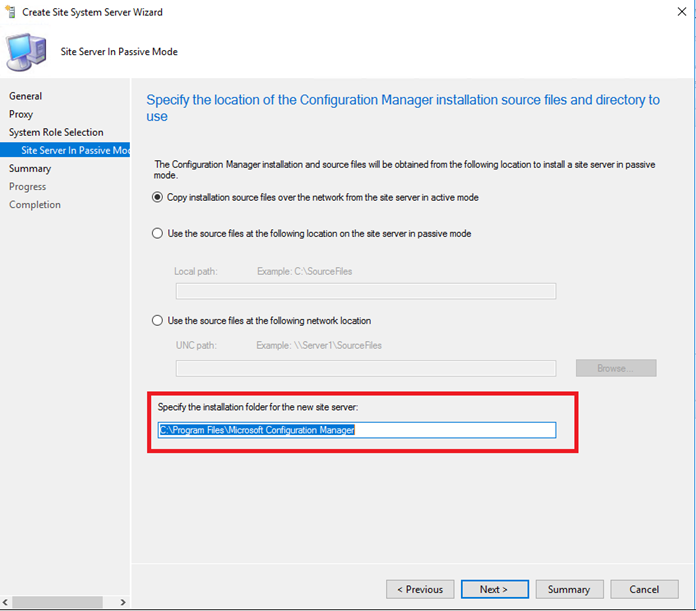
- Choose your desired option to provide the Source files.
- Specify the Installation directory. [do not choose the root of the Program Files, it must be a directory inside and doesn't needs to be already present]
- Click Next to complete and finish the wizard.
- Validate the progress in the FailOverMgr.log
The Scheduler and Sender creates job to copy the files to the Passive Site Server. You can also check the ConfigMgrSetup.log on the root of the Passive Site Server.
Refer the Installation Workflow in this link.
- Validate the successful completion on the console. Both the Active and Passive Site Servers with status OK

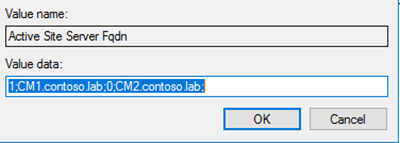
The following Registry Keys are created which reflects the Passive Site Server –
- HKEY_LOCAL_MACHINE\SOFTWARE\Microsoft\SMS\Identification
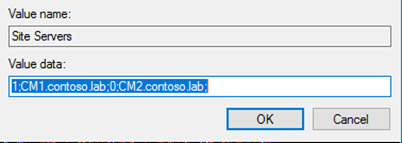
- HKEY_LOCAL_MACHINE\SOFTWARE\Microsoft\SMS\Site Failover
Troubleshooting Installation
If you experience issues while installation, let's say you missed a prerequisite and the installation failed, refer the below steps.
- The Console status shows the Passive Site Server as Installation failed. You will get the right click option to Retry Installation
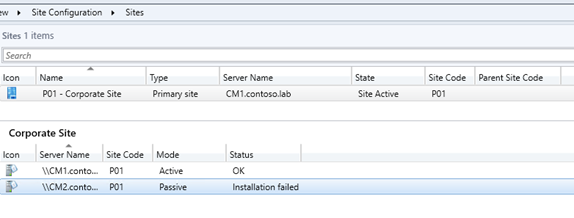
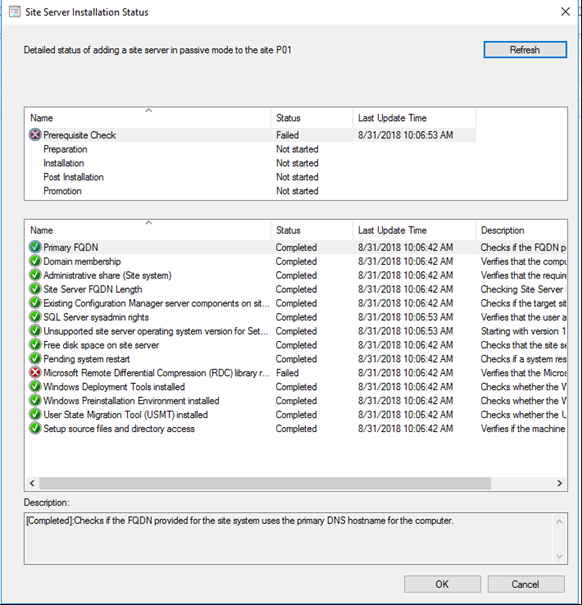
- The reason for the failure is available under Monitoring > Site Server Status
- Click on Show Status to view the reason of failure.
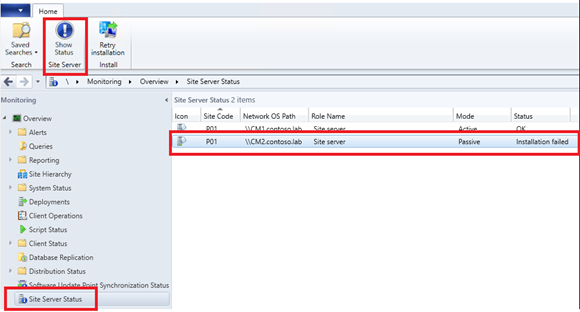
- Once you resolve the issue, click Retry Installation.
Console
The ConfigMgr console is not installed as a part of the Passive Site Server installation and needs to be manually installed.
- Go to Installation directory > Tools > ConsoleSetup folder to initiate the installation.

- Connect to the Passive Primary Site Server
Promote Passive Site Server - Planned
Its now time to test the Passive Site Server by promoting it as Active.
Console > Administration > Site Configuration > Sites > Nodes Tab
Select Passive Site Server > Right click and choose Promote to Active and confirm.

Note the change in Status from OK to Promoting (Passive to Active) and Installing for the Active to Passive site.
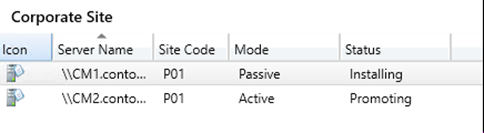
Subsequent failover will only change to Promoting for the Passive Site as it doesn't need to install any components
Review the FailOverMgr.log on both the nodes.
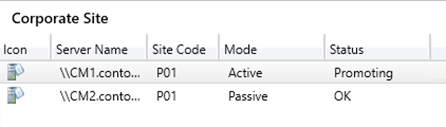
The Mode (Active/Passive) switches between the two Site Servers and Status to OK.
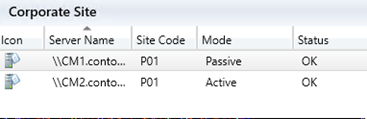
The Primary Site Server name changes to the Passive Site Server which we just promoted to Active.
Here's a Flowchart - Promote site server (planned)
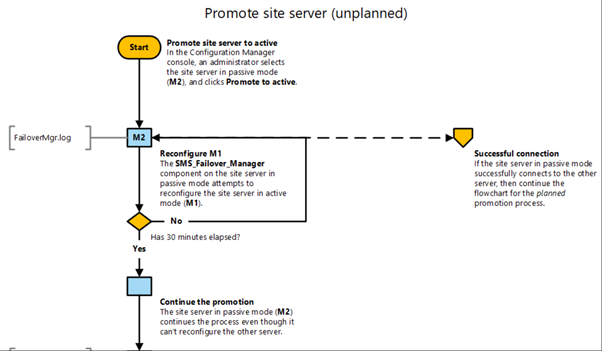
Promote Passive Site Server – Unplanned [30-minute delay]
This will be an actual disaster scenario where the Active Primary Site Server is offline, and you need to promote the Passive Site Server to Active. There is no automatic failover.
The steps are same as above to switch a Passive Site Server to Active via the ConfigMgr Console.
Note – There is a 30-minute wait before the Passive Site Server switches to Active mode. Refer the Unplanned Workflow snippet below. The time start when you click Promote Active and not since the server is actually offline which could be longer.
I had to restart the Site Server to fully initialize and act as an Active Site Server.
Limitations and Non-HA Site System Roles
- Refer the Site Server HA Limitations in this link.
- Certain Site System roles do not support high availability (example – Service Connection Point), the option is to Uninstall and Reinstall the role on a new server. Refer this link for guidance on each role.
- When you have two primary sites(active/passive), it may get confusing when you are troubleshooting and looking at logs. Always check the time stamps to be sure.
Thanks,
Arnab Mitra