Walkthrough: Using App Extensions in Visual Studio
Interested in using extensions and don't quite know how to get started? Here's a walk-through of the basics for getting an app extension platform added to your app and testing it. Be sure to check out the introduction to App Extensions for a more high level overview.
How App Extensions Work
To set up App Extensions, you first have an App Extension Host app declare it is a host and specify it's namespace. Then in other apps providing extensions you create a similar App Extension declaration and specify the same namespace. At runtime the Host app can use the App Extension API to discover and access any installed the extensions which match one of the namespaces they have declared.
So to set up the App Extension relationship, we need to do the following:
- Set up the App Extension Host declaration in the host app
- Set up the App Extension declaration in the extending app(s)
- Use the API in the host app to access the extensions
We'll start by going through each of those and then end with testing guidance.
Create App Extension Host Declaration
1) In your Universal App Project, right-click the "Package.appxmanifest" file and select "view code"
This will bring up the XML view of the appxmanifest.
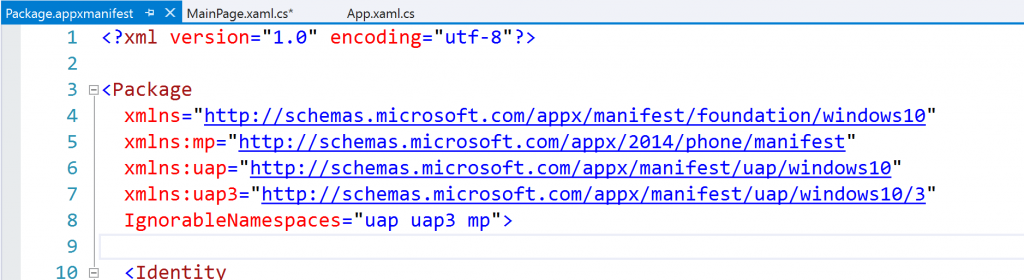
2) Add the uap3 schema reference attribute if it does not already exist to the <Package> element after the uap reference
xmlns:uap3="https://schemas.microsoft.com/appx/manifest/uap/windows10/3"
3) Add "uap3" to the IgnorableNamespaces attribute in the Package Element
IgnorableNamespaces="uap uap3 mp"
The above two steps should result in a package element that looks like this:
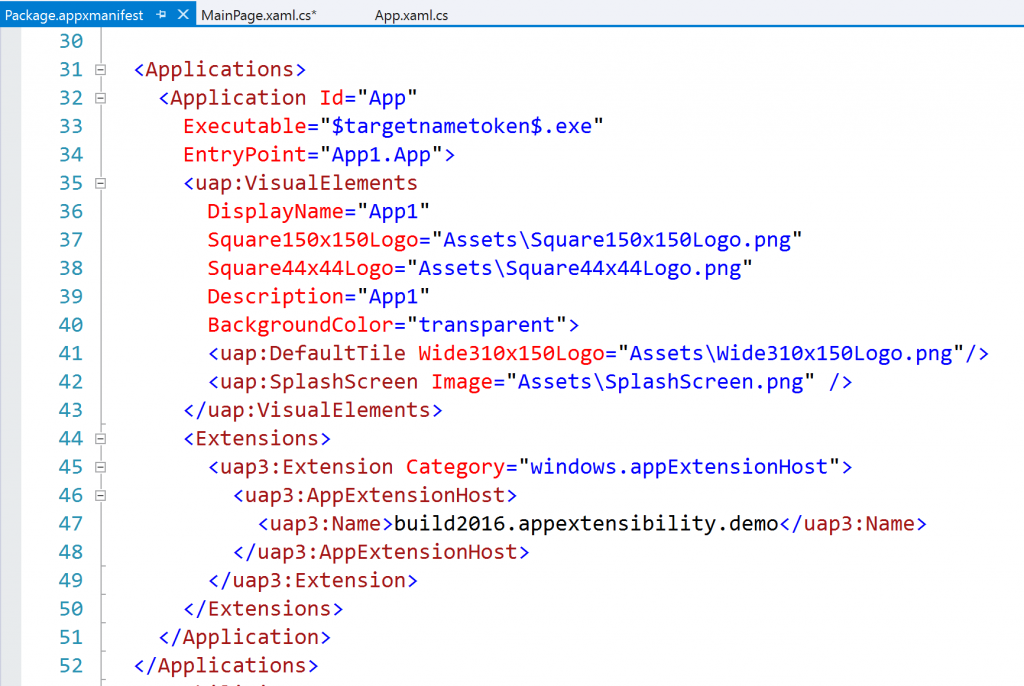
4) Add the App Extension Host declaration to the app
This appears under the Application\Extensions elements:
<uap3:Extension Category="windows.appExtensionHost">
<uap3:AppExtensionHost>
<uap3:Name>build2016.appextensibility.demo</uap3:Name>
</uap3:AppExtensionHost>
</uap3:Extension>
There is only one element to define here, which is the Name. This what we call the contract name; it is how we bind app extensions with hosts. Only extensions matching the name provided will be visible and actionable to an App Extension Host. By convention we recommend using a Name that incorporates your app or publisher name to avoid potential collisions with other apps using extensions.
There is no exclusivity rules for extension declarations; you can have multiple hosts and multiple extensions, and both together in the same app.
Once completed, your application node will look something like this:
Create App Extension Declaration
The App Extension declaration is very similar. In the app you want to have provide an extension, do the following:
1) Repeat steps 1-3 in the previous section.
Extensions and Extension Hosts both require the same uwp3 namespace.
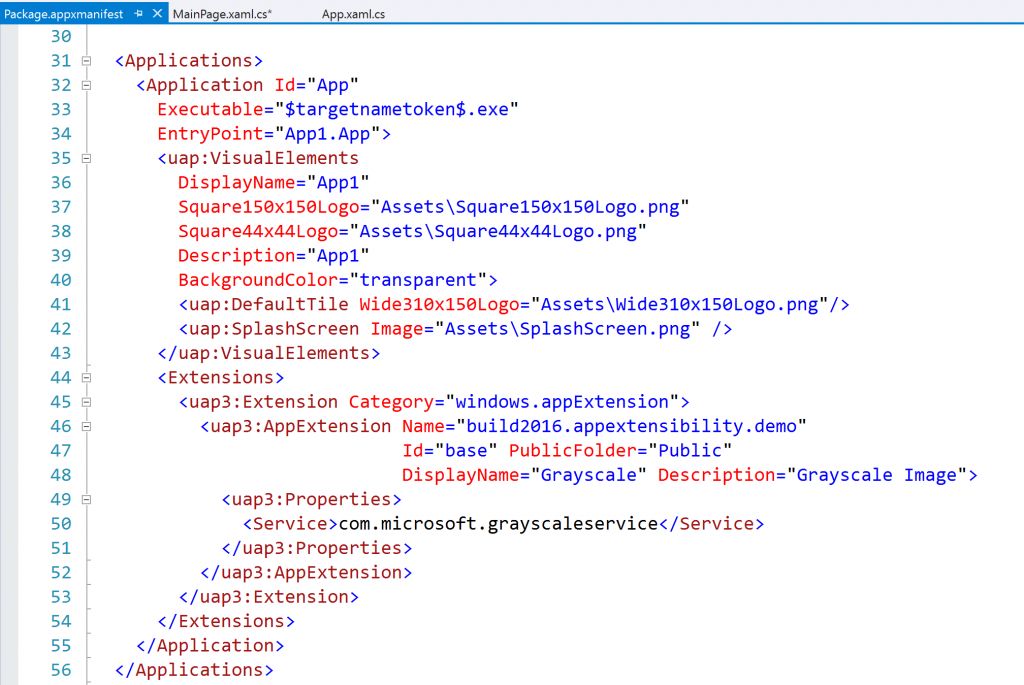
2) Add the App Extension declaration to the app manifest, under the Application\Extensions element:
<uap3:Extension Category="windows.appExtension">
<uap3:AppExtension Name="build2016.appextensibility.demo" Id="base" PublicFolder="Public" DisplayName="Grayscale" Description="Grayscale Image">
<uap3:Properties>
<Service>com.microsoft.grayscaleservice</Service>
</uap3:Properties>
</uap3:AppExtension>
</uap3:Extension>
For this declaration you must have the Name attribute value exactly match the Name attribute value of the host declaration. This is a required attribute.
The PublicFolder attribute is the name of the folder relative to the package root that you want to share with the host app. By convention we typically use "Public" but you can use whatever name you want so long as it matches a valid folder in your app. This is a required attribute.
DisplayName and Description are queryable from and can use MRT references, which we recommend for localization support. The MRT references are loaded from the app extension package, not the host app.
The Id attribute is used to uniquely identify this particular extension. This is because you can have multiple App Extension declarations, even for the same host. If you want to have two extensions for a particular host name, then you can do so if you ensure that the Id values are different. App Extension hosts may use the Id value as a clue about what type of extension. For example, you could have one Extension designed for desktop and one for mobile, with the Id being the differentiator. You can also use Properties for that. Id is a required attribute.
The Properties element is filled with custom-defined metadata that is readable by the Host apps at runtime. In this example, I added a property that told the Host app the name of the service that the extension uses. You can also use properties as clues about the usage of the extension, what sort of features or capabilities the extension uses from the Host app, versioning, or many other uses. They are deliberately open-ended so Extension Host apps can specify the type of properties they look for or expect to be present for their extensions. Properties are optional and do not need to be specified.
When you are finished, your Application node should look something like this:
Using the App Extension API in the Host App
Here's a brief overview of the API for App Extensions. You can see a working example of an extension manager using this API from our Build 2016 sample:
Using the API
using Windows.ApplicationModel.AppExtensions;
Creating a Catalog
Extensions listed by creating a catalog for each extension name your host supports.
private AppExtensionCatalog _catalog; _catalog = AppExtensionCatalog.Open("build2016.appextensibility.demo");
The name you specify in Open() should match the name you specify in the host declaration. If you have multiple hosts you must create a separate catalog for each.
Finding Existing Extensions
Once you have a catalog you can use it to discover any existing and current extensions on the system that use that host name.
IReadOnlyList<AppExtension> extensions = await _catalog.FindAllAsync();
This list is a snapshot at the time you call it. Extensions can be added or removed after this call, which is why you need Deployment events to avoid polling them.
Getting Extension Deployment Events
To stay on top of changes to the set of extensions, you should subscribe to all of the extension deployment events:
_catalog.PackageInstalled += Catalog_PackageInstalled; _catalog.PackageUpdated += Catalog_PackageUpdated; _catalog.PackageUninstalling += Catalog_PackageUninstalling; _catalog.PackageUpdating += Catalog_PackageUpdating; _catalog.PackageStatusChanged += Catalog_PackageStatusChanged;
Getting Extension Properties
If you have an extension named ext, then you can get any properties defined in the declaration of the extension:
var properties = await ext.GetExtensionPropertiesAsync() as PropertySet;
Important: In the Anniversary Edition, there is a bug where calling this on an extension that has no properties defined can return null instead of an empty PropertySet. This will throw an exception in the usage above. This is corrected in Insider builds to instead return an empty PropertySet. If targeting the Anniversary Edition as the minimum version you should either test for a null return or catch and handle the exception.
Reading the Public Folder
You can read the contents of the PublicFolder specified by the app extension declaration using the catalog:
extensionfile = await folder.GetFileAsync(fileName);
Testing Extension Hosts and Extensions
If you are developing an app extension host and you want to test out extensions it can be a little tricky. An easy way to do it is to load up your test extension app in a separate instance of Visual Studio and run them side by side.
Then to test you can launch your host app and then in the extension app instance of VS, build & deploy (Right-click the App in solution explorer, do Build and then do Deploy). You don't need to F5 the extension app, as extensions work as long as the app is deployed and do not require it to run. You can now independently deploy the extension app while debugging your host app.
Try different configurations where the host app comes along after the extension app, or try removing the extension app from Settings while the extension host is running.
A quick checklist of basic scenarios to test:
- Run host and then deploy Extension app
- Does the host pick up new extensions that come along while its running?
- Deploy Extension app and then deploy & run host.
- Does the host pick up previously-existing extensions?
- Run host and then remove extension app.
- Does the host detect the remove correctly?
- Run host and then update the extension app to a newer version.
- Does the host pick up the changes and unload the extension properly when you get update events?
Some more advanced things to check are:
- Run host, move extension app to removable media, remove that media
- Does the host detect the change in package status and disable the extension?
- Run host, then corrupt the extension app (make it invalid, signed differently, etc.)
- Does the host detect the tampered extension and handle it cleanly?
- Run host, deploy Extension app that has invalid content or properties
- Does the host detect invalid content and handle it cleanly?
If you have a good extension manager in your host then you should be able to gracefully handle all of those cases using the properties and events available in the API.
There's much more to go over with App Extensions, but this is a good starting point. Are there any specific areas you would like to see more information on? Please leave your questions and feedback in the comments, thanks!
- David Bennett, Program Manager, Windows Developer Platform