Streaming Install Part 2: Content Group Maps Overview
To illustrate the streaming install concepts through the rest of this blog series, we will use parts of our streaming install demo app (full project here) and where it is more applicable, a new project.
As touched on in the previous blog post, the content group map is a file that defines the files in your required and automatic content groups. This file is must be named the AppxContentGroupMap.xml and it will be at the root of your project and your package. Here is what the AppxContentGroupMap.xml looks like for our streaming install demo app:
 <?xml version="1.0" encoding="utf-8"?>
<ContentGroupMap xmlns="https://schemas.microsoft.com/appx/2016/contentgroupmap" xmlns:s="https://schemas.microsoft.com/appx/2016/contentgroupmap">
    <Automatic>
        <ContentGroup Name="ItemPack1">
            <File Name="Assets\ItemPack1\ItemPack1.png"/>
            <File Name="Assets\ItemPack1\ItemPack1Dummy.txt"/>
        </ContentGroup>
        <ContentGroup Name="ItemPack2">
            <File Name="Assets\ItemPack2\ItemPack2.png"/>
            <File Name="Assets\ItemPack2\ItemPack2Dummy.txt"/>
        </ContentGroup>
        <ContentGroup Name="Level1">
            <File Name="Assets\Level1\Level1.png"/>
            <File Name="Assets\Level1\Level1Dummy.txt"/>
        </ContentGroup>
        <ContentGroup Name="Level2">
            <File Name="Assets\Level2\Level2.png"/>
            <File Name="Assets\Level2\Level2Dummy.txt"/>
        </ContentGroup>
        <ContentGroup Name="Level3">
            <File Name="Assets\Level3\Level3.png"/>
            <File Name="Assets\Level3\Level3Dummy.txt"/>
        </ContentGroup>
        <ContentGroup Name="FrenchPack1">
            <File Name="Assets\fr-fr\FrenchPack1.png"/>
            <File Name="Assets\fr-fr\FrenchPack1Dummy.txt"/>
        </ContentGroup>
        <ContentGroup Name="FrenchPack2">
            <File Name="Assets\fr-fr\FrenchPack2.png"/>
            <File Name="Assets\fr-fr\FrenchPack2Dummy.txt"/>
        </ContentGroup>
    </Automatic>
</ContentGroupMap>
The first thing you will notice is that all of the files are listed out explicitly and you’re probably thinking: “Do I have to list out off of the files of my app one by one?” The good thing is that the answer is “No, there’s a faster way!”
Instead of creating an AppxContentGroupMap.xml manually, you can create the SourceAppxContentGroupMap.xml. This map is easier and much faster to create than the AppxContentGroupMap.xml because it supports wildcards. This is the SourceAppxContentGroupMap.xml for the streaming demo app:
 <?xml version="1.0" encoding="utf-8"?>
<ContentGroupMap xmlns="https://schemas.microsoft.com/appx/2016/sourcecontentgroupmap" xmlns:s="https://schemas.microsoft.com/appx/2016/sourcecontentgroupmap" >
    <Required>
        <ContentGroup Name="Required">
            <File Name="*"/>
            <File Name="WinMetadata\*"/>
            <File Name="Properties\*"/>
            <File Name="Assets\*scale*"/>
            <File Name="Assets\*Logo*"/>
        </ContentGroup>
    </Required>
    <Automatic>
        <ContentGroup Name="ItemPack1">
            <File Name="Assets\ItemPack1\*"/>
        </ContentGroup>
        <ContentGroup Name="ItemPack2">
            <File Name="Assets\ItemPack2\*"/>
        </ContentGroup>
        <ContentGroup Name="Level1">
            <File Name="Assets\Level1\*"/>
        </ContentGroup>
        <ContentGroup Name="Level2">
            <File Name="Assets\Level2\*"/>
        </ContentGroup>
        <ContentGroup Name="Level3">
            <File Name="Assets\Level3\*"/>
        </ContentGroup>
        <ContentGroup Name="FrenchPack1">
            <File Name="Assets\FrenchPack1.png"/>
            <File Name="Assets\FrenchPack1Dummy.txt"/>
        </ContentGroup>
        <ContentGroup Name="FrenchPack2">
            <File Name="Assets\FrenchPack2.png"/>
            <File Name="Assets\FrenchPack2Dummy.txt"/>
        </ContentGroup>
    </Automatic>
</ContentGroupMap>
Here, instead of listing out all the files, I used wildcards to select the files in a folder that I want to include in a content group. And when I want to deploy or package the app, I will then convert the SourceAppxContentGroupMap.xml to the AppxContentGroupMap.xml using MakeAppx.exe.
Using SourceAppxContentGroupMap.xml vs AppxContentGroupMap.xml
So when would you want to use the SourceAppxContentGroupMap.xml vs the AppxContentGroupMap.xml? Well, if you have files that can change constantly from other artists or developers on the team, then being able to just wildcard the folders would allow you to not have to micromanage how these files are represented in the AppxContentGroupMap.xml. Also, if you want to make sure you didn’t miss any file in your content group map, then you should use the SourceAppxContentGroupMap.xml so that MakeAppx.exe can do this validation for you during conversion. You can author the AppxContentGroupMap.xml directly when there are not many streaming files in your app or if you don’t want to have to convert every time before packaging and deployment.
Authoring Content Group Maps With a New Project
So let’s dive into actually authoring the content group maps in Visual Studio. But first, make sure you have the latest version of Visual Studio preview that supports streaming install (download link here).
We will use a new project instead of the existing streaming demo app so we can illustrate this better. Let’s get a blank app by doing File -> New -> Project -> Blank App (Universal Windows) in Visual Studio.
With our blank app, we can start by creating the SourceAppxContentGroupMap.xml either by File -> Add -> New Item or by creating a blank XML file and dropping it into our solution. To make the process easier, you can copy this SourceAppxContentGroupMap.xml template for use with Visual Studio C# UWP apps.
 <?xml version="1.0" encoding="utf-8"?>
<ContentGroupMap xmlns="https://schemas.microsoft.com/appx/2016/sourcecontentgroupmap" xmlns:s="https://schemas.microsoft.com/appx/2016/sourcecontentgroupmap" >
    <Required>
        <ContentGroup Name="Required">
            <File Name="*"/>
            <File Name="WinMetadata\*"/>
            <File Name="Properties\*"/>
            <File Name="Assets\*SplashScreen*"/>
            <File Name="Assets\*Logo*"/>
        </ContentGroup>
    </Required>
    <Automatic>
        <ContentGroup Name="AutomaticContentGroup1">
            <File Name=""/>
        </ContentGroup>
    </Automatic>
</ContentGroupMap>
After creating the SourceAppxContentGroupMap.xml, we want to make sure it’s the target for conversion, so right click on it, then “Properties”, and in the Properties window, change the file’s Build Action to “AppxSourceContentGroupMap”.

With this done, let’s add an image to the Assets folder to have it be streamed to our app (this has to be done so that the automatic group is not empty and have it pass the schema validation). We added a picture called “image.png”. So our resulting SourceAppxContentGroupMap.xml should look like this:
 <?xml version="1.0" encoding="utf-8"?>
<ContentGroupMap xmlns="https://schemas.microsoft.com/appx/2016/sourcecontentgroupmap" xmlns:s="https://schemas.microsoft.com/appx/2016/sourcecontentgroupmap" >
    <Required>
        <ContentGroup Name="Required">
            <File Name="*"/>
            <File Name="WinMetadata\*"/>
            <File Name="Properties\*"/>
            <File Name="Assets\*SplashScreen*"/>
            <File Name="Assets\*Logo*"/>
        </ContentGroup>
    </Required>
    <Automatic>
        <ContentGroup Name="AutomaticContentGroup1">
            <File Name="Assets\image.png"/>
        </ContentGroup>
    </Automatic>
</ContentGroupMap>
The newly added “image.png” is referenced in AutomaticContentGroup1 by “Assets\image.png”. “Assets\” must be added because all files defined in content group maps are relative to the root of the package.
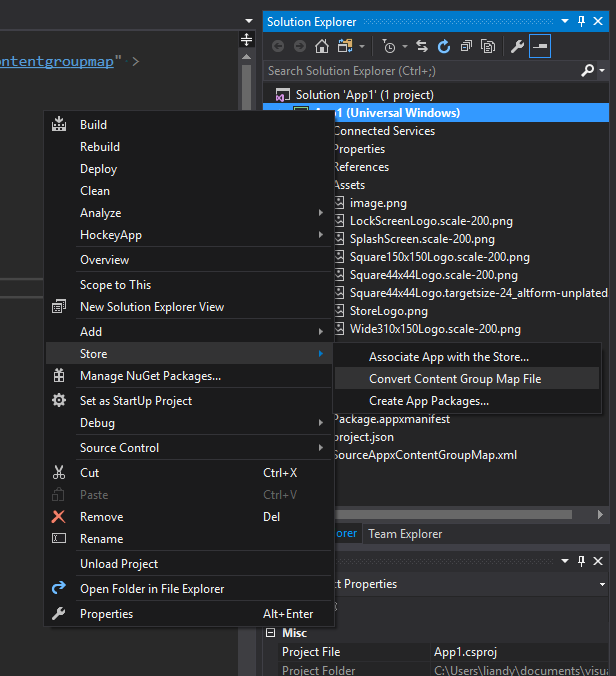
Without our SourceAppxContentGroupMap.xml crafted, we can convert it by right clicking on the project -> Store -> “Convert Content Group Map File”.
After conversion succeeds, we will see the AppxContentGroupMap.xml added to the root of our project. If we open it, then Edit -> Advanced -> Format Document, we will see this:
 <?xml version="1.0" encoding="UTF-8" standalone="no"?>
<ContentGroupMap xmlns="https://schemas.microsoft.com/appx/2016/contentgroupmap" xmlns:s="https://schemas.microsoft.com/appx/2016/contentgroupmap">
    <Automatic>
        <ContentGroup Name="AutomaticContentGroup1">
            <File Name="Assets\image.png"/>
        </ContentGroup>
    </Automatic>
</ContentGroupMap>
Note that conversion must be manually triggered again whenever the SourceAppxContentGroupMap.xml has been changed or app files (that are included using wildcards) have been added or removed.
Now that our AppxContentGroupMap.xml has been created, we can deploy the app with F5 or package it by right clicking on the project -> Store -> Create App Packages.
For Visual Studio Update 1: During F5 deployments of your app in Visual Studio 2017 Update 1, the app will be deployed as non-streaming (without the content groups being staged). To enable streaming install, begin the flow of creating an app package, then select "Never" for bundle creation and finally exit out of the creation wizard. At this point, you can F5 the again, and the app will be deployed as streaming.
The created .appx package should look something like this:
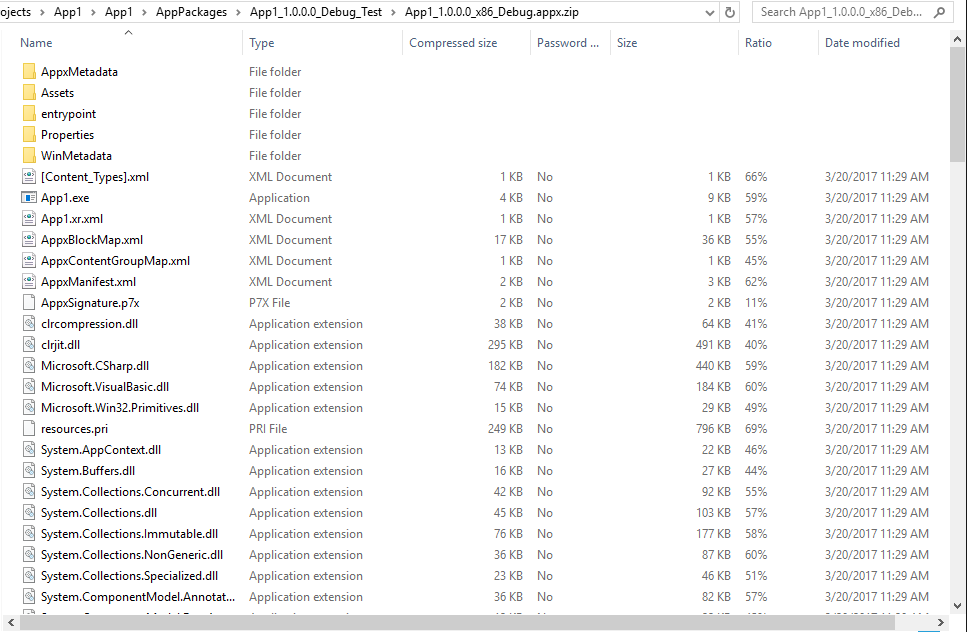
(Tip: You can quickly view the contents of a package by changing its file extension to .zip.)
Notice that the package will only contain the AppxContentGroupMap.xml and not the SourceAppxContentGroupMap.xml. This is because the platform only understands the AppxContentGroupMap.xml and not the SourceAppxContentGroupMap.xml and its wildcards. The SourceAppxContentGroupMap.xml is an intermediate content group map to help make the process of authoring the AppxContentGroupMap.xml easier. This is why if you choose to author the SourceAppxContentGroupMap.xml, you must always convert before deploying or packaging the app.
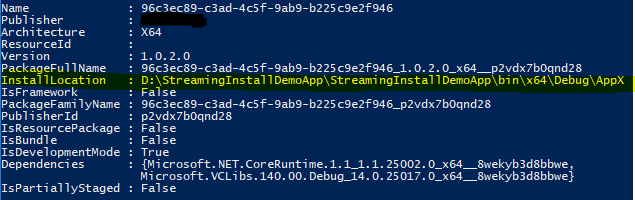
Lastly, you might have noticed that the folders that we wildcarded in our SourceAppxContentGroupMap.xml does not match the folders in your Solution Explorer. This is because content group maps reference the files in the app’s package layout, not the files in the project. You cannot reference App.xaml or MainPage.xaml, you must reference the compiled binary in the content group map. By default, conversion will tell you what files you are missing so it will be easy to fix conversion problems. If you are working in Visual Studio with more complex solutions and encounter other conversion errors, you can find the list of files that conversion is validating against in “\obj\x86\Debug\layout.resfiles" (where the obj folder is in the same directory as the AppPackages folder, x86 will change to x64 or ARM depending on what architecture you are building, and Debug will change to Release depending on your solution configuration; you can open the layout.resfiles with any text editor). You can also find the files that will be in your package where Visual Studio deploys the app from during F5. This folder can be found after you click F5 by opening PowerShell, typing “Get-AppxPackage”, and the app you just deployed should be listed last (check to see if IsDevelopmentMode is True).
Follow the links below for more detailed information on building apps with streaming installation:
- Streaming Install Part 1: UWP Streaming App Installation Overview
- Streaming Install Part 2: Content Group Maps Overview
- Streaming Install Part 3: Content Group Maps Deep Dive
- Streaming Install Part 4: Support Streaming Install in the App
- Streaming Install Part 5: Testing and Debugging a Stream-able App
<more links coming soon>
Questions? Ask in the comments section below.
Andy Liu, Program Manager, Windows Developer Platform