Azure Batch for the IT Pro - Part 2
This is the second and final part of a blog series with a walkthrough for Azure Batch. The first part is here:
In the first part I showed you how to create an Azure Batch Account, the corresponding Storage Account, a test application based on Powershell, and a pool of VMs to run the application. In this second part we will actually do the work of calculating Mersenne Prime Numbers.
At this point, you should have a working Azure Batch account with a pool of VMs and a provisioned application. The first step is to retrieve the configuration.
Retrieve the Azure Batch configuration
Note that the code shown in this post is working, but was taken from Create-BatchJobsAndTasks.ps1 and simplified: no logging or error checking. Refer to the Azure-Batch GitHub project for the full scripts.
The code below is straight from the script, stripped from comments and additions. You can either execute Create-BatchJobsAndTasks.ps1 after downloading, or run the snippets below one-by-one.
First, the configuration parameters. These should match the ones from the creation script discussed in the first post, Create-BatchAccountMersenne.ps1. The indexes here refer to Mersenne numbers; 20 is not high. Anything larger than 30 will take a measurable amount of time, indexes above 40 will take hours or days (and generate numbers with millions of digits).
 $firstindex = 1
$lastindex = 20 # current maximum index.
$jobnamePrefix = "mersenne-job"
$tasknameprefix = "task"

$Applicationname = "Mersenne"
$ResourceGroupName = "rg-batch-walkthrough"
$BatchAccountNamePrefix = "walkthrough"
$ShareName ="mersenneshare"
The following helper function is needed to reconstruct the actual names of the Azure Batch and Storage account, as explained in the first post.
 function Get-LowerCaseUniqueID ([string]$id, $length=8)
{
    $hashArray = (New-Object System.Security.Cryptography.SHA512Managed).ComputeHash($id.ToCharArray())
    -join ($hashArray[1..$length] | ForEach-Object { [char]($_ % 26 + [byte][char]'a') })
}
Read the Resource Group, reconstruct the Azure Batch account name from the Resource Group ID, and read the access keys of the Batch Account.
 $ResourceGroup = Get-AzureRmResourceGroup -Name $ResourceGroupName -ErrorAction stop
$BatchAccountName = $BatchAccountNamePrefix + (Get-LowerCaseUniqueID -id $ResourceGroup.ResourceId)
$batchaccount = Get-AzureRmBatchAccount | Where-Object { $_.AccountName -eq $batchaccountName } -ErrorAction stop
$batchkeys = $batchaccount | Get-AzureRmBatchAccountKeys
We need the storage account to reconstruct the parameters ($Storagekey, $uncPath, $shareAccount) needed to access its SMB share. These parameters must be passed to the application what we will run on the nodes.
 $StorageAccountName = "sa$($BatchAccountName)"
$StorageAccount = Get-AzureRmStorageAccount -ResourceGroupName $ResourceGroupName -Name $StorageAccountName -ErrorAction stop
$StorageKey = ($StorageAccount | Get-AzureRmStorageAccountKey)[0].Value
$Share = Get-AzureStorageShare -Name $ShareName -Context $StorageAccount.Context
$uncPath = $Share.Uri -replace 'https://','\\' -replace '/','\'
$shareAccount = "AZURE\$($StorageAccount.StorageAccountName)"
The final step before we can do real work is to retrieve the configuration of the VM pool. We will submit the job and tasks to this pool.
 $pool = Get-AzureBatchPool -BatchContext $batchkeys | Where-Object { $_.State -eq "Active" }
$PoolInformation = New-Object -TypeName "Microsoft.Azure.Commands.Batch.Models.PSPoolInformation"
$PoolInformation.PoolId = $pool.Id
Create Batch Job and Tasks
A job is basically a container for tasks. It has a name, can be disabled or enabled, and is dedicated to a pool in an Azure Batch account. The name contains a timestamp, making it more convenient to track what happened and when. If job creation fails for some reason, we require a hard stop.
 $jobnamePostfix = (Get-Date -Format s) -replace ':', ''
$jobname = "$jobnamePrefix-$jobnamePostfix"
New-AzureBatchJob -BatchContext $batchkeys -Id $jobname -PoolInformation $PoolInformation -ErrorAction Stop
Once the job exists, tasks can be submitted. The tricky part is to construct the commandline argument. We need to do a little pre-work: creating a unique name using a random generator, constraining the task to have 3 retries on failure, and retrieving the application definition to run.
 $taskPostfix = Get-Random -Minimum 0 -Maximum 1000000
$constraints = New-Object Microsoft.Azure.Commands.Batch.Models.PSTaskConstraints -ArgumentList @($null,$null,3)
$batchapp = Get-AzureRmBatchApplication -AccountName $batchaccountName -ResourceGroupName $batchaccount.ResourceGroupName -ApplicationId $Applicationname -ErrorAction stop
$version = $batchapp.DefaultVersion
$appref = New-Object Microsoft.Azure.Commands.Batch.Models.PSApplicationPackageReference
$appref.ApplicationId = $batchapp.id
$appref.Version = $version
Finally, tasks are submitted to the VM Pool. For each Mersenne prime to be calculated, a new task is created. Each task gets put into a queue. The queue is used to submit tasks to Pool nodes (VMs). A next task gets scheduled only after successful completion, or definite failure of the previous task. Non-definite task failures are simply retried.
The important bits: $ps1file is a hardcoded reference to the glue script generate_decimal_mersenne_and_upload.ps1. This script accepts the commandline arguments (an index to a Mersenne prime, and parameters for the SMB share). The taskname must be unique, and is constructed from a prefix, the index, and a random postfix. The commandlet New-AzureBatchTask submits the task and does not wait for its completion.
 $firstindex..$lastindex  | ForEach-Object {
    $ps1file =  "%AZ_BATCH_APP_PACKAGE_MERSENNE#$($version)%\generate_decimal_mersenne_and_upload.ps1"
    $taskCMD = "cmd /c `"powershell -executionpolicy bypass -File $ps1file -index $_ -uncpath $uncPath -account $shareAccount -sakey $StorageKey`""
    $taskName = "$tasknameprefix-$_-$taskPostfix"
    New-AzureBatchTask -JobId $jobname -BatchContext $batchkeys -CommandLine $taskCMD -Id $taskname -Constraints $constraints -ApplicationPackageReferences $appref
}
If you would dump $taskCMD, it might look like the following (credentials are randomized): cmd /c "powershell -executionpolicy bypass -File %AZ_BATCH_APP_PACKAGE_MERSENNE#1.0%\generate_decimal_mersenne_and_upload.ps1 -index 20 -uncpath \\sawalkthroughpkvydrcf.file.core.windows.net\mersenneshare -account AZURE\sawalkthroughpkvydrcf -sakey RCjwDatDd2TXgugAA74cfVUBqWROYvEYiEls0dKtXdD5zff4uOBW+SkHwonIG8iNJDG1kTf9anmKmrgbjBqWAZ=="
At this point, tasks should be running. To monitor for completion you could do something like the following. It gets the current state of all tasks in the job, summarises them, and if there are any unfinished tasks, sleep for three seconds. When done, terminate the job because there is no more work to do. This should not take long if you used the script defaults because it generates only the first 20 Mersenne primes, all of which are not very large.
 do {
    $stats = Get-AzureBatchTask -BatchContext $batchkeys -JobId $jobname | Group-Object -NoElement state
    $stats | Format-Table
    $ready = ($stats.Values -notcontains "Active") -and ($stats.Values -notcontains "Running")
    if (-not $ready) { Start-Sleep -Seconds 3 }
} until ($ready)
Stop-AzureBatchJob -id $jobname -BatchContext $batchkeys
Inspect the results
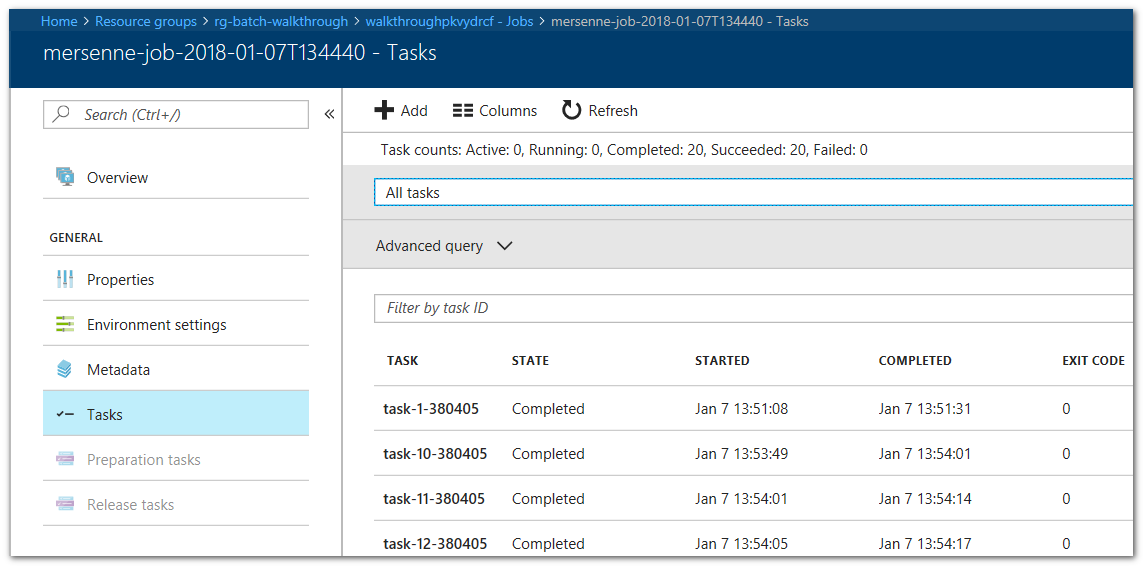
With all the work done it's time to look at the Azure Portal and to retrieve the results. Let's start with the jobs and tasks. Go to the Resource group rg-batch-walkthrough, select the Batch Account, then Jobs (there should be just one initially), select this job, then select Tasks. The portal view should list the completed tasks, as follows.
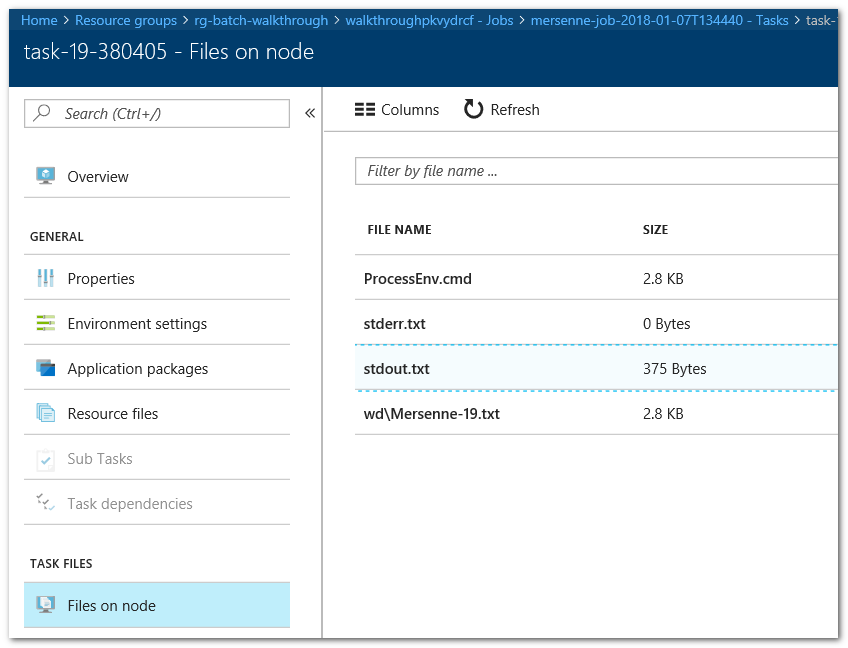
Pick any task you like, open it, select Files on Node. This will show you the list of files in the Working Directory of this particular task. This will always contain the stdout and stderr streams, which is very handy for debugging. It also shows the output file from the Mersenne calculation. You can download this if you like.
But since we made a point of saving the output to an SMB share, there are also other ways to get at the data. For instance, if you have access to the storage account using the SMB protocol (445/tcp) you can access it directly, for instance from an Azure VM. Accessing it from your home or company network is very likely to fail because few ISPs allow 445 to/from the Internet.
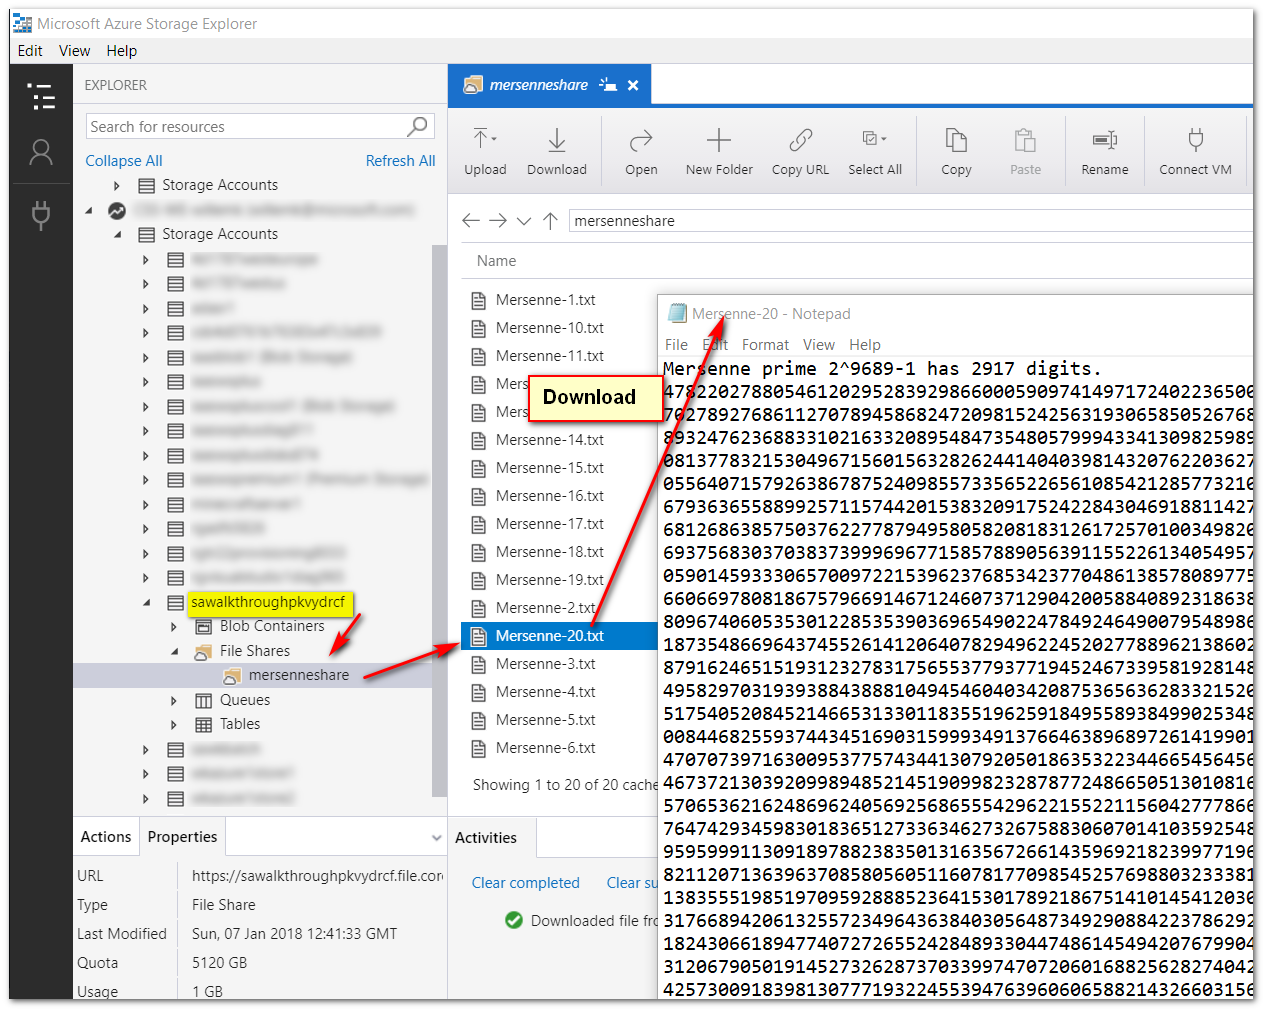
Alternatively, use Azure Storage Explorer, a tool to manage Azure Storage Accounts. You really should have a look at this if you are not familiar with it.
Suggested exercise:
- generate a couple of really large primes, such as the indices 42 or 43. If you are feeling brave and are prepared to wait a couple of days, try the largest one: 49.